Basics of GAPS

GAPS Legal Caramel Recipe

Several years ago I discovered that the mythical candy known as caramel was actually fairly simple to make. It merely involved heating a mixture of water and some type of sugar substance to a certain temperature to change the properties and create soft caramel syrup, chewy caramel candies, and even hard candy. This discovery has lead to many delicious treats and snacks!

And over the years I have become more and more comfortable with the caramel-making process. You can also make caramel more complicated by adding milk, coconut milk, or other ingredients. But I like the simplicity of honey, water and vanilla. And in this combination, it is full GAPS legal! Leave the vanilla out and it can be had in very small amounts starting on Intro Stage 4.

I would like to again point out that I do not like to heat honey on a regular basis. Ayurvedic tradition holds that heating honey over 104°F is unhealthy. The chemical changes that can be seen in heated honey* indicated that the honey becomes less healthy when it is heated over 140°F. For this reason I do not bake with honey. In fact, caramel and marshmallows are the only time I ever eat heated honey. But when caramel is needed, I'm sure that the homemade caramel I make with honey is much better than the commercially-made, sugar or corn-syrup based caramel alternative. Even so I recommend that if you do choose to eat heated honey, you do it in very small amounts, for special treats. And as soon as I discover another way to make caramel, I will let you know!

*It's also important to note that most honey commercially available has been heated to pasteurize it. For this reason it is very important to know your honey source, and make sure you are getting a raw honey.

Ok, back to caramel. You can easily look up the temperature ranges for your desired caramel range, from syrup to toffee. And depending on your purpose for the caramel, you should choose your temperature. The ingredients and procedure is exactly the same, only the end-point temperature varies.

Don't have a candy thermometer? No problem. You can check the stage of the candy by dripping a little caramel into a glass of clean, cold water. I prefer this way, and have learned at what "stage" I like by how the caramel behaves in the water.

Have fun with this! And don't be afraid to "mess up." The worst you can get (unless you let it burn) is a sugary treat in a different stage than you were hoping.

My final tip: Stir constantly and don't turn up the heat too high. Clean-up is a breeze. Just add hot water and the honey will clean itself off. But if you burn the sugar, you may never get it off the pan!

Now it's your turn!  

GAPS Legal Caramel

Ingredients:

  • 1/2 cup water

  • 1 cup honey

  • 1/2 - 1 tsp. vanilla (optional)

Directions:

In a saucepan, add water and honey.

Stir constantly on medium to high heat for 7-12 minutes.

As the mixture begins to form into a caramel sauce, slowly drip a few drops of the sauce into a cup of cool water to check for the beginnings of the 'softball stage' of candy making. Alternatively, use a candy thermometer. You're looking for temperatures between 116° & 120°.

Once sauce reaches this temperature, remove from heat.

Optional: add in vanilla.

Option 1: Caramel Candies

Prepare a glass dish with parchment paper.

Pour hot caramel sauce into the prepared pan.

Cool overnight.

Once cool, remove the parchment paper and caramel.

Cut the caramel into small square pieces.

Twirl or press the square pieces into candy shapes.

Option 2: Dipping Sauce

Simply serve the sauce warm once it reaches 116 - 120.

Dip in your favorite fruits!

Enjoy!


GAPS Legal Caramel

Author:
prep time: cook time: total time:

ingredients:

  • 1/2 cup water
  • 1 cup honey
  • 1/2 - 1 tsp. vanilla (optional)

instructions:

How to cook GAPS Legal Caramel

  1. In a saucepan, add water and honey. 
  2. Stir constantly on medium to high heat for 7-12 minutes. 
  3. As the mixture begins to form into a caramel sauce, slowly drip a few drops of the sauce into a cup of cool water to check for the beginnings of the 'softball stage' of candy making. Alternatively, use a candy thermometer. You're looking for temperatures between 116° & 120°. 
  4. Once sauce reaches this temperature, remove from heat. 
  5. Optional: add in vanilla.
Option 1: Caramel Candies
  1. Prepare a glass dish with parchment paper. 
  2. Pour hot caramel sauce into the prepared pan. 
  3. Cool overnight. 
  4. Once cool, remove the parchment paper and caramel. 
  5. Cut the caramel into small square pieces. 
  6. Twirl or press the square pieces into candy shapes.
Option 2: Dipping Sauce
  1. Simply serve the sauce warm once it reaches 116 - 120. 
  2. Dip in your favorite fruits! Enjoy!
Created using The Recipes Generator

Buckeye Cookies

Another one of my favorite Christmas cookies are Buckeyes. These delicious cookies are traditionally peanut butter and powder sugar balls dipped in chocolate, made to look like the buckeye nut. The buckeye nut is commonly found back East, like Ohio and Michigan, where my family is originally from.

The roots for this recipe go deep in our family. Much like the Force.  

Ok, maybe not the Force (although I am excited for the new Star Wars movie that comes out this week!)

But we do make Buckeye cookies a lot. Since powdered sugar is hardly GAPS legal, I haven't had these cookies for a while either. But all that is about the change!  

Introducing Buckeye cookies, made with real food!  

These no-bake cookies are egg free, and casein and lactose free (contains whey and butter). They are also coconut free!  

Please note that while cassava flour is not technically on the GAPS-illegal list, it is still quite starchy. These cookies should be a special treat, and consumed infrequently and in small amounts. Same with cocoa powder. And, as always, observe if YOUR body is okay with this particular food at this time. Just because something is "GAPS legal" does not give you a free pass to eat it! Pay attention to what your body is telling you. But if it's telling you that these cookies are okay for you, then by all means ENJOY THEM!!!

GAPS Legal Buckeye Cookies

Makes about 48 cookies

Ingredients:

Filling:

  • 1 cup peanut butter

  • 2 cups cassava flour

  • 8 TBS whey

  • 1/2-1 cup honey

  • 8 oz butter

  • 2 tsp vanilla

Coating:

  • 1 1/2 cup cocoa butter chips

  • 1/8 cup raw honey

  • 1 TBS cocoa powder

Directions:

Prep time: Need to start this recipe 24 hours in advance, 5 minutes prep time. Then it takes about 30-45 minutes to finish on the following day.  

Filling:

IMG_0070.jpg

Twenty-four hours in advance: mix 1/2 cup peanut butter, 4 TBS whey, and 1 cup cassava flour together until everything is moist and crumbly. Try to eliminate as many clumps as possible. Leave on the countertop in a glass container with a lid. This is to give the legumes and cassava flour a chance to lacto-ferment. This makes them more digestible and increase the nutritional value. For more on why we should only eat nuts and seeds that have been properly prepared, watch my video on this.

After 24 hours, the mixture should look something like this...just a little more moist than what you started with the day before.

IMG_0087.jpg

Add to this the vanilla extract, honey and 8 oz of softened butter (it's not the end of the world if you melt it, but try not to).

I used 1 cup of honey for this recipe, and to my non-sugar eating palate they are very sweet (which is the point, I suppose)! I plan to reduce the honey by about half the next time I make this. The mixture just needs to be formed into balls.

Mix well, and smooth out as many clumps as possible. You should be able to easily for this mixture into little balls.

IMG_0085.jpg

Form the dough into 1 inch balls and place on a cookie sheet covered in parchment paper

Place the balls in the freezer to chill (about 10-15 minutes)   Next, make the coating   The most important part of making the coating is to heat things just hot enough to melt. Nothing should be cooked here! You are gently heating them up to mix. Then gradually cooling them back down again.  

IMG_0090.jpg

Using a double boiler (or as I just discovered, my glass 2 cup measuring container fits perfectly into a medium saucepan) On low heat, melt the cacao butter chips.

When they are fully melted, turn off the heat and add the honey.

Next, stir in the cocoa powder (I recommend using a whisk to mix well.) 

Finally, remove the mixture in the top half of the double boiler to the coating is allowed to start cooling   Continue whisking the coating mixture occasionally. The honey cools faster than the cocoa butter, and you need to keep them mixed.

IMG_0099.jpg

When the mixture is cool enough, remove the dough balls from the freezer. Stick a toothpick (or broken-off bamboo skewer in our case) into a ball and dip it into the coating. Depending on the temperature of the coating, you may need to dip more than once to achieve a satisfactory coating. After allowing the extra coating to drip off for a few moments, return the ball to the parchment paper.

Maintain the coating within a narow temperature margin. Keep the water from the lower part of your double-boiler ready. If your coating begins to cool too much, slip the top of the double-boiler back on top of the hot water for a minute or so to warm it back up (you probably don't need to turn on the heat). Do not let it cool too much or reheat it too quickly or too much—these can cause the chocolate to clump (this happened), and there's not going back from this. You would just need to start over making the coating.  

Traditionally the coating is darker than this recipe. I originally made a darker coating, but more cocoa powder required more honey, which seemed to throw everything off balance. I think this is part of why it clumped. Once you master the basics of temperature and consistency, you can try increasing the cocoa powder to darken the color. I will be doing that myself. In the meantime, even though this isn't as dark as traditional Buckeye cookies, the coating dries hard at room temperature. I'm calling that a win!

When they are all dipped to your satisfaction, use a toothpick to roll over the holes, filling them in.

There you have it! Rich, delicious Buckeye cookies.

Enjoy!


Buckeye Cookies

Author:
prep time: cook time: total time:

ingredients:

Filling:
  • 1 cup peanut butter
  • 2 cups cassava flour
  • 8 TBS whey
  • 1/2-1 cup honey
  • 8 oz butter
  • 2 tsp vanilla
Coating:
  • 1 1/2 cup cocoa butter chips
  • 1/8 cup raw honey
  • 1 TBS cocoa powder

instructions:

How to cook Buckeye Cookies

24 Hours in Advance:
  1. Twenty-four hours in advance: mix 1/2 cup peanut butter, 4 TBS whey, and 1 cup cassava flour together until everything is moist and crumbly. Try to eliminate as many clumps as possible. Leave on the countertop in a glass container with a lid. This is to give the legumes and cassava flour a chance to lacto-ferment. This makes them more digestible and increase the nutritional value. For more on why we should only eat nuts and seeds that have been properly prepared, watch my video onthis.
The Next Day:
  1. After 24 hours, the mixture should look something like this...just a little more moist than what you started with the day before.
  2. Add to this the vanilla extract, honey and 8 oz of softened butter (it's not the end of the world if you melt it, but try not to).
  3. I used 1 cup of honey for this recipe, and to my non-sugar eating palate they are very sweet (which is the point, I suppose)! I plan to reduce the honey by about half the next time I make this. The mixture just needs to be formed into balls.
  4. Mix well, and smooth out as many clumps as possible. You should be able to easily for this mixture into little balls.
  5. Form the dough into 1 inch balls and place on a cookie sheet covered in parchment paper
  6. Place the balls in the freezer to chill (about 10-15 minutes) Next, make the coating The most important part of making the coating is to heat things just hot enough to melt. Nothing should be cooked here! You are gently heating them up to mix. Then gradually cooling them back down again.
  7. Using a double boiler (or as I just discovered, my glass 2 cup measuring container fits perfectly into a medium saucepan) On low heat, melt the cacao butter chips.
  8. When they are fully melted, turn off the heat and add the honey.
  9. Next, stir in the cocoa powder (I recommend using a whisk to mix well.)
  10. Finally, remove the mixture in the top half of the double boiler to the coating is allowed to start cooling Continue whisking the coating mixture occasionally. The honey cools faster than the cocoa butter, and you need to keep them mixed.
  11. When the mixture is cool enough, remove the dough balls from the freezer. Stick a toothpick (or broken-off bamboo skewer in our case) into a ball and dip it into the coating. Depending on the temperature of the coating, you may need to dip more than once to achieve a satisfactory coating. After allowing the extra coating to drip off for a few moments, return the ball to the parchment paper.
  12. Maintain the coating within a narow temperature margin. Keep the water from the lower part of your double-boiler ready. If your coating begins to cool too much, slip the top of the double-boiler back on top of the hot water for a minute or so to warm it back up (you probably don't need to turn on the heat). Do not let it cool too much or reheat it too quickly or too much—these can cause the chocolate to clump (this happened), and there's not going back from this. You would just need to start over making the coating.
  13. Traditionally the coating is darker than this recipe. I originally made a darker coating, but more cocoa powder required more honey, which seemed to throw everything off balance. I think this is part of why it clumped. Once you master the basics of temperature and consistency, you can try increasing the cocoa powder to darken the color. I will be doing that myself. In the meantime, even though this isn't as dark as traditional Buckeye cookies, the coating dries hard at room temperature. I'm calling that a win!
  14. When they are all dipped to your satisfaction, use a toothpick to roll over the holes, filling them in.
  15. There you have it! Rich, delicious Buckeye cookies.
Created using The Recipes Generator

Christmas Wreath Cookies {GAPS Legal}

It's the holiday season! More specifically, it's cookie season!   I love making, giving away (and eating) Christmas cookies. But it's been a long time since I have enjoyed many of the cookies I grew up making, so this year I decided I wanted to create real-food versions of some of my favorite Christmas cookie recipes.  

First up, Christmas Wreath cookies!

  This cookie is traditionally a mix of corn flakes, marshmallows, and butter. So let's look at the ingredients...

  • The butter is already a real food!

  • Marshmallows I have made before, modified from Mommypotamus' marshmallow recipe.

So all I had to do was figure out a substitution for the corn flakes (and see if the marshmallows actually work the same as the commercial variety).   Challenge accepted!

Christmas Wreath Cookies

Makes about 36 cookies (recipe can be halved)

Ingredients

For Marshmallows

  • 2 cups honey

  • 1 cup of filtered water

  • 2 tsp vanilla

  • 1 tsp sea salt

  • 6 TBS grass-fed beef gelatin

  • 1 cup of filtered water

For Wreath Cookies

  • Marshmallow paste (above)

  • 8 ounces organic butter

  • 14 cups coconut flakes (approximately 20 ounces)

  • Red hots (my homemade recipe)

  • Natural food coloring, blue and yellow packets (I used this one)

Directions

IMG_9987.jpg

Place the coconut flakes in the oven at 200°

Toast the coconut until they are light brown—this makes the cookies crispier! When done, remove them from the oven Place in a large bowl, set aside.

IMG_9996.jpg

Melt the butter in a saucepan over low heat When melted, remove from heat and set aside   Next, make the marshmallow paste. See recipe here.

Soften the gelatin

  • Add gelatin to 1 cup hot water

  • Stir and allow to to sit, keep warm (not on stove)

While gelatin is softening... Heat honey and water in a medium saucepan (medium to high heat), stirring frequently, until it reaches the soft ball candy stage (about 235°F).

If you don't have a thermometer, you can check by dripping the heated honey into a glass of cold water. When the candy forms a ball, it is ready!

When the honey has reached the soft ball stage, remove from heat. Add the heated mixture to the softened gelatin in a large bowl. Add vanilla.

Do these steps quickly, you don't want honey mixture to cool off too much!

Whisk the mixture using an electric mixer or stand mixer for about 10 minutes.

When the mixture is thick and looks like marshmallow paste, it's done!  

If you want marshmallows, you can stop here. Put the marshmallow paste in a greased glass 9x11 dish and allow to cool and dry for a 24-36 hrs. Then cut up and serve.  

But we are not stopping here! To make traditional Christmas wreath cookies you melt the marshmallows and turn them back into paste-which is what you just created!  

Next, stir the melted butter into the mixture. It will deflate the mixture somewhat, this is normal.

Mix in the blue and yellow food coloring packets. This will turn it green (not neon green—that's an artificial color). But when it's made into wreathes it does look green—although you're going to have to take my word for it!

IMG_0006.jpg

Pour the marshmallow mixture into the bowl with the toasted coconut flakes. Mix until the flakes are coated.

Finally, form the warm mixture into wreath-shaped cookies on parchment paper.

IMG_0019.jpg

Add decorative red hots as berries (see my homemade recipe) Allow to cool.

See, I told you they look green!

All that's left is to share and enjoy these delicious treats!

Disclosure: This post contains affiliate links. Your trust is important. I only recommend products I trust. 

IMG_0021.jpg

Christmas Wreath Cookies

Author:
prep time: cook time: total time:

ingredients:

For Marshmallows
  • 2 cups honey
  • 1 cup of filtered water
  • 2 tsp vanilla
  • 1 tsp sea salt
  • 6 TBS grass-fed beef gelatin
  • 1 cup of filtered water
For Wreath Cookies
  • Marshmallow paste (above)
  • 8 ounces organic butter
  • 14 cups coconut flakes (approximately 20 ounces)
  • Red hots (my homemaderecipe)
  • Natural food coloring, blue and yellow packets (I used this one)

instructions:

How to cook Christmas Wreath Cookies

  1. Place the coconut flakes in the oven at 200°
  2. Toast the coconut until they are light brown—this makes the cookies crispier! When done, remove them from the oven Place in a large bowl, set aside.
  3. Melt the butter in a saucepan over low heat When melted, remove from heat and set aside Next, make the marshmallow paste. See recipe here.
  4. Soften the gelatin
  5. Add gelatin to 1 cup hot water
  6. Stir and allow to to sit, keep warm (not on stove)
  7. While gelatin is softening... Heat honey and water in a medium saucepan (medium to high heat), stirring frequently, until it reaches the soft ball candy stage (about 235°F).
  8. If you don't have a thermometer, you can check by dripping the heated honey into a glass of cold water. When the candy forms a ball, it is ready!
  9. When the honey has reached the soft ball stage, remove from heat. Add the heated mixture to the softened gelatin in a large bowl. Add vanilla.
  10. Do these steps quickly, you don't want honey mixture to cool off too much!
  11. Whisk the mixture using an electric mixer or stand mixer for about 10 minutes.
  12. When the mixture is thick and looks like marshmallow paste, it's done!
  13. If you want marshmallows, you can stop here. Put the marshmallow paste in a greased glass 9x11 dish and allow to cool and dry for a 24-36 hrs. Then cut up and serve.
  14. But we are not stopping here! To make traditional Christmas wreath cookies you melt the marshmallows and turn them back into paste-which is what you just created!
  15. Next, stir the melted butter into the mixture. It will deflate the mixture somewhat, this is normal.
  16. Mix in the blue and yellow food coloring packets. This will turn it green (not neon green—that's an artificial color). But when it's made into wreathes it does look green—although you're going to have to take my word for it!
  17. Pour the marshmallow mixture into the bowl with the toasted coconut flakes. Mix until the flakes are coated.
  18. Finally, form the warm mixture into wreath-shaped cookies on parchment paper.
  19. Add decorative red hots as berries (see my homemade recipe) Allow to cool.
  20. See, I told you they look green!
  21. All that's left is to share and enjoy these delicious treats!
Created using The Recipes Generator

Homemade Red Hots {GAPS Legal}

I have been getting more bold in the kitchen, and this December I decided to create alternative recipes featuring some of my favorite Christmas cookies. To enjoy.

I decided on my first cookie to make, Christmas Wreath cookies. And as I was running through my ingredients and working out substitutions I came to the decorative red hots.

And I was faced with a dilemma... could I create a red hot, or should I simply bite the bullet and just use traditional red hots. Maybe I could even find a healthy brand...

But my all-or-nothing attitude kicked in. If I was going to do this, I was going to do it right.

And that meant making red hots. From scratch. A quick search revealed that it was possible... in essence red hots are a sugar brittle flavored with spices, like cinnamon.

I knew how to make candy out of honey. This could work.

It did work. But I'll admit that when I make the Christmas Wreaths in the future I may use boughten red hots... and tell people they are just for decoration and to pick them off.  

Because making homemade red hots is a labor of love. There is no other way to put it. But being able to put healthy, three ingredient red hots on your Christmas cookies is amazing! And if you don't care if they are rounded into tiny, holly-berry decorative balls, then this is a really easy candy to make!  

GAPS Legal Homemade Red Hots / Cinnamon Hard Candy

Ingredients:

  • 1/2 cup water

  • 1 cup honey

  • 1/4-1/2 tsp cinnamon

  • 1 package natural red coloring (I used this one)

Directions:

IMG_9966.jpg

Combine the honey and water on the stovetop in a medium saucepan, stirring frequently.

You want to heat it at a temperature that is not too hot that it burns, but if it's too low it will take forever to get to temperature.

You're going to have to find your heat sweet spot. It should take between 5-10 minutes to get to soft ball stage, if it's taking longer, turn it up!

Soft ball stage occurs around 235°. If you don't have a thermometer available, you can drip some into a clear glass of cold water. It will form into a little ball upon hitting the water. For a little harder candy (I recommend this), let it go a minute or two after you hit the soft-ball stage.  

IMG_9967.jpg

After whisking thoroughly, pour the liquid onto some parchment paper to cool When it has cooled enough to touch (doesn't take very long), then use well buttered fingers to form tiny little balls

Not tolerating butter? Any fat will do—the key is to prevent sticking!

Roll those little suckers quickly... after a while the candy will get too hard to work with. You can reheat it to soften in up, but believe me, you will be ready to stop rolling balls. Better yet, recruit a friend (or two) to roll with you!

IMG_9975.jpg

Set the balls in a cold place (outside works for us right now!) When they are hard, gather them up and store them in a container in the fridge. This prevents the balls from clumping.   This candy could be made into any size (I only chose red hot size because of the Christmas wreath cookies)... or simply cooled and broken into pieces. It is a delicious treat!

Enjoy!
Disclosure: This post contains affiliate links. Your trust is important. I only recommend products I trust. 


Homemade Red Hots

Author:
prep time: cook time: total time:

ingredients:

  • 1/2 cup water
  • 1 cup honey
  • 1/4-1/2 tsp cinnamon
  • 1 package natural red coloring (I usedthis one)

instructions:

How to cook Homemade Red Hots

  1. Combine the honey and water on the stovetop in a medium saucepan, stirring frequently.
  2. You want to heat it at a temperature that is not too hot that it burns, but if it's too low it will take forever to get to temperature.
  3. You're going to have to find your heat sweet spot. It should take between 5-10 minutes to get to soft ball stage, if it's taking longer, turn it up!
  4. Soft ball stage occurs around 235°. If you don't have a thermometer available, you can drip some into a clear glass of cold water. It will form into a little ball upon hitting the water. For a little harder candy (I recommend this), let it go a minute or two after you hit the soft-ball stage.
  5. After whisking thoroughly, pour the liquid onto some parchment paper to cool When it has cooled enough to touch (doesn't take very long), then use well buttered fingers to form tiny little balls
  6. Not tolerating butter? Any fat will do—the key is to prevent sticking!
  7. Roll those little suckers quickly... after a while the candy will get too hard to work with. You can reheat it to soften in up, but believe me, you will be ready to stop rolling balls. Better yet, recruit a friend (or two) to roll with you!
  8. Set the balls in a cold place (outside works for us right now!) When they are hard, gather them up and store them in a container in the fridge. This prevents the balls from clumping. This candy could be made into any size (I only chose red hot size because of the Christmas wreath cookies)... or simply cooled and broken into pieces. It is a delicious treat!
  9. Enjoy!
Created using The Recipes Generator

Fermented Garlic: A Powerful Food for Health

Fermented Garlic: A Powerful Food for Health

Heard of fermented garlic? Wondered what the health benefits of garlic are? Then this post is for you!

Lovely Lard

Eating animal fat is important to our body's health. But eating enough fat can be challenging, especially when there is a dairy allergy. Lard is a great alternative to butter, and its taste is more mild than that of tallow.

You can buy lard at the store, but it is expensive and may be hydrogenated or of poor quality. Making your own lard is simple and easy, and can be done for a fraction of the price.

To make lard, you first start out with pig fat. This can be obtained from a butcher, or even trimmed off of fatty cuts of pork like the Boston butt. The process of turning fat into lard or tallow is called rendering. In this post I describe rendering lard, but the process for rendering tallow (which is fat from beef, bison, deer, lamb, or elk) is the same, although for tallow it may take a few more hours.  

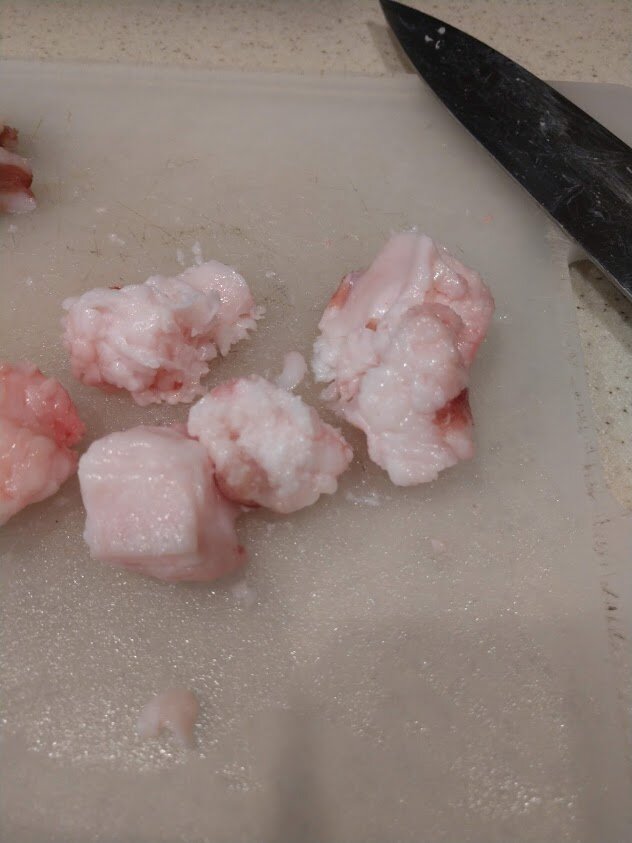
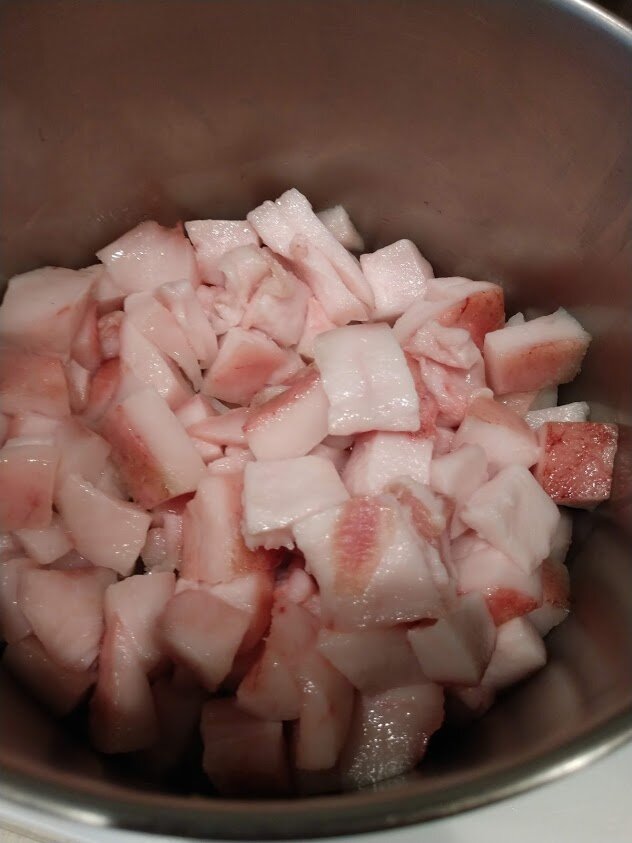
There are two kinds of pig fat. Leaf fat is from fat surrounding the internal organs. It is very mild in taste and used to be reserved for making pies and pastries. Body fat is from the layer of fat beneath the skin. This has a slightly stronger pork taste, and is better used in cooking meat and vegetables. Along with a different taste, there is a different look to the two types of fat. Body fat is in large pieces, and appears more dense and flat. Leaf fat is in smaller pieces, has a fluffier texture, and may contain membranes. The fat you get from a butcher may contain both types of fat. If that is the case, I recommend separating out the two types of fat and rendering them separately so you can use them for different purposes. However, there is no problem in mixing them and rendering them together.

Leaf fat

IMG_20190605_084127513.jpg

Body Fat

IMG_20190605_084134159.jpg

Watch the video below to learn how to make lard and then scroll down for the recipe and directions!

Making Lard:

First, cut up the pig fat into small 1-2 inch sized cubes. If using leaf fat, remove as much membrane as possible.

Put the fat cubes in a medium saucepan on low heat. You may use a crockpot, but it must have a very low setting or the fat will burn. Stir occasionally and watch closely. Don't let the lard smoke!

With time, the solid pieces of fat will get smaller, and the liquid will increase.

After a few hours, when the lard is liquefied, set up your strainer and cloth. A metal strainer is best because the lard is hot! For extra strained lard which will last even longer you can additionally strain through a cloth. You can use an old napkin or other cloth, or several layers of cheesecloth. I have a dedicated cloth I use just for straining lard because you can never really wash out all the grease.

Pour the liquid into the strainer. The liquid will go into the jar and the cracklings will stay in the cloth or strainer.

Squeeze the rest of the liquid out of the cracklings.

Once cracklings are separated from the liquid lard, salt and fry them. You can eat them like bacon bits, or just by themselves.

Allow the jar of lard to cool on the counter.

When the lard is cool you can move it to the fridge, or leave it on the counter.

If you are careful not to contaminate the jar, the lard will last for several months, even left out at room temperature. Use the lard in your cooking— it is a wonderful thing to fry up vegetables or meat and add fat to your diet. Bon appétit!

Onward!


How to Make Lard

Author:
prep time: cook time: total time:

instructions:

How to cook How to Make Lard

  1. First, cut up the pig fat into small 1-2 inch sized cubes. If using leaf fat, remove as much membrane as possible.
  2. Put the fat cubes in a medium saucepan on low heat. You may use a crockpot, but it must have a very low setting or the fat will burn. Stir occasionally and watch closely. Don't let the lard smoke!
  3. With time, the solid pieces of fat will get smaller, and the liquid will increase.
  4. After a few hours, when the lard is liquified, set up your strainer and cloth.
  5. Below you see pictured a jar, jar funnel, and metal strainer. Metal is best because the lard is hot! To finish it off, place a cloth. You can use an old napkin or other cloth, or several layers of cheesecloth.
  6. Pour the liquid into the strainer. The liquid will go into the jar and the cracklings will stay in the cloth.
  7. Squeeze the rest of the liquid out of the cracklings.
  8. Cracklings separated from the liquid lard. Salt and fry these. You can eat them like bacon bits, or just plain.
  9. Allow the jar of lard to cool on the counter.
  10. When the lard is cool you can move it to the fridge, or leave it on the counter.
  11. If you are careful not to contaminate the jar, the lard will last for several months, even left out at room temperature. Use the lard in your cooking— it is a wonderful thing to fry up vegetables or meat and add fat to your diet. Bon appétit!
Created using The Recipes Generator

Zucchini Bread {GAPS legal}

Zucchini... if there is one harvest that defines summer, it's zucchini.

Zucchini is great because of its versatility: it can be used hot or cold, baked or fried, and in soups, salads, breads, or even as a noodle substitute.

Today I want to share with you a recipe for a zucchini bread that is legal on the full GAPS diet, WAPF diet, Paleo diet and Whole30. I want you to remember (and take hope in) the fact that I am not primarily a chef. I am just average in the kitchen. If I can make this, so can you! This recipe is very forgiving—so try it!

There are a couple keys to this recipe that need to be followed. Don't shortcut them...they are what make this recipe forgiving, and the bread yummy! The first key is also the first step: fermenting the almond flour. Have you eaten baked goods made of almond flour that are dense and dry? Fermenting the flour creates a lighter, fluffier end product. But that's not all! Fermenting is one of the three processes that can be used to make nuts more digestible.

For more about soaking, sprouting or fermenting, watch this video.

The other key is using sour cream (you could also substitute in a full-fat yogurt) for the fat. As a cultured food, sour cream helps make the bread lighter as well.

Fermented Almond Flour Zucchini Bread

Ingredients

  • 2 1/2 cups almond flour (organic preferred)

  • 1/2 cup whey (strained from yogurt or kefir)

  • 2 cups zucchini (grated and squeezed to remove the liquid)

  • 2-3 eggs (chicken or duck)

  • 1 tsp cinnamon

  • 1/4 tsp ginger

  • 1/4 tsp nutmeg

  • 1 tsp sea salt (source)

  • 1/2 cup sour cream

  • 2/3 cup date syrup (source)

Directions

24 hours (or more) before

Mix almond flour and whey together in a bow.l Cover and set on the counter for 24 hours

This fermentation, which takes place at room temperature, will change the texture of the "flour." At the end of 24 hours you will have something that resembles dough more than wet flour. This is a base that can be used for many recipes. It will keep in the fridge about a week, so many people make this ahead of time and keep it in their fridge for future use. With this step done ahead of time, you can pull it out, add ingredients, and have a fermented baked good in about an hour.

The Next Day

Preheat the oven to 350° F Grate more than 2 cups of zucchini. The zucchini is very wet, so squeeze it dry using a cloth or towel (you can see it in the picture below).

Next, measure 2 cups of the zucchini (dry, but not compressed) and mix it into the 24 hour fermented flour. Add 2-3 eggs (it depends on the size of your egg, those pictured are duck eggs, which are larger than chicken eggs).

Mix in the rest of the ingredients (sour cream, date syrup, salt and spices).

I used date paste instead of honey because cooking honey is thought to turn the honey toxic. You can also make your own date paste in a strong blender like a Vitamix.

Pour into a greased pan (I prefer lining mine with parchment paper, but this is optional).

Bake at 350° for 45-50 minutes, or until toothpick comes out clean from the middle. Wait at least 10 minutes before cutting into the bread. This allows the steam to finish the cooking progress, and will make the texture of the bread better. Add butter, and enjoy!

This post contains affiliate links. Your trust is important to me, and I only recommend products that I trust.


Fermented Almond Flour Zucchini Bread

Author:
prep time: cook time: total time:

ingredients:

  • 2 1/2 cups almond flour (organic preferred)
  • 1/2 cup whey (strained from yogurt or kefir)
  • 2 cups zucchini (grated and squeezed to remove the liquid)
  • 2-3 eggs (chicken or duck)
  • 1 tsp cinnamon
  • 1/4 tsp ginger
  • 1/4 tsp nutmeg
  • 1 tsp sea salt (source)
  • 1/2 cup sour cream
  • 2/3 cup date syrup (source)

instructions:

How to cook Fermented Almond Flour Zucchini Bread

24 hours (or more) before
  1. Mix almond flour and whey together in a bow.l Cover and set on the counter for 24 hours
  2. This fermentation, which takes place at room temperature, will change the texture of the "flour." At the end of 24 hours you will have something that resembles dough more than wet flour. This is a base that can be used for many recipes. It will keep in the fridge about a week, so many people make this ahead of time and keep it in their fridge for future use. With this step done ahead of time, you can pull it out, add ingredients, and have a fermented baked good in about an hour.
The Next Day
  1. Preheat the oven to 350° F Grate more than 2 cups of zucchini. The zucchini is very wet, so squeeze it dry using a cloth or towel (you can see it in the picture below).
  2. Next, measure 2 cups of the zucchini (dry, but not compressed) and mix it into the 24 hour fermented flour. Add 2-3 eggs (it depends on the size of your egg, those pictured are duck eggs, which are larger than chicken eggs).
  3. Mix in the rest of the ingredients (sour cream, date syrup, salt and spices).
  4. I used date paste instead of honey because cooking honey is thought to turn the honey toxic. You can also make your own date paste in a strong blender like a Vitamix.
  5. Pour into a greased pan (I prefer lining mine with parchment paper, but this is optional).
  6. Bake at 350° for 45-50 minutes, or until toothpick comes out clean from the middle. Wait at least 10 minutes before cutting into the bread. This allows the steam to finish the cooking progress, and will make the texture of the bread better. Add butter, and enjoy!
Created using The Recipes Generator

Raw Milk Chocolate Pudding

Some days don't you just miss pudding cups? I know I do.

Now you can make your own! The most frequent comment about this pudding (besides "yum", "delicious", and "mmm...") is that it tastes just like a chocolate pudding cup! This simple recipe is a wonderful treat for you and your family, and because it's made of real food ingredients it can be enjoyed without guilt.

Of course this, like all sweet items, should be enjoyed in moderation and not as a meal replacement. And if you are following a healing protocol, you will need to wait until significant gut healing has occurred before enjoying this.

A note for those on the GAPS diet: While this is technically (advanced) full GAPS legal, not everyone is able to tolerate raw milk, cream or cocoa. Listen to your body and only eat this when it is a good choice for you.

Enjoy this video, then scroll down for the recipe. We hope you enjoy it!

Raw Milk Chocolate Pudding

Recipe by Erin Goodin

Warm on stovetop (medium heat)

Heat to 95°F to activate the gelatin, then remove from heat

In a blender, combine

  • 2 cups raw milk

  • 1/2 cup raw honey

  • 3 egg yolks

  • 1/4 cup cocoa powder

  • heated mixture

  • 1 tsp vanilla extract

Blend until combined

Pour into desired container(s)

Chill for 12-24 hrs in the fridge

Whipped Cream Topping

  • 2 cups cream

  • 2 TBS honey

Whip until stiff, then use to top the pudding

Enjoy!

Affiliate disclosure: There are affiliate links contained in the post. The small commission I receive helps to keep this blog going. I do not recommend products that I do not trust.


Raw Milk Chocolate Pudding

Author:
prep time: cook time: total time:

ingredients:

Raw Milk Chocolate Pudding
Whipped Topping
  • 2 cups cream
  • 2 TBS honey

instructions:

How to cook Raw Milk Chocolate Pudding

  1. Warm on stovetop (medium heat): 1 cup raw milk, 1 TBS gelatin (brand I recommend), 1/2 tsp sea salt (brands I recommend),  1 TBS butter.
  2. Heat to 95°F to activate the gelatin, then remove from heat
  3. In a blender, combine: 2 cups raw milk, 1/2 cup raw honey, 3 egg yolks, 1/4 cup cocoa powder, heated mixture, 1 tsp vanilla extract.
  4. Blend until combined
  5. Pour into desired container(s)
  6. Chill for 12-24 hrs in the fridge
  7. Whipped Cream Topping: 2 cups cream,  2 TBS honey.
  8. Whip until stiff, then use to top the pudding
  9. Enjoy!
NOTES:

Recipe by Erin Goodin
Created using The Recipes Generator

Decadent Hot Chocolate

Winter is here in full force... the weather is cold, snow storms are common, and the evenings are dark and long. It's a great time to stay in, cuddle up in a blanket, and drink hot chocolate.

"Hot chocolate?" you ask. "I'm on (GAPS, WAPF, SCD, Paleo) and not eating processed food—how in the world can I drink hot chocolate?" Well, I'm about to tell you. I have also been without hot chocolate for a long time, but inspiration struck and I can now present you with an amazing hot chocolate recipe.

No really, it's amazing. Rich, thick, decadent, filling, indulging, chocolaty goodness.   

It even passed the skeptical, hot chocolate-loving teenage boy test.  

Which is a big deal.   And it's a nutrient-dense food!  

Are you ready?

Without further ado, here is the...

Decadent Hot Chocolate Recipe

*Legal on Paleo, SCD, WAPF, and Full GAPS (if tolerating milk and cocoa powder)

—Makes 2 large or 3 medium mugs of hot cocoa—

Ingredients:

  • 3 cups Milk (Raw)

  • 2 Eggs

  • 6-8 TBS Honey

  • 4 tsp Cocoa Powder

  • 1/8 tsp Sea Salt

  • 1/4 tsp Vanilla

Directions for raw milk hot chocolate:

Over low-medium heat, mix:

  • 2 cups milk

  • 2 eggs

  • 6-8 TBS honey

  • 1/8 tsp salt

IMG_0914.JPG

Stir or whisk constantly:

Whisk over low to medium heat for about 5-8 minutes, until the mixture coats the back of a spoon (if you have ever made ice cream, this is the same process as making the base)

IMG_0924.JPG

Remove From Heat:

When the spoon is coated, remove from the heat (or you will get milky scrambled eggs!)

Whisk in:

  • 1/4 tsp Vanilla

  • 4 tsp Cocoa powder

IMG_0939.JPG

(in this picture we did this in a cup because we were experimenting... you should add these ingredients to the saucepan—it's much easier)

Whisk until frothy

Pour into mugs, filling each mug about 2/3 full

Finish filling the mugs by carefully pouring plain milk (warmed or cool) down the inside of the mug (so as not to disturb the foam on top)

Add a few GAPS marshmallows if desired

For an added option (adults only!) I recommend adding a little rum

Serve and enjoy!

...you can clean up the mess later..


Raw Milk Hot Chocolate

Author:
prep time: cook time: total time:

ingredients:

  • 3 cups Milk (Raw)
  • 2 Eggs
  • 6-8 TBS Honey
  • 4 tsp Cocoa Powder
  • 1/8 tsp Sea Salt
  • 1/4 tsp Vanilla

instructions:

How to cook Raw Milk Hot Chocolate

  1. Over low-medium heat, mix:  cups milk, 2 eggs, 6-8 TBS honey, 1/8 tsp salt.
  2. Whisk over low to medium heat for about 5-8 minutes, until the mixture coats the back of a spoon (if you have ever made ice cream, this is the same process as making the base)
  3. When the spoon is coated, remove from the heat (or you will get milky scrambled eggs!)
  4. Whisk in: 1/4 tsp Vanilla, 4 tsp Cocoa powder
  5. (in this picture we did this in a cup because we were experimenting... you should add these ingredients to the saucepan—it's much easier)
  6. Whisk until frothy
  7. Pour into mugs, filling each mug about 2/3 full
  8. Finish filling the mugs by carefully pouring plain milk (warmed or cool) down the inside of the mug (so as not to disturb the foam on top)
  9. Add a few GAPS marshmallows if desired
  10. For an added option (adults only!) I recommend adding a little rum
  11. Serve and enjoy!
Created using The Recipes Generator

Making the Vegetable Medley

One of the most important ferments in the GAPS™ diet is the vegetablemedley. You can find this recipe in Dr. Natasha Cambell-McBride's book, Gut and Psychology Syndrome. Her recipe is for a bowl ferment, but you can also make it in a jar, which is how I prefer to make it. And this is the recipe we are going to do today! This recipe contains five different vegetables: beets (good for liver and blood cleansing), cabbage (stimulates digestion), carrots (contain vitamin A), and cauliflower (makes it taste better, believe me), and garlic (good for immune support). It makes a very rich and flavorful liquid, which is also a wonderful probiotic drink.
No matter how delicious this is, and how much you like it, drink only a little bit in the beginning to avoid die-off. Respect the ferments, man!

IMG_7729.jpg

Ingredients and Supplies for Vegetable Medley

  • Glass jar, 1/2 gallon

  • Sea salt, 3-4 TBS

  • 1 Medium beet

  • 3 Carrots

  • 1/2 Cauliflower

  • 1/2 Cabbage

  • Garlic (5-7 cloves), fresh or fermented

Instructions for Vegetable Medley

IMG_7693.jpg

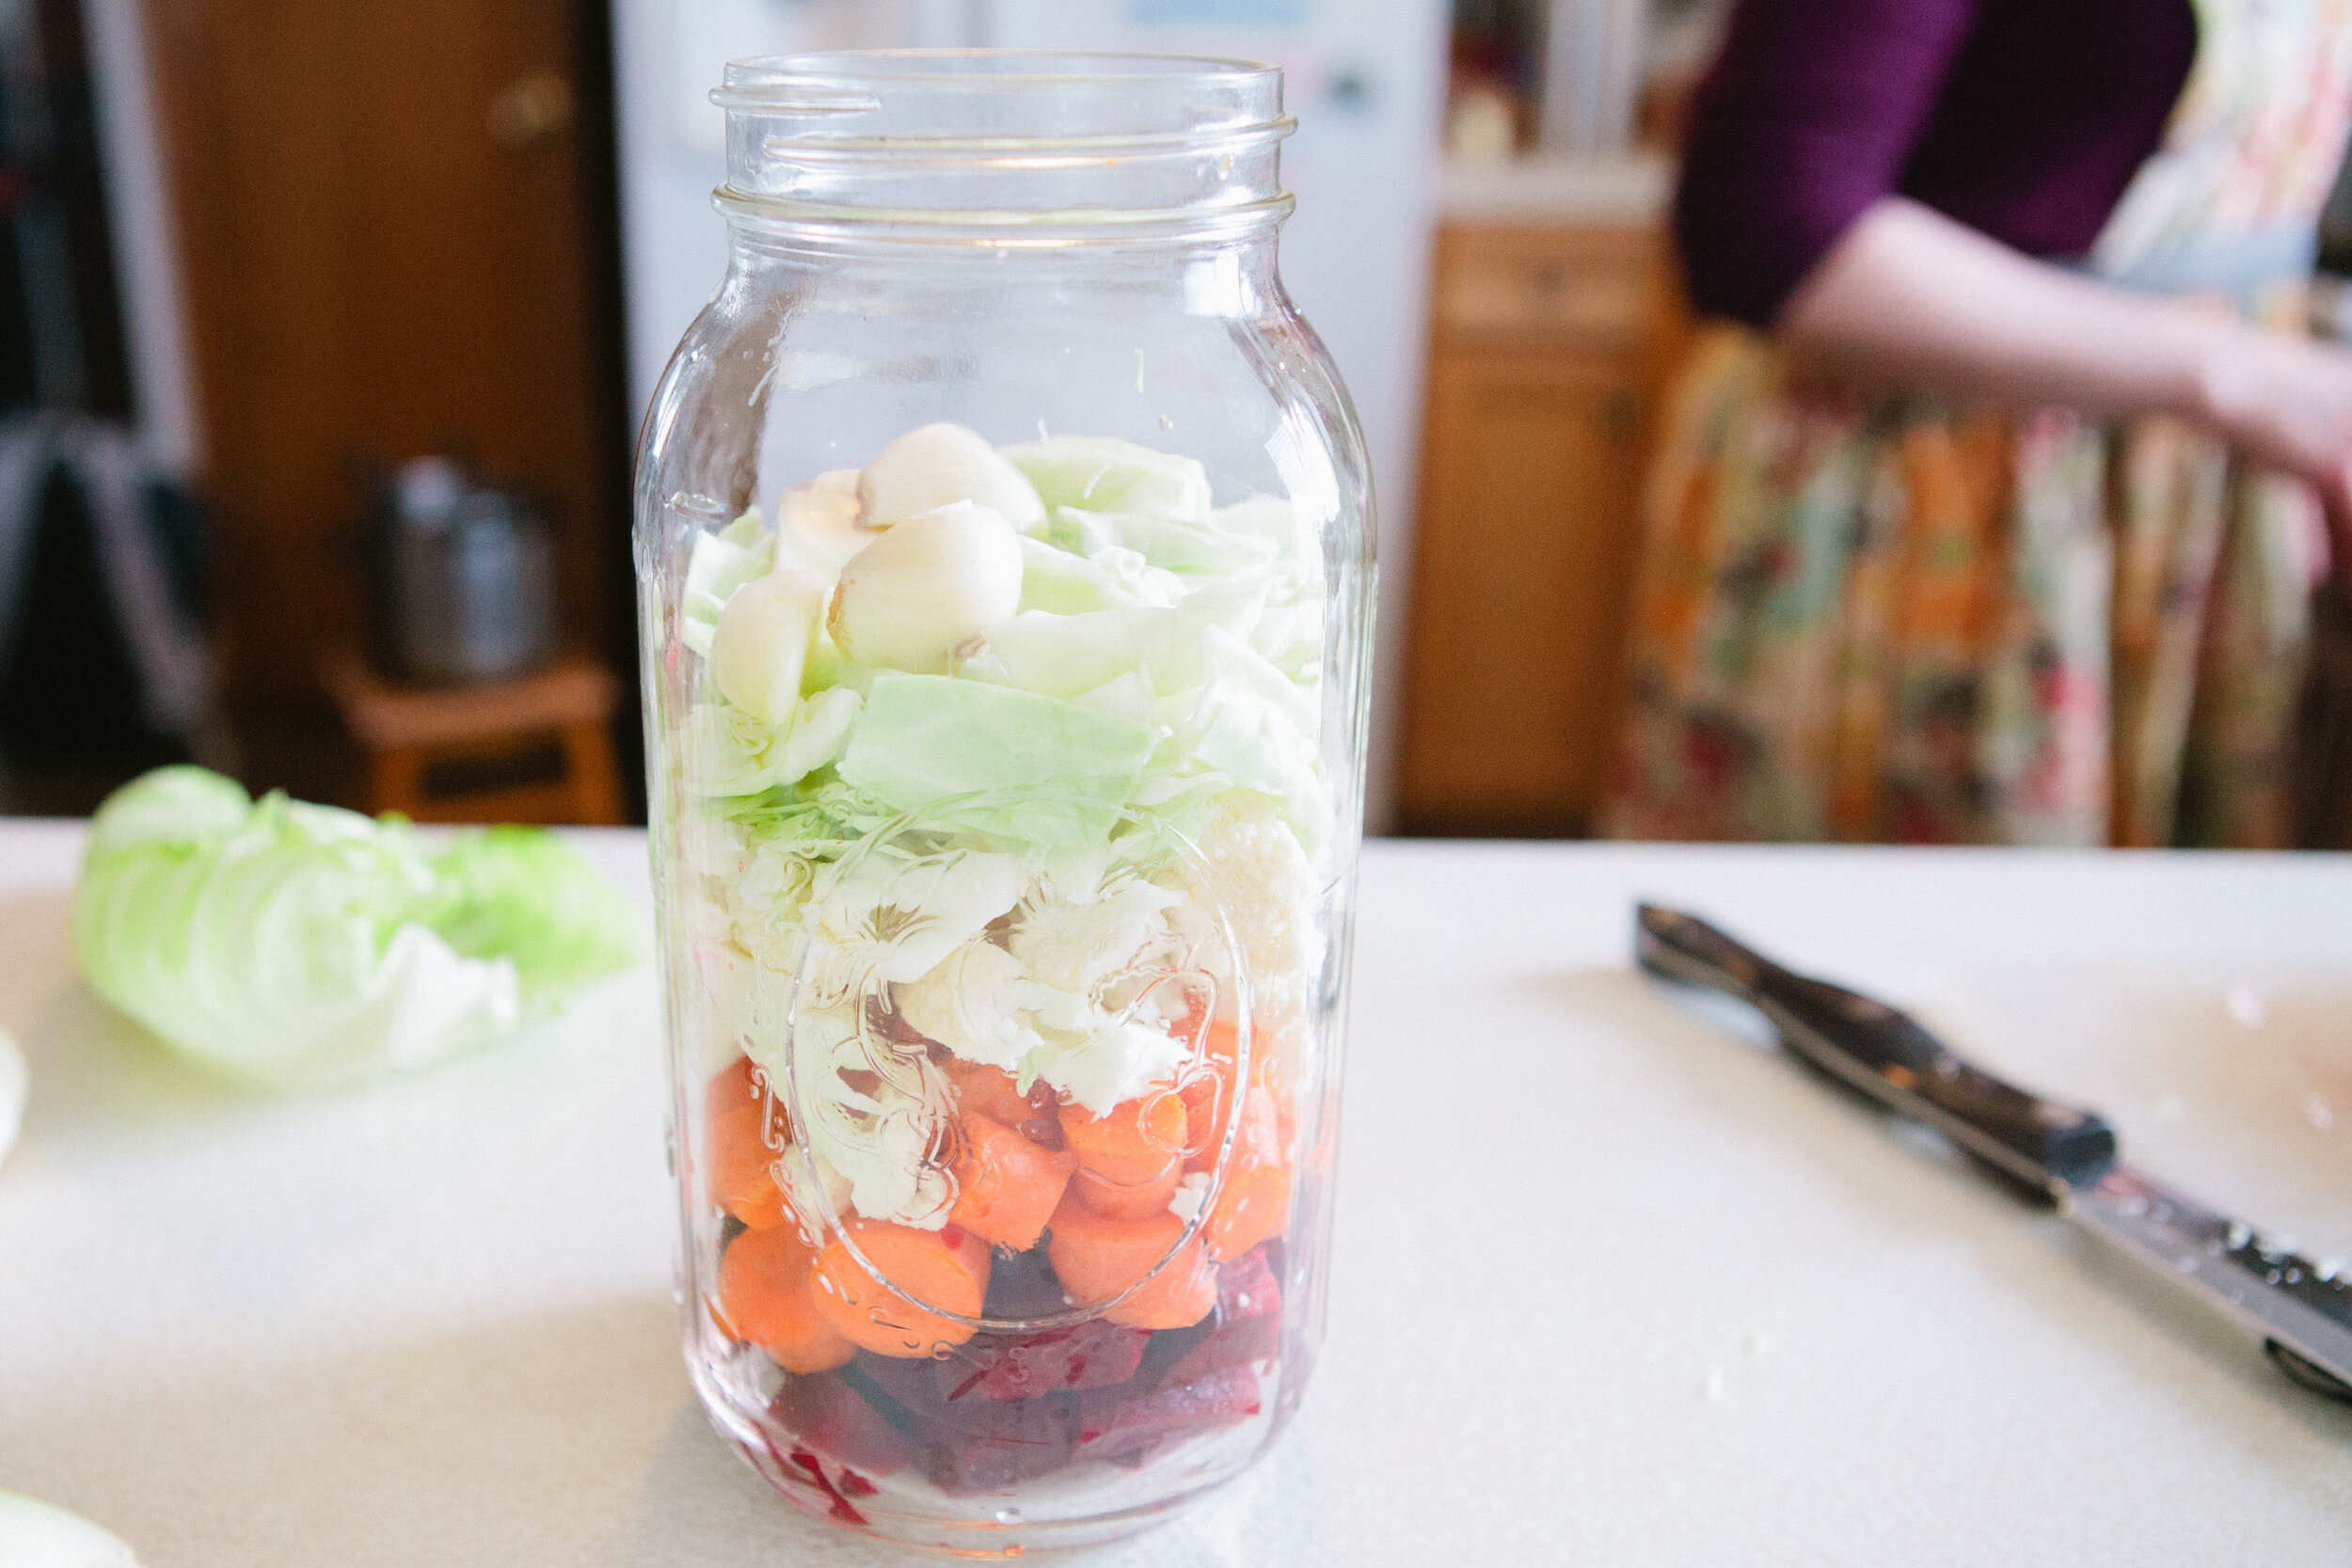
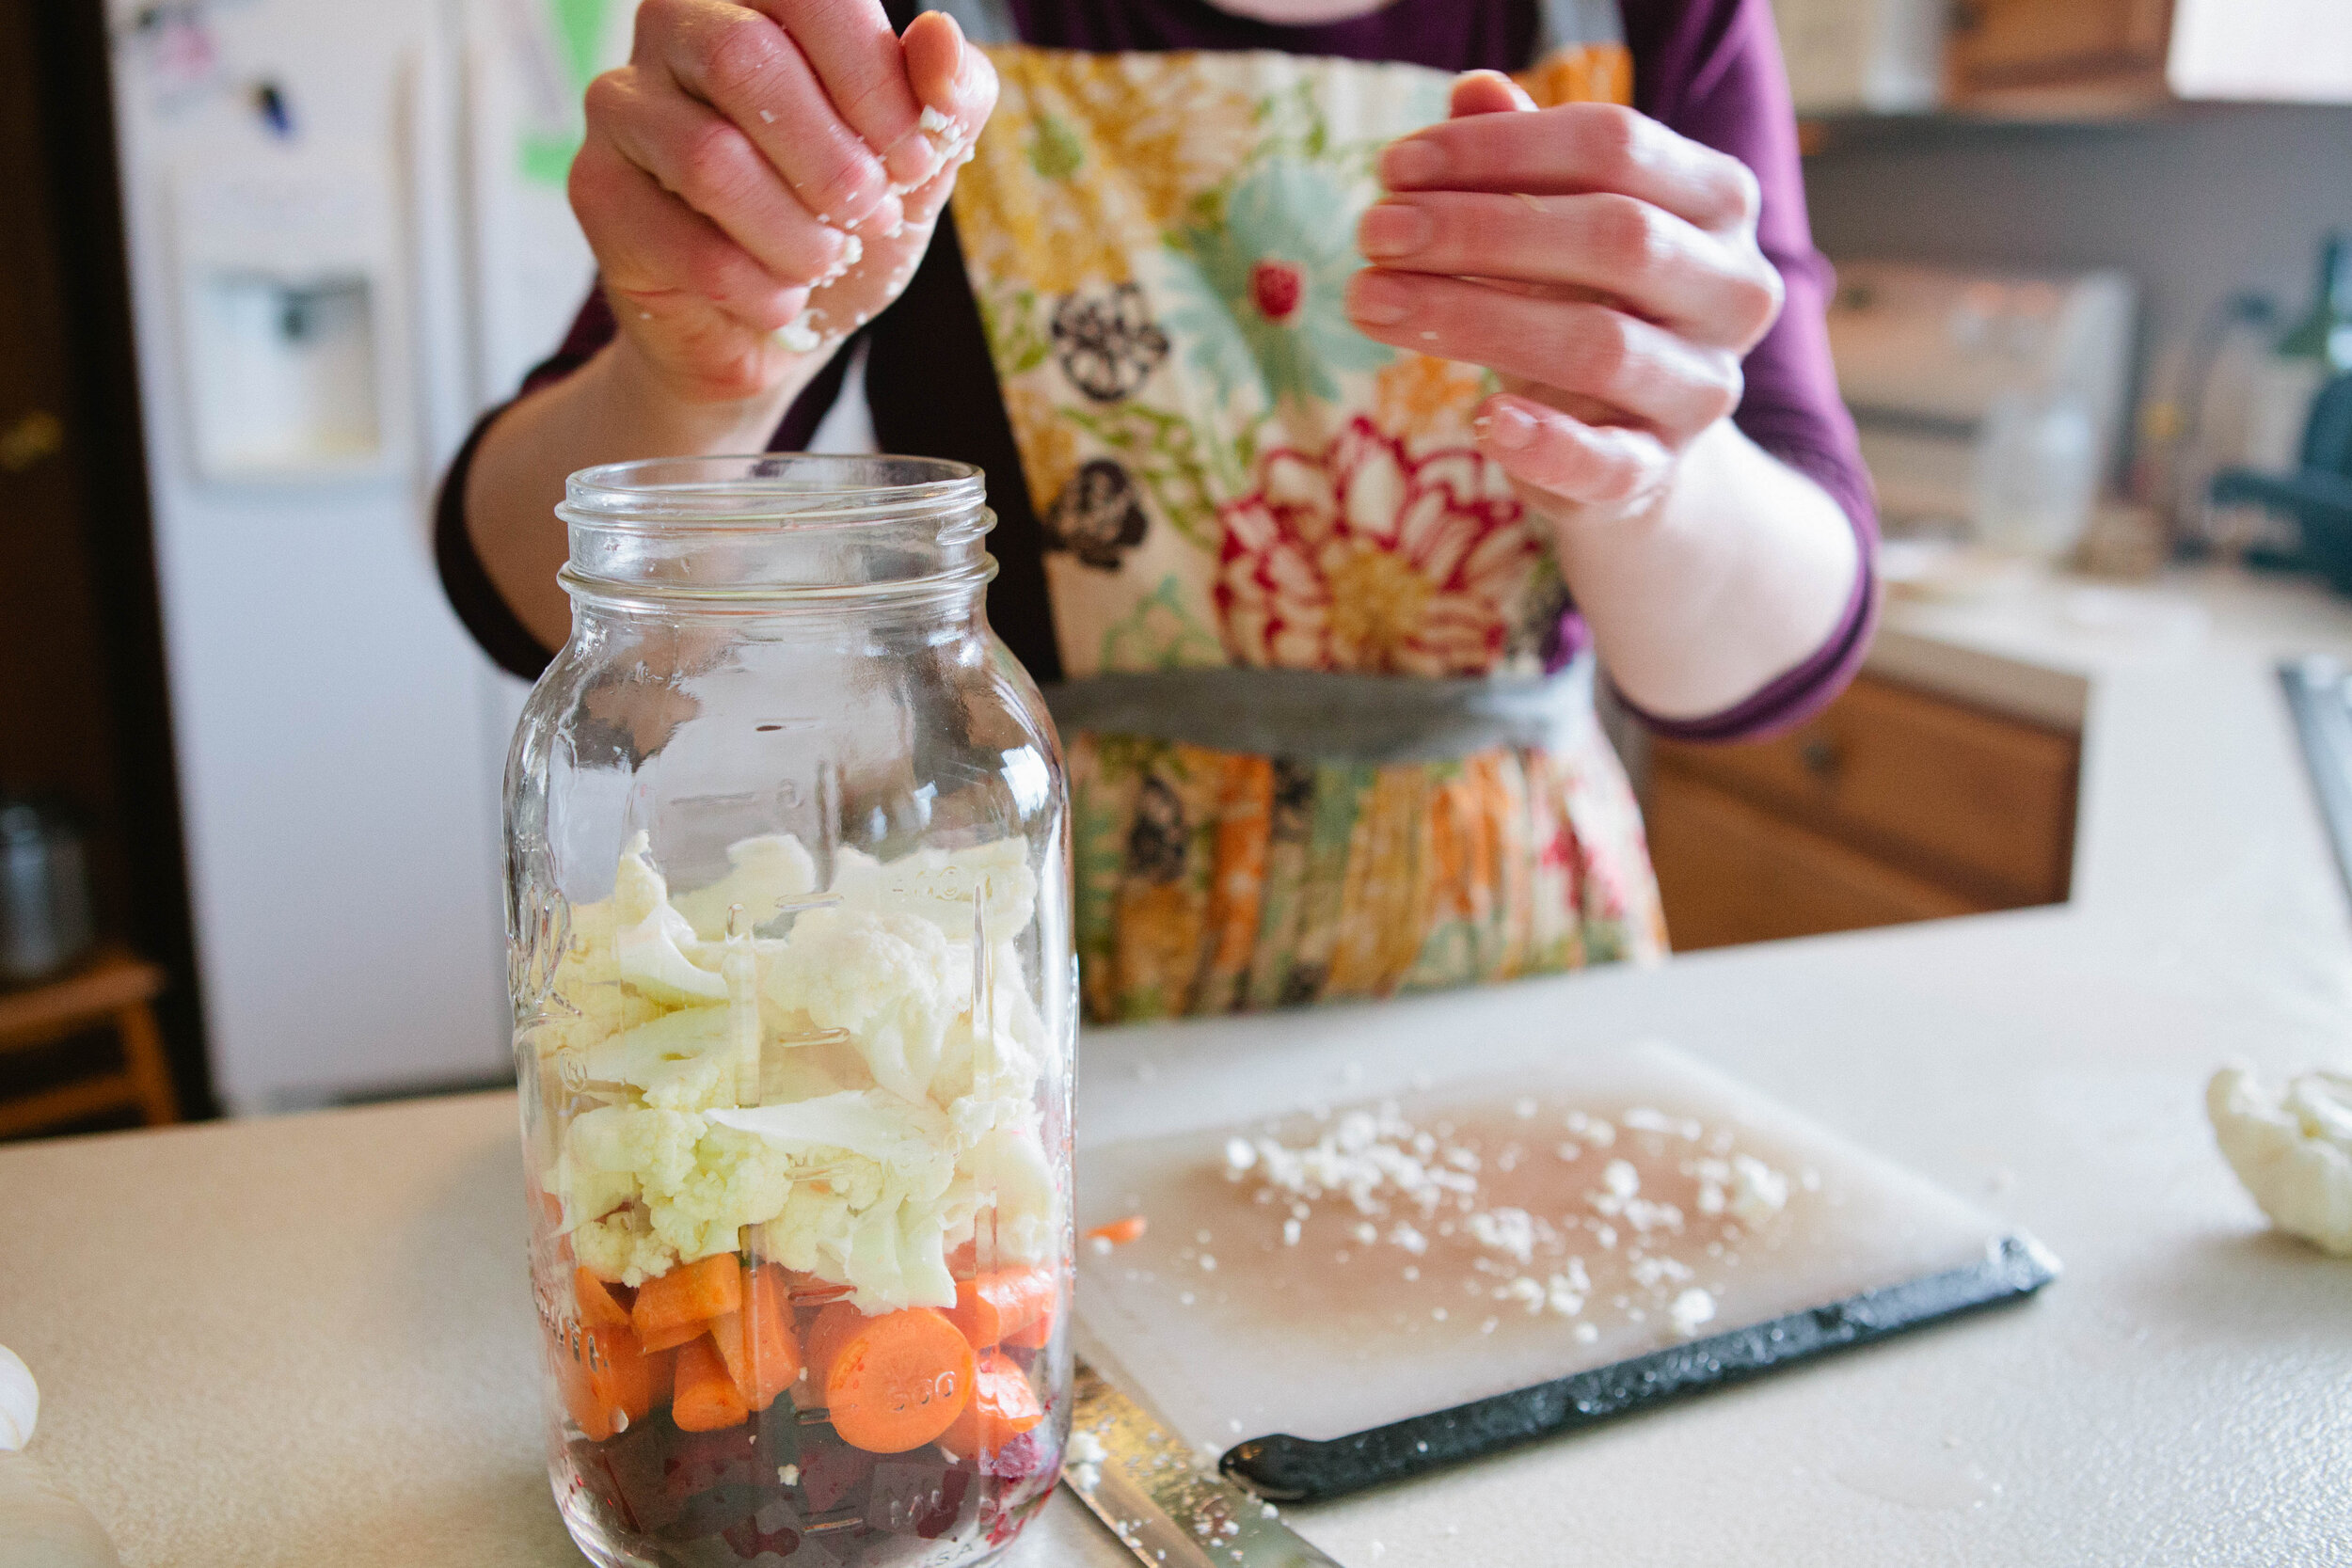
To a clean half-gallon jar, add about 1/2 cup of each vegetable. You can add them in any order you like. The main purpose of the vegetable medley is to drink the liquid, so make sure the ingredients you add only fill the jar half way (or a little more). This will create enough liquid to make it worth it!

IMG_7715.jpg

Add the beets. Then the carrots. And so on...

IMG_7727.jpg

Last of all, add the garlic. When all the ingredients are in the jar, it should be less than 3/4 full.

IMG_7732.jpg

Create a brine of the salt and about a 1 cup of filtered water. Swirl and shake to dissolve the salt.

Add filtered water, to the shoulder of the jar.

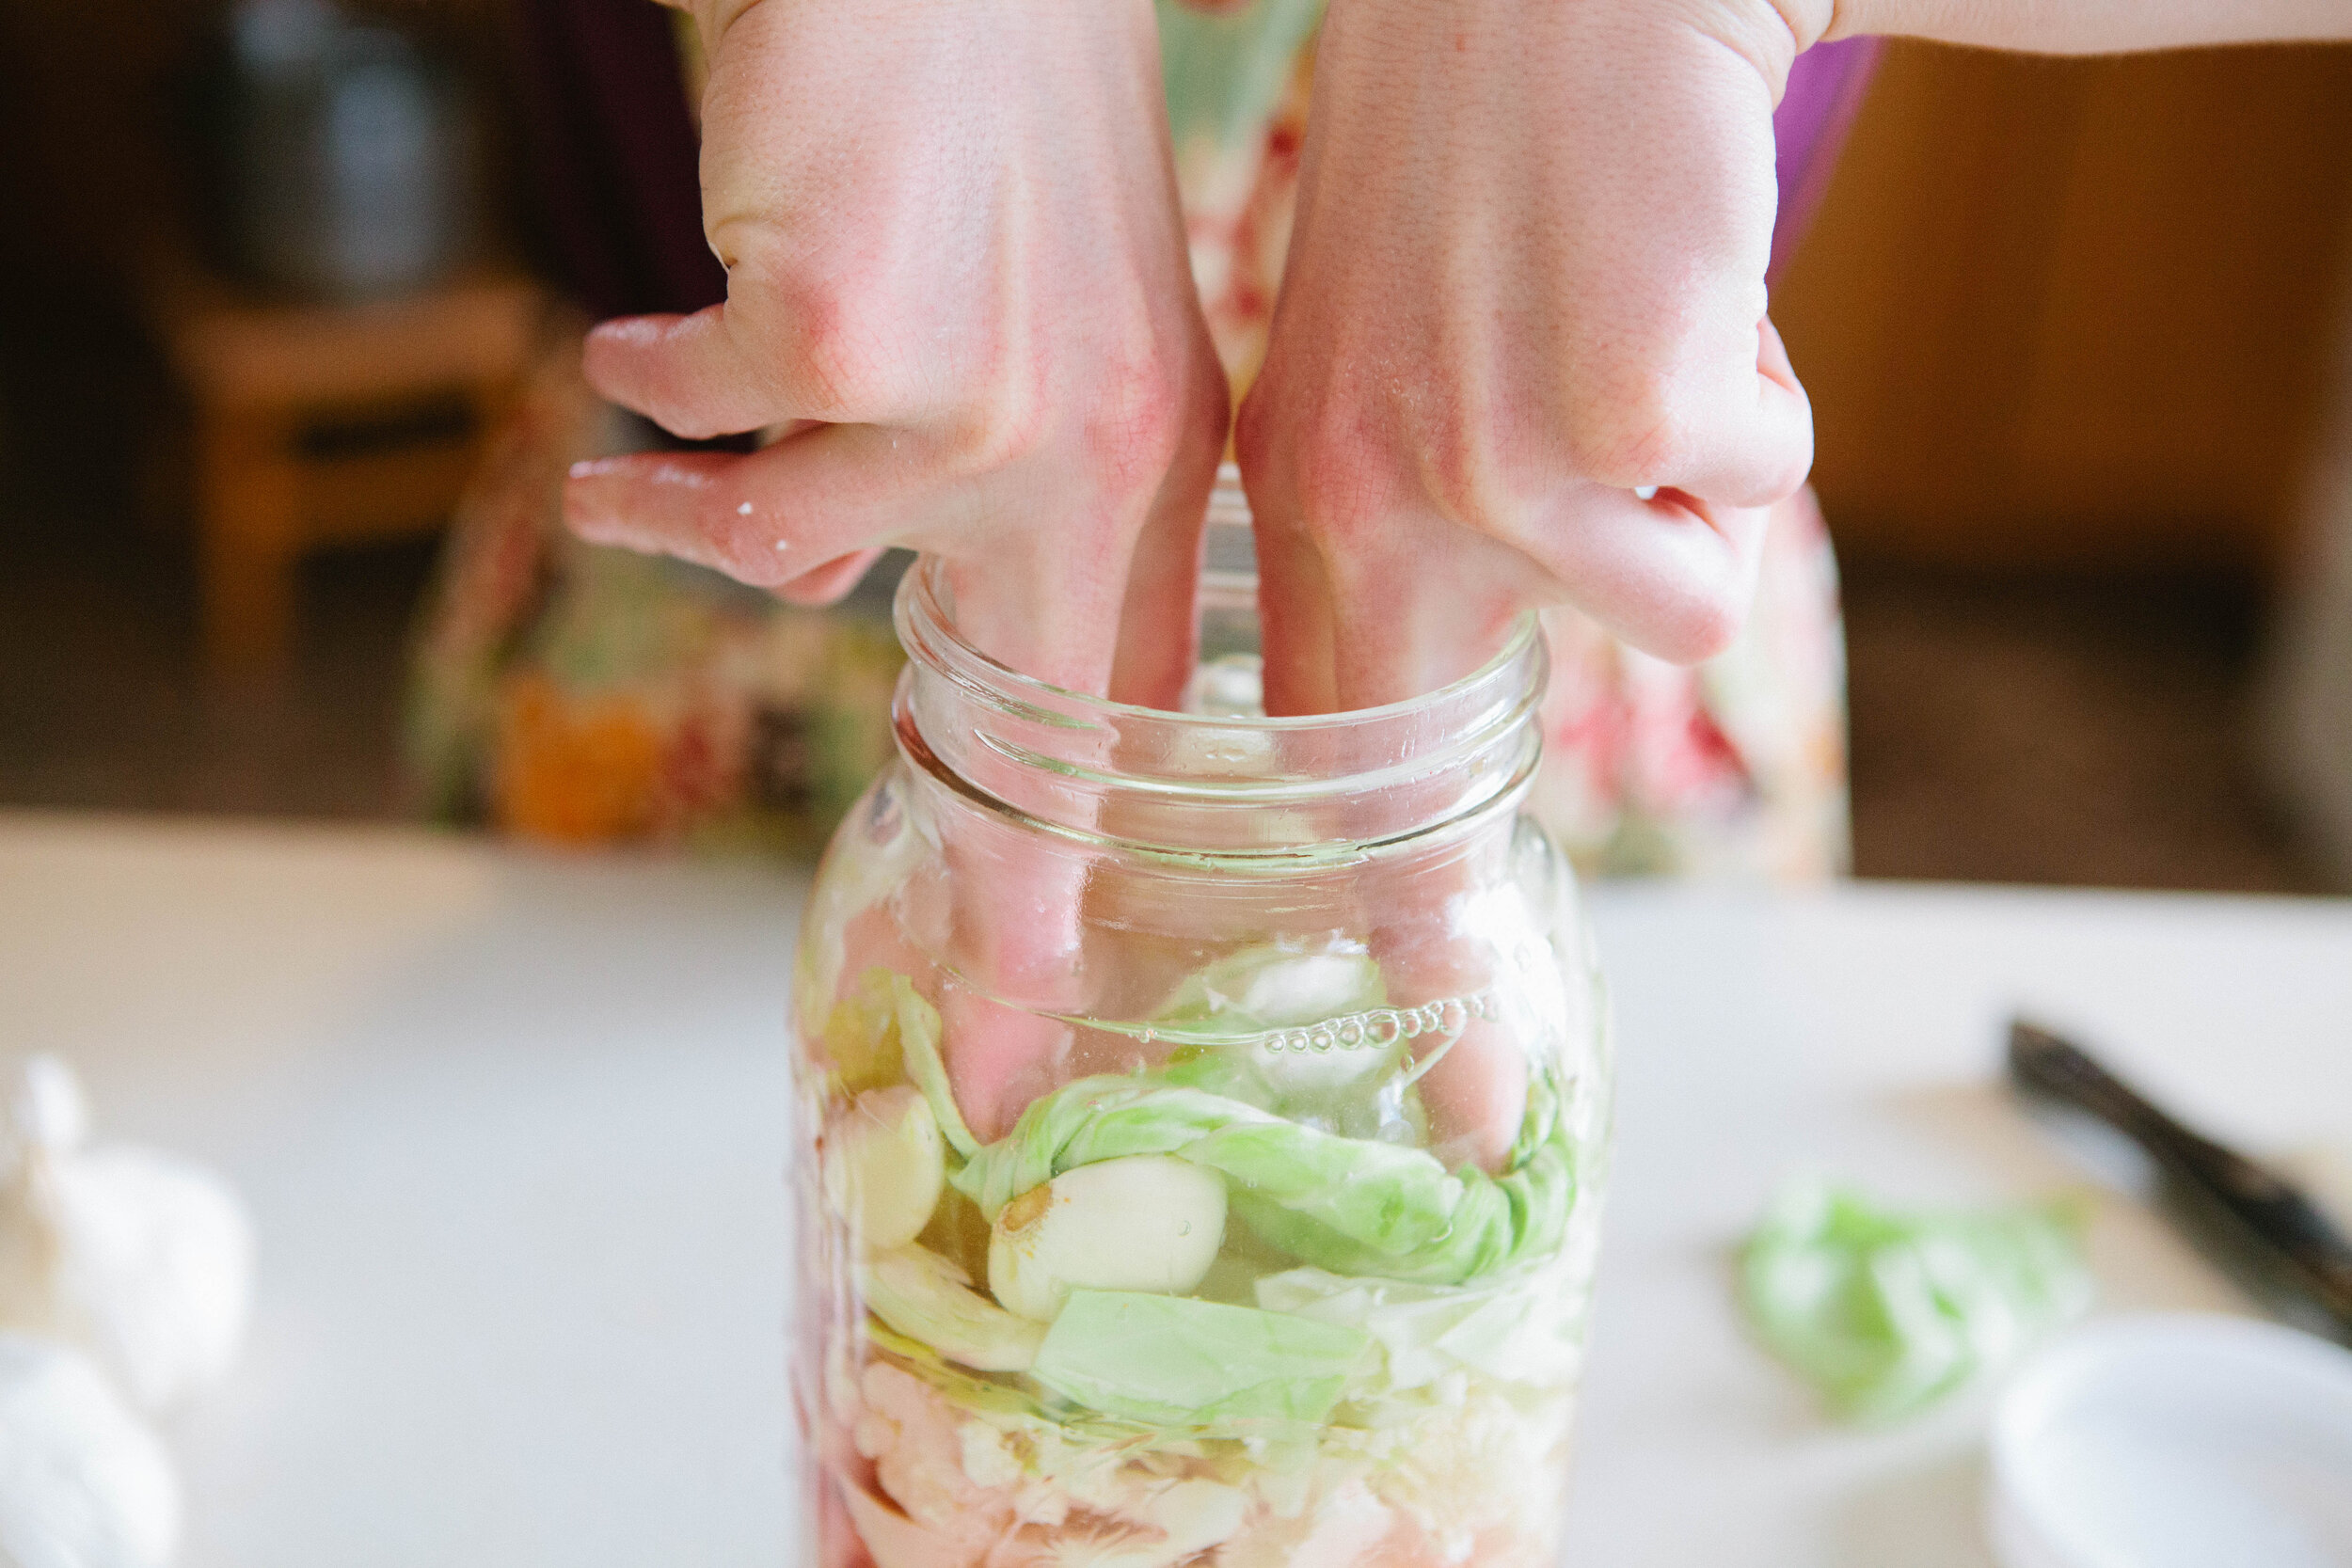
IMG_7754.jpg

Finally, add a cabbage leaf or two to hold all the ingredients under the water. I add a pinch of salt after the cabbage leaves are in place to discourage bad bacterial growth. All that's left is to tightly screw on the lid and leave it on the counter.

After 7 days, move the jar to the fridge and consume the liquid until it's gone, and eat the vegetable pieces. This can be a perpetual ferment. To do this, daily drink what you need, then replace that amount with filtered water, and continue to leave it out on the counter. Keep up with this process until the vegetables are spent (they turn grey and tasteless).

That's it! You have successfully made the veggie medley! Once you get the basics down, you can experiment with different vegetable combinations (eg. broccoli instead of cauliflower). Let us know your favorite combinations!

Onward!


Vegetable Medley

Author:
prep time: cook time: total time:

ingredients:

  • Glass jar, 1/2 gallon
  • Sea salt, 3-4 TBS
  • Medium beet
  • Carrots (3)
  • Cauliflower
  • Cabbage
  • Garlic (5-7 cloves), fresh or fermented

instructions:

How to cook Vegetable Medley

  1. To a clean half-gallon jar, add about 1/2 cup of each vegetable.You can add them in any order you like. The main purpose of the vegetable medley is to drink the liquid, so make sure the ingredients you add only fill the jar half way (or a little more). This will create enough liquid to make it worth it!
  2. Add the beets
  3. And carrots
  4. And so on...
  5. Last of all, garlic and salt
  6. When all the ingredients are in the jar, it should be less than 3/4 full. Add filtered water, to the shoulder of the jar. Finally, add a cabbage leaf or two to hold all the ingredients under the water. I add a pinch of salt after the cabbage leaves are in place to discourage bad bacterial growth. All that's left is to tightly screw on the lid and leave it on the counter.
  7. After 7 days, move the jar to the fridge and consume the liquid until it's gone, and eat the vegetable pieces. This can be a perpetual ferment. To do this, daily drink what you need, then replace that amount with filtered water, and continue to leave it out on the counter. Keep up with this process until the vegetables are spent (they turn grey and tasteless).
  8. That's it! You have successfully made the veggie medley! Once you get the basics down, you can experiment with different vegetable combinations (eg. broccoli instead of cauliflower). 
Created using The Recipes Generator
VegetableMedley.png

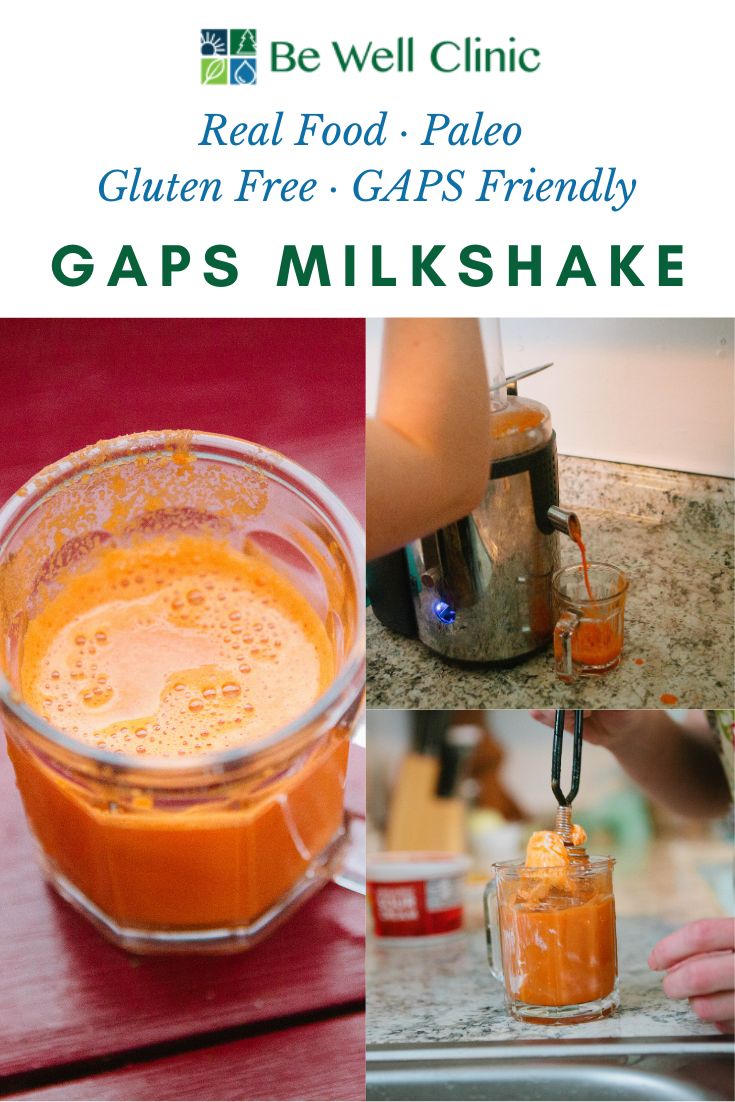
GAPS Milkshake

Our recipe this week is a simple, but powerful one! It is called the GAPS™ milkshake, and it packs a powerful punch! This delicious, satisfying and helpful beverage is a wonderful way to daily consume your freshly-pressed juices, and can even be a meal.

The GAPS™ milkshake is mix of juice, protein, and fat. Because it is easily digested, usually in about 20 minutes, it can be eaten when you don't have much time to sit and digest. But because it contains fat and protein, as well as sugar, it can sustain you for a while, often a few hours.

Let's get down to making it! You need a few simple ingredients.

  1. Freshly pressed juices (I like carrots, but you can use any juice mixture)

  2. Sour cream (creme fraische), coconut oil, or another fat

  3. Raw egg (whole or just the yoke)

  4. Raw honey (optional, and only a little!)

IMG_7397.jpg

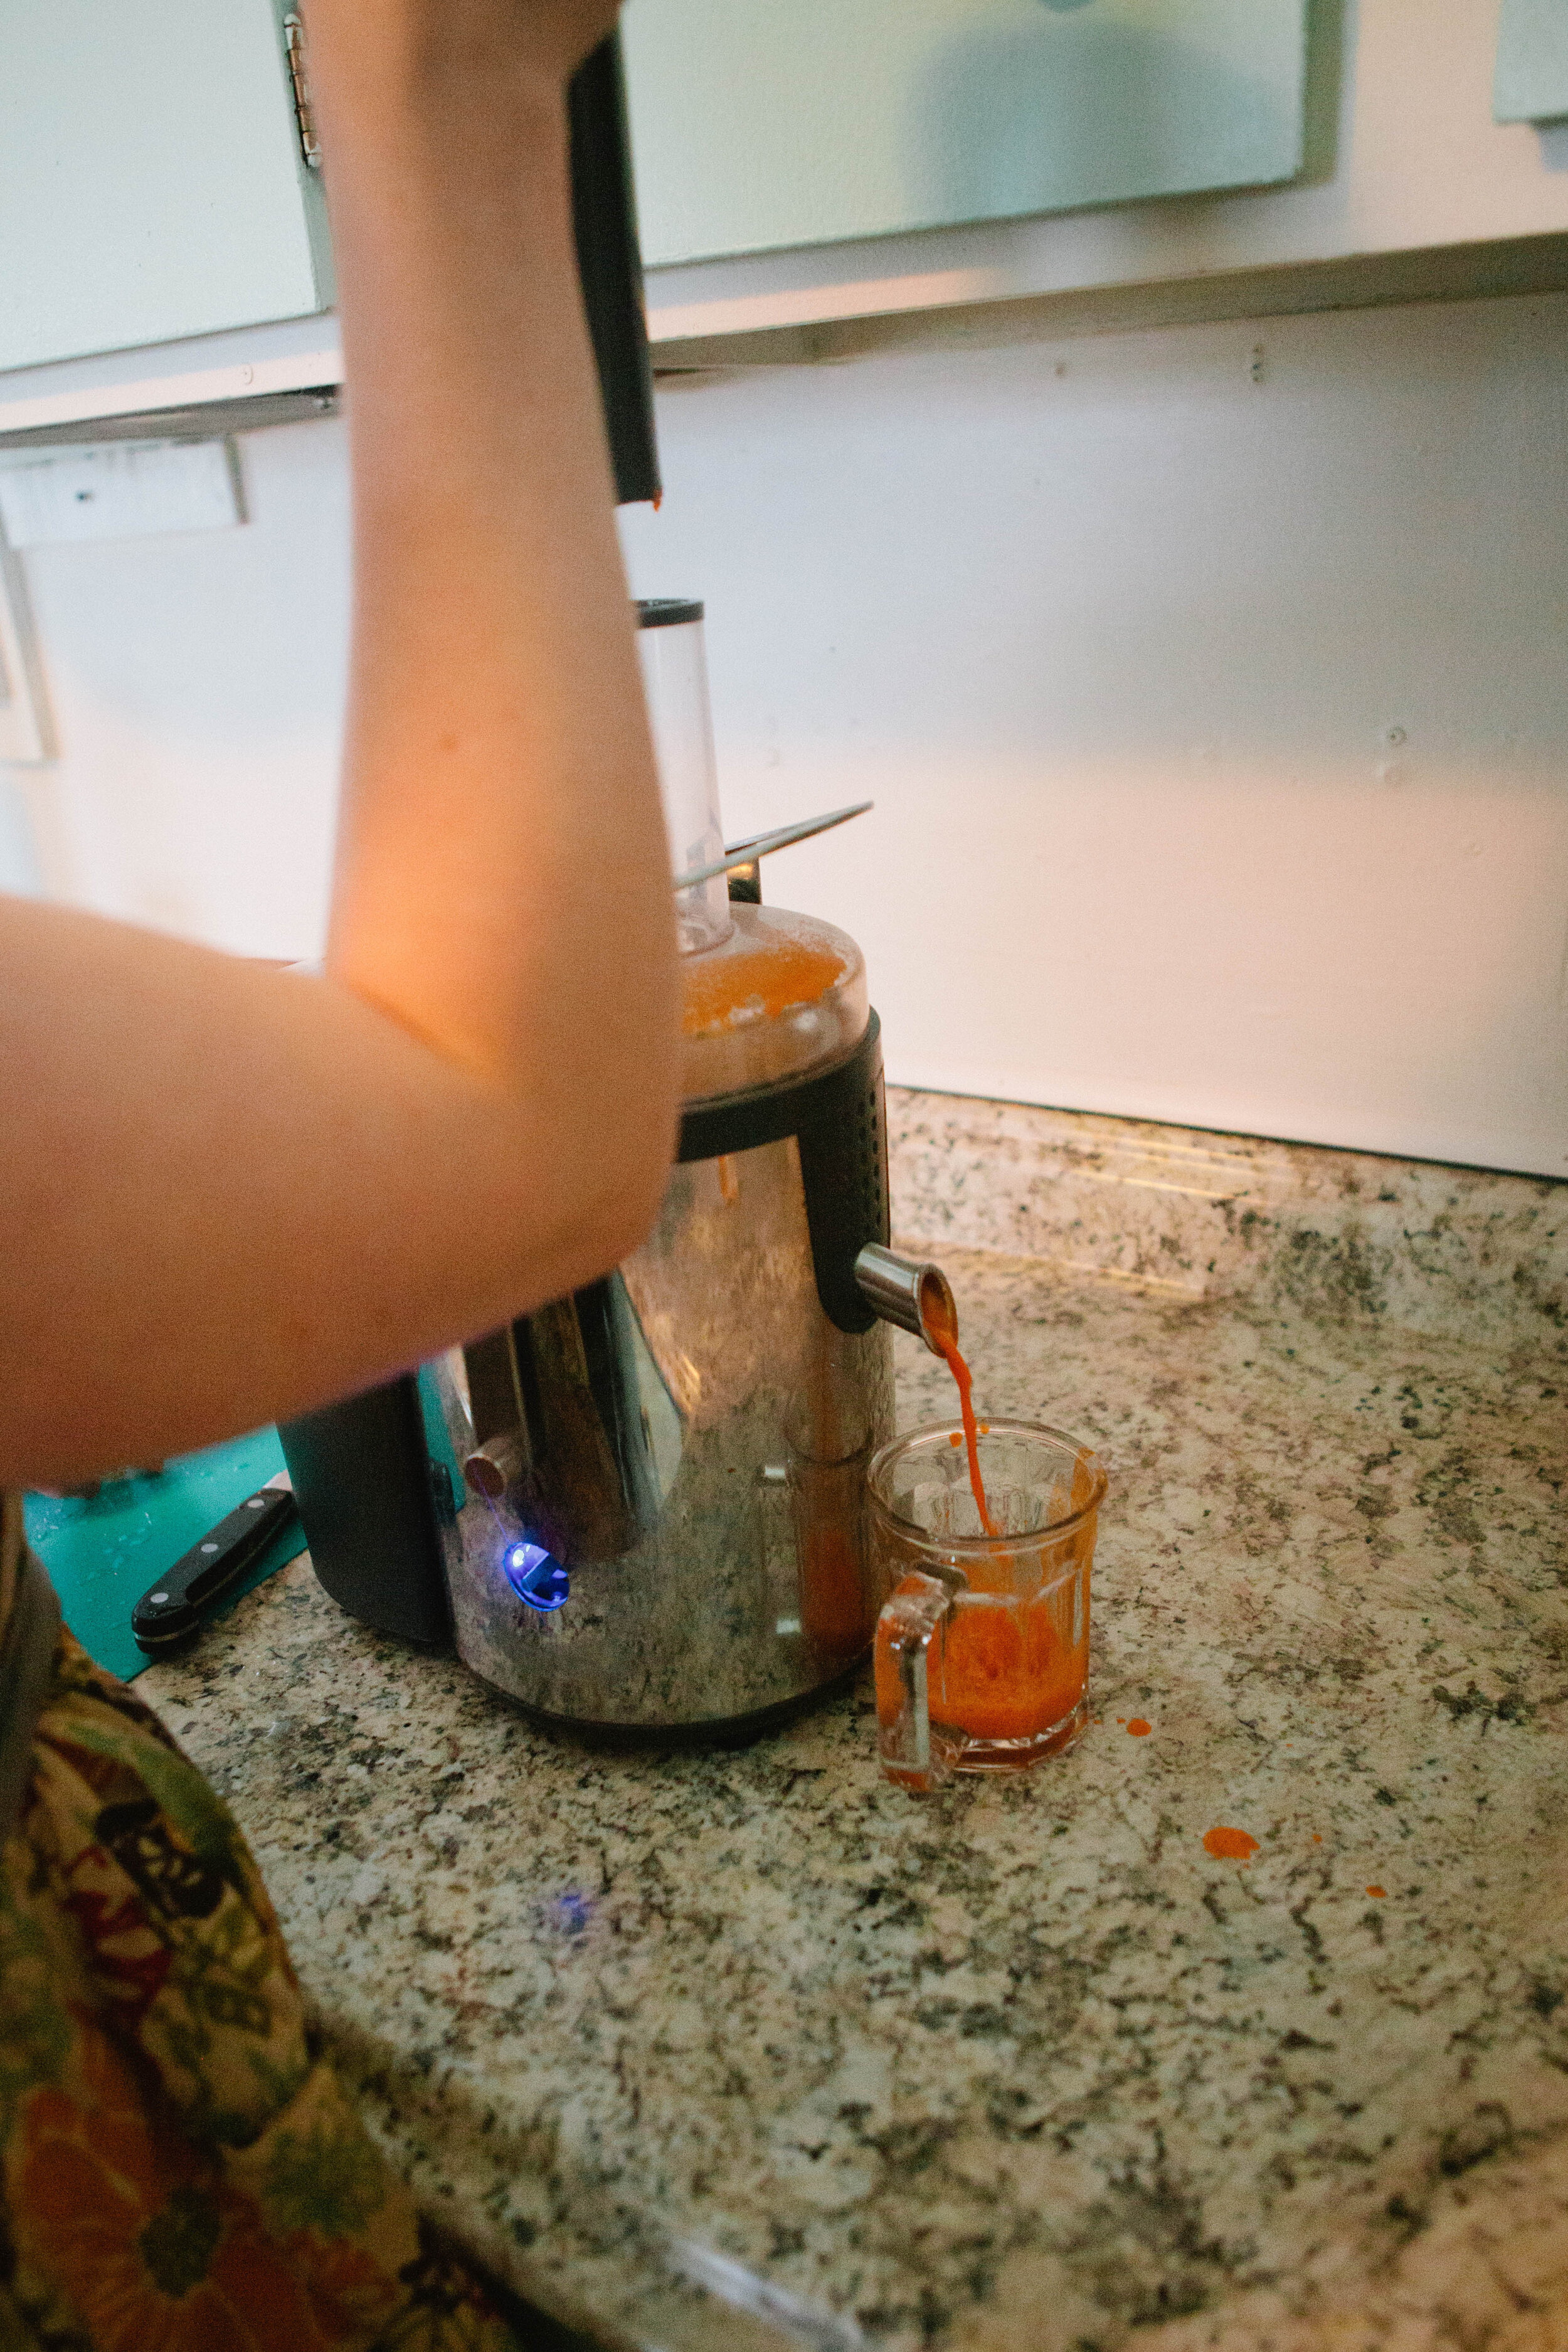
Juice the carrot (and/or other vegetables and fruits). I use organic vegetables so I just rinse them off (sometimes). You can see my (not) high-end juicer in the picture! But it works! Don't feel like you have to spend hundreds of dollars to juice (this one was about $40). It is a centrifuge juicer, and I try to consume the juices within 15 minutes to get the most enzyme activity, but again, it works! Successful GAPS is not about perfection, it is about action!

IMG_7433.jpg

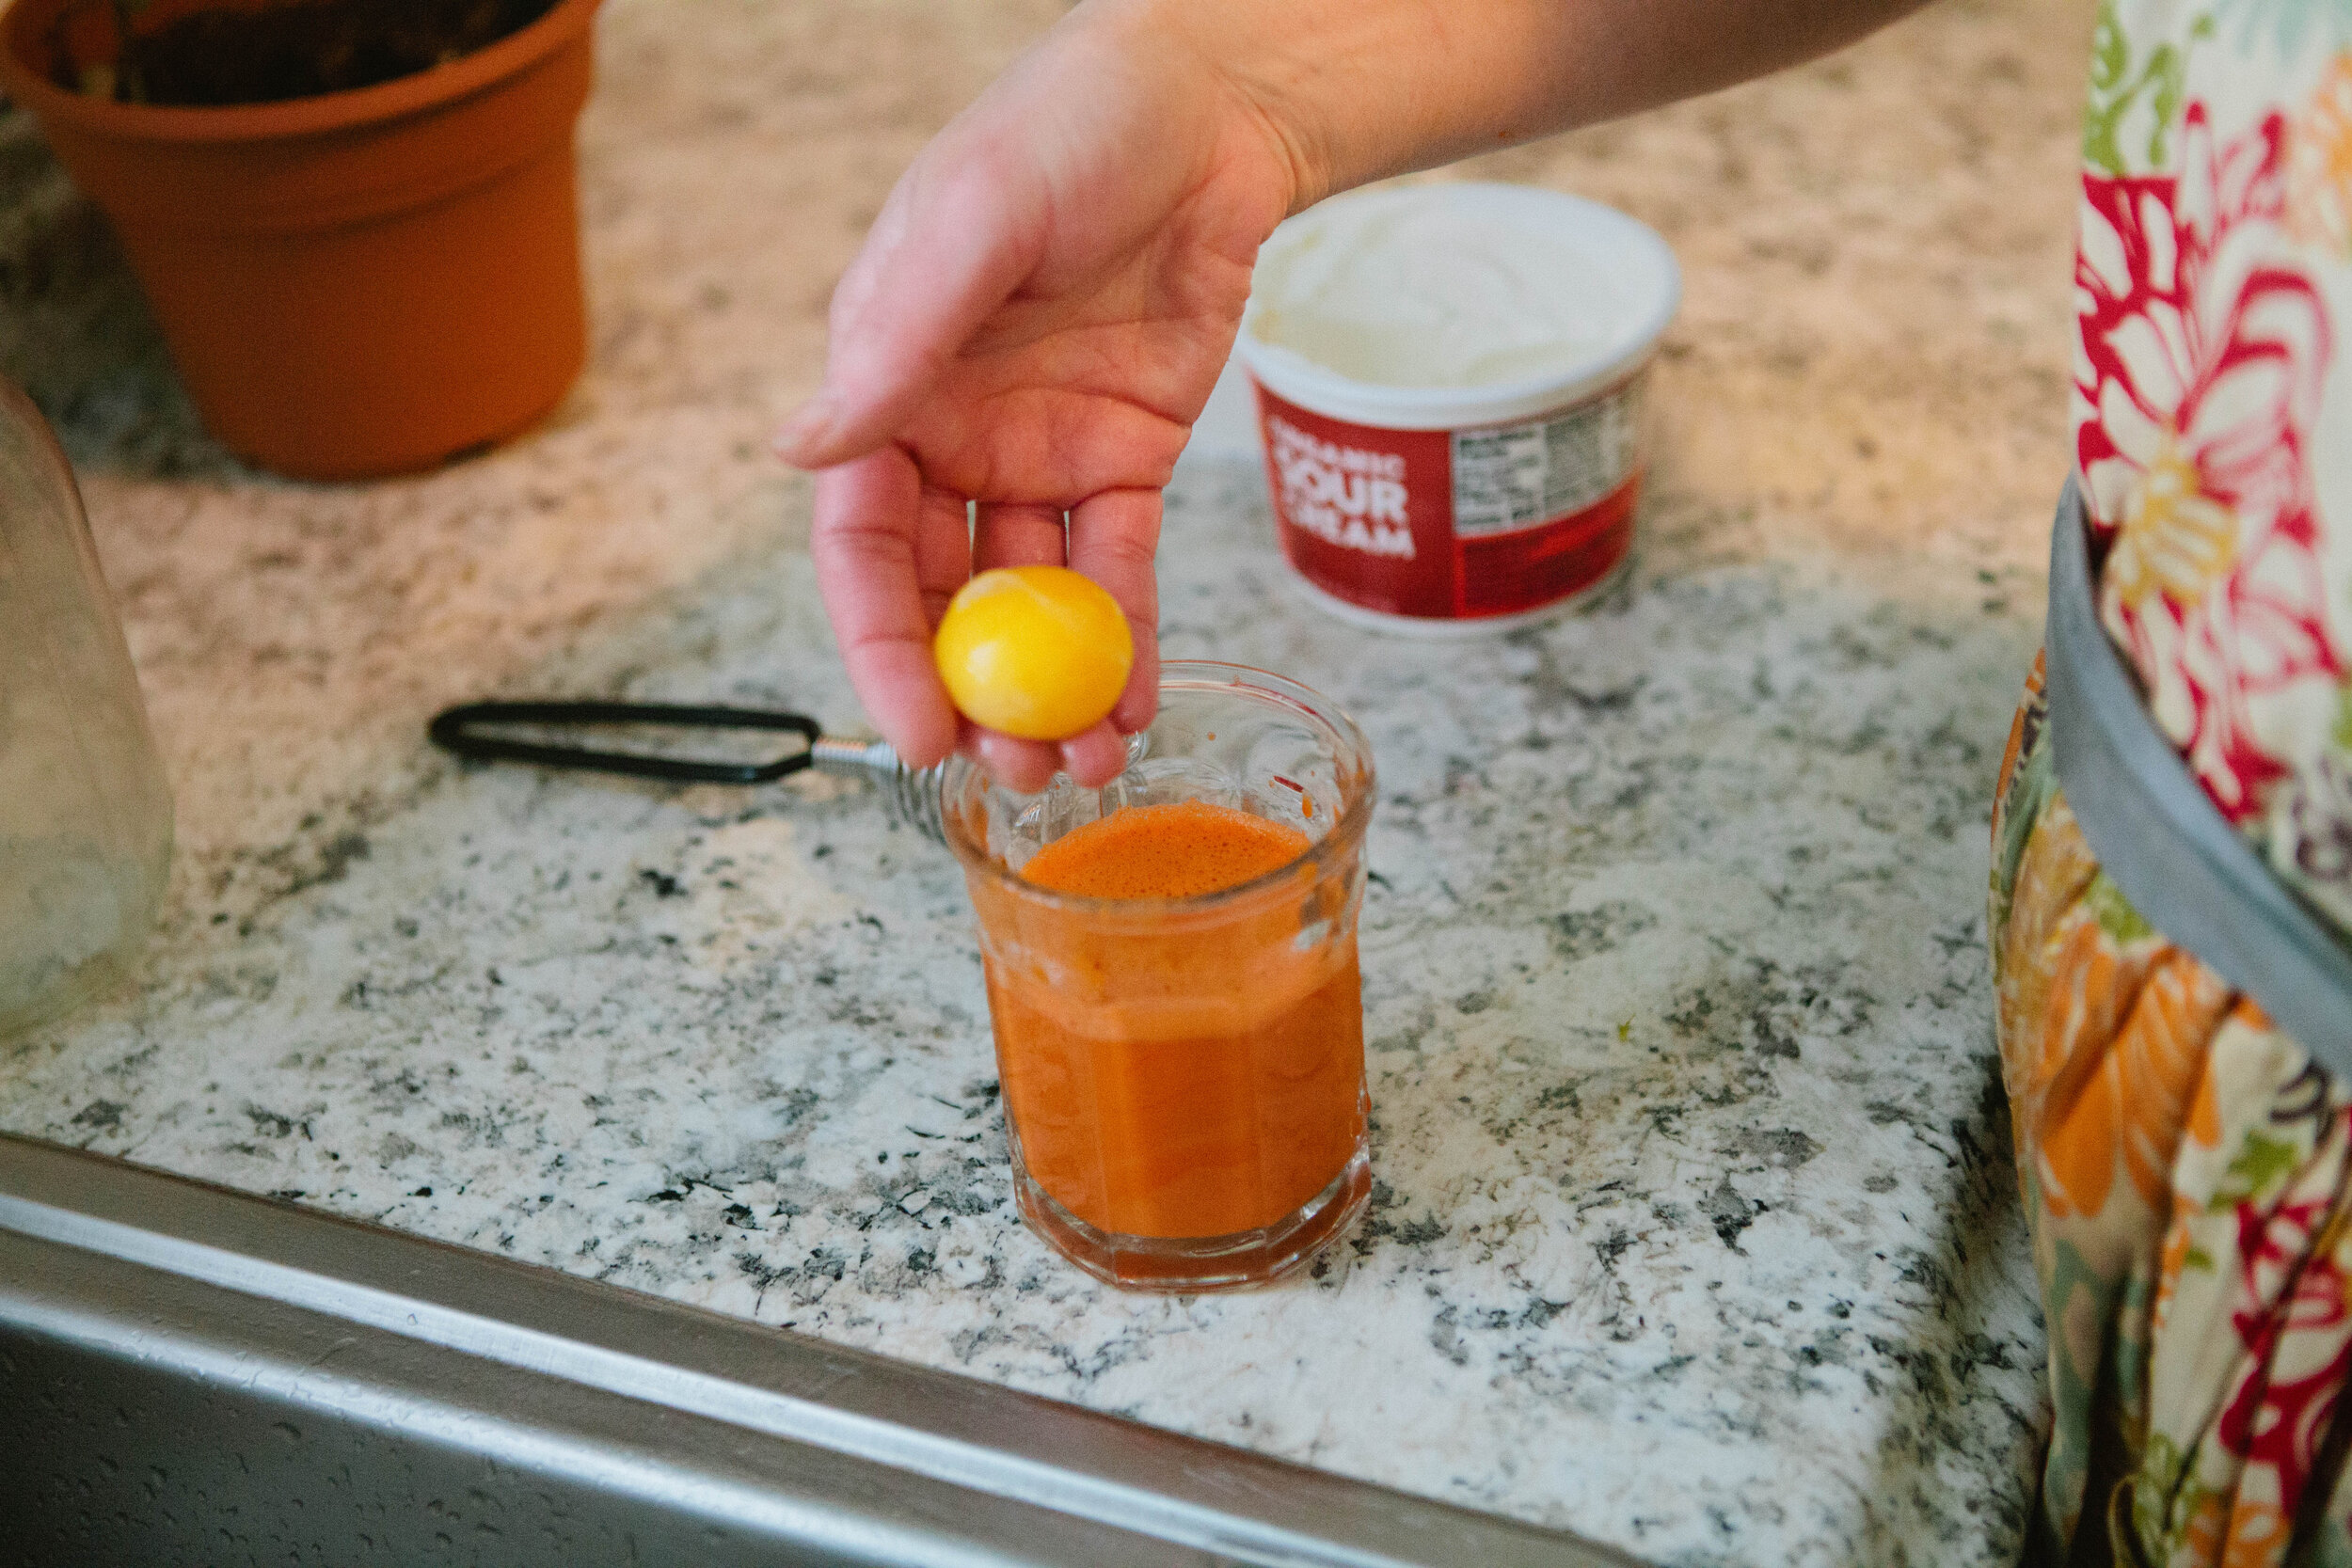
Once you have your juice in a glass, you are ready to add your other ingredients. Add 1-2 raw egg yolks or whole raw eggs. If you do add the white, I recommend using a spring whisk or a blender to break up the white--that is a hard texture to get down! With raw eggs, it is also important to know the source of your eggs (were the chickens healthy) and try not to touch the shell with the egg. If there happens to be any salmonella present, it is likely still on the outside of the egg, not the inside. Of course, there is no guarantee, especially if the eggs are washed (this breaks down the protective layer around the egg), so consume at your own risk! But I have yet to get sick, even using store bought eggs sometimes.

IMG_7441.jpg

Add the sour cream (a good-sized dollop). The sour cream is there primarily to slow the absorption of sugar from the juice—add to taste. You can also add coconut oil if you are not tolerating dairy (technically this makes it a GAPS Smoothie) Stir, whisk or blend together.

You can add a little honey if you need to. It is better to add some fruit to your juice ingredients instead of honey, but that isn't always an option, especially on early stages. I have found that the egg whites are a little bitter, and when I add a whole egg instead of just the yolk, I often need a little honey to help it go down. That's it! All that's left is to enjoy it!

As I said, this is a great "meal" for those on-the-go mornings. Especially if you are hungry early in the morning, this is a great thing to drink, as it is not a burden to the digestive system. The juices support your body's cleansing processes, which are often happening from 4am-10am every day. You could also add beet kvass to this beverage as an extra liver cleanser. It can overwhelm the flavor, so I prefer to drink mine separately. Experiment with your preferences, and with the recipe! Let us know how you like it best!

Onward!

GAPS Milkshake

GAPSmilkshake-150x150.jpg
  • Freshly Pressed Juices

  • Sour cream, creme faiche, coconut oil, or another fat

  • Raw Egg ((whole or just the yoke))

  • Raw Honey ((optional and only a little))

  1. Juice the carrot (and/or other vegetables and fruits).

  2. Add 1-2 raw egg yolks or whole raw eggs. If you do add the white, I recommend using a spring whisk or a blender to break up the white–that is a hard texture to get down!

  3. Add the sour cream to taste. The sour cream is there primarily to slow the absorption of sugar from the juice.

  4. Stir, whisk or blend together.

  5. Add a little honey if you need to

With raw eggs, it is also important to know the source of your eggs (were the chickens healthy) and try not to touch the shell with the egg. If there happens to be any salmonella present, it is likely still on the outside of the egg, not the inside. Of course, there is no guarantee, especially if the eggs are washed (this breaks down the protective layer around the egg), so consume at your own risk! 

I have found that the egg whites are a little bitter, and when I add a whole egg instead of just the yolk, I often need a little honey to help it go down.


HowtoMaketheGAPSMilkshakeJuiceCleanseGAPSDietRecipe.png

GAPS Milkshake

Author:
prep time: cook time: total time:

ingredients:

  • Freshly Pressed Juices
  • Sour cream, creme faiche, coconut oil, or another fat
  • Raw Egg ((whole or just the yoke))
  • Raw Honey ((optional and only a little))

instructions:

How to cook GAPS Milkshake

  1. Juice the carrot (and/or other vegetables and fruits).
  2. Add 1-2 raw egg yolks or whole raw eggs. If you do add the white, I recommend using a spring whisk or a blender to break up the white–that is a hard texture to get down!
  3. Add the sour cream to taste. The sour cream is there primarily to slow the absorption of sugar from the juice.
  4. Stir, whisk or blend together.
  5. Add a little honey if you need to

NOTES:

With raw eggs, it is also important to know the source of your eggs (were the chickens healthy) and try not to touch the shell with the egg. If there happens to be any salmonella present, it is likely still on the outside of the egg, not the inside. Of course, there is no guarantee, especially if the eggs are washed (this breaks down the protective layer around the egg), so consume at your own risk! I have found that the egg whites are a little bitter, and when I add a whole egg instead of just the yolk, I often need a little honey to help it go down.
Created using The Recipes Generator

Beet Kvass

Beet Kvass is a liver tonic. Anyone can make this simple fermented drink! It requires only a few ingredients, and only a few minutes to "put up."

Want to learn how? Good!

But first, some definitions:

  • Kvass: beverage

  • "Put up" a ferment: combine ingredients and set it aside to let it ferment

  • Sea Salt: unrefined salt, salt that is the same way it was found in nature

    • contains many trace minerals, depending on which type it is

    • Celtic Sea Salt, Real Salt, Himalayan Salt, others

    • most fermenting enthusiasts prefer Himalayan for fermenting (it's a taste thing)

  • Shoulder of the jar: the area of a jar where the jar narrows to become the mouth


Ingredients & Supplies to make beet kvass

  • 1/2 gallon glass mason jar

  • 1 medium-large beet

  • 2 TBS sea salt

  • cold, filtered water

Directions to Make Your Own Beet Kvass

Cut the beet into 1-2 inch cubes. Do not cut too small or shred the beet! Too much surface area and the beets will ferment too fast and create alcohol!

You do not need to peel the beets, just wash fairly well and cut off the top. A little organic dirt will add minerals and soil bacterium.

Place the cut beet in the mason jar. The beets should fill the jar about 1/4-1/3 of the way

Add salt to the jar. 2 TBS is the traditional amount when whey is not added.

Fill the jar up to the shoulder with cold, filtered water.

Seal the jar with a metal lid and ring, closing tightly.

Gently tip and swirl the jar to help the salt dissolve.

Set on the counter for 3-5 days, until the kvass is a rich purple color.

Move to the fridge (the beets stay in the liquid)

Consume daily!

You can use the beets for two batches

  • when the liquid is almost gone (about a pint left) then refill with water and salt

  • set on the counter for another 3-5 days

  • when the liquid is gone the second time, discard the beets and start fresh

Tips and Tricks for beet kvass

  • My beets are floating!

    • It's okay if the beets are floating-they often do, but will eventually sink. You don't need a weight for this ferment.

  • How much salt?????

    • The amount of salt largely depends on you--your taste, and your climate.

    • The salt is there to inhibit bad bacteria growth until the good bacteria are strong enough.

    • Beet kvass doesn't seem to go bad often, especially in the dry climate of Colorado.

    • I use about 2 TBS salt and no whey, with no problem. No whey! Ha ha ha, get it?

    • People like their kvass with more or less salt, so see how it tastes best to you.

  • I have a white film on the top and/or the bottom of my kvass.

    • DON'T start over!

    • This is merely the hard working lactobacillus bacterium thriving!

    • You can shake or stir in the white film, or skim it off, if you prefer.

  • I have blue or black, or another color of mold!

    • This is NOT okay. If you find this, throw it out and start over!

  • How much do I take each day?

    • It is generally recommended that you take up to 4 ounces 2x/day.

    • As with all ferments, it is important to START SLOW and increase gradually.

    • It's best to take this on an empty stomach, like first thing in the morning.

Love beets?!?!?!?

Can't get enough of them?!?!?

Learn about other great ways to eat beets here!

Happy fermenting!

Onward!


Beet Kvass

Author: Amy Mihaly, Be Well Clinic

Ingredients

  • 1/2 gallon glass mason jar
  • 1 medium-large beet
  • 2 TBS sea salt
  • cold, filtered water

Instructions

  1. Cut the beet into 1-2 inch cubes. Do not cut too small or shred the beet! Too much surface area and the beets will ferment too fast and create alcohol!
  2. You do not need to peel the beets, just wash fairly well and cut off the top. A little organic dirt will add minerals and soil bacterium.
  3. Place the cut beet in the mason jar. The beets should fill the jar about 1/4-1/3 of the way
  4. Add salt to the jar. 2 TBS is the traditional amount if no whey added.
  5. Fill the jar up to the shoulder with cold, filtered water.
  6. Seal the jar with a metal lid and ring, closing tightly.
  7. Gently tip and swirl the jar to help the salt dissolve.
  8. Set on the counter for 3-5 days, until the kvass is a rich purple color.
  9. Move to the fridge (the beets stay in the liquid)
  10. Consume daily!
  11. You can use the beets for two batches: when the liquid is almost gone (about a pint left) then refill with water and salt, set on the counter for another 3-5 day. When the liquid is gone the second time, discard the beets and start fresh.
BeetKvassBlogPost.png

Say No to Bone Broth!

Bone broth! It’s all the rage right now! But I don’t recommend it for most people. Find out why, and what I recommend doing instead.

Why avoid bone broth? Bone broth is good, and contains high levels of minerals and amino acids, including glutamic acid.

But large amounts of glutamic acid can be a problem for some people, especially those who have a leaky gut. Although some people can tolerate bone broth right away, it is advisable for everyone to start with meat stock, and then slowly add bone broth.

If you want more details about the differences between stock and broth, and what things like glutamic acid are, Biodynamic Wellness wrote a wonderful article that you can read for more information!

Important note: you can get a die-off reaction from both meat stock and bone broth. This is a sign of healing, but care should be taken to slowly increase the amount as the person is tolerating. You should always discuss issues with the practitioner you are working with.

How to make Meat Stock:

Ingredients:

  • Meat (80%) and bones with joint(s) (20%)

  • Organ meats (optional, but recommended)

  • 2-3 carrots

  • 1-2 celery stalks (on early GAPS, remove the celery before eating)

  • 1 onion

  • 4-6 whole peppercorns

  • 3-4 quarts filtered water (approximately)

  • 1 bunch of fresh parsley

Directions:

  • Prepare your meat

    • cut up chicken to expose the joints

    • braise or roast the beef/buffalo/pork meat briefly (for added flavor)

  • Add meat and bones to stockpot or dutch oven

  • Add filtered water, enough to just cover the meat (3-4 quarts)

  • Turn on the heat, bring to a boil

  • Cut up onion, carrot and celery

  • When water comes to a boil, reduce the heat and skim the scum (foam)

  • the scum is impurities, dirt, blood, bacteria, etc

  • if you miss this, it's ok but it does make it taste better!

  • Add chopped vegetables and peppercorns

  • Simmer for 1.5-3 hrs (chicken) 2-4 hrs (lamb & pork), 3-5 hrs (beef, etc). Do not cook longer than 6 hrs, this will increase the glutamic acid

  • Add the parsley to the simmering stock 10 minutes before it's done

  • Allow to cool to room temperature before placing in the fridge

  • Enjoy the delicious and nutritious stock that you made yourself!

  • If you are new to this, start by making a pot of stock every week, consuming a little of it daily. You could make different soups with it, or just drink some stock (hot or cold) as a beverage or snack.

Extra Tips:

  • Meat stock should be a meal--eat it as a basic soup, or add other vegetables and spices to change it into something completely different.

  • Don't throw out the best parts! If you are dealing with picky eaters (including yourself), you can blend the parts of the meat you don't want to eat (skin, joint cartilages, organ meats) with a little stock liquid. It will make your stock slightly thicker, but it will also increase the nutrition--meaning you will heal faster!

  • DO NOT THROW OUT THE FAT! This is a vital food for healing. You can keep it on your stock and mix it in as you consume it, or put it aside in the refrigerator and add it to your food one serving at at time.

  • Most people debone the meat after the stock is cooked. When you do this, you should be left with just a pile of bones--everything else is considered meat.

  • Store the bones in a freezer bag and when you have a full bag, you can use them to make bone broth later--when you are ready for it!

  • You can strain the stock into jars (it’s easiest to do this when it is warm) and use it as a base for other soups. Eat or freeze the meat. Again, meat stock is a meal, all the components can and should be eaten.

  • If you want to freeze meals ahead of time, it's easier to freeze soup instead of stock. Stock tends to expand and can crack the container it is frozen. Soup is less likely to harm the container it is frozen in.

  • This is only the basic recipe. Use other vegetables and fresh herbs to make a variety of different soups.

  • It is best to add salt to each serving of soup or stock, instead of salting the entire pot. Salt should be consumed as desired. Always use a whole sea salt (Celtic, Real Salt, or Himalayan).

And after you make your nourishing stock, then you can make a soup! You can read more about how to make soup without a recipe here.

Simple Roasted Beets

Beets... either you love 'em or you hate 'em...

...but did you know they really are really good for you?

Not only are beets high in many vitamins and minerals, including vitamin C, beets have been shown to lower blood pressure, detoxify the body (especially by cleansing the blood and the liver), fight inflammation, boost stamina in workouts, and more! And, of course, beets may turn your stool and urine red or pink when you eat them, which should be enough to make your ten-year old boys try it!  

Ya don't dig beets, ya say? Here's how to get dem good beets in ya!

#1 Try golden beets. These beets are milder and have less of the "dirt" taste.

#2 Buy or raise homegrown. Fresh beets are more delicious and nutritious!

#3 Juice your beets. Caution: a little beet goes a long way--use just a little!

#4 Drink beet kvass. This fermented drink has intensified cleansing properties.

#5 Bake your beets with lots of butter and salt. Try the delicious recipe below!

Oven-Baked Beets recipe

Ingredients for oven baked beets:

  • Beets (you will want more than 1, believe you me!)

  • Sea Salt (I recommend Celtic, Himalayan or Real Salt)

  • Butter (none of that fake stuff!)

  • Oven safe dish (glass or ceramic is best), a size that snugly hold the beets

Directions for Oven Baked Beets:

Preheat the oven to 400 degrees.

Wash the beets.

Cut off the tops and tails of the beets--not too much or all the juice will bleed out!

Cut an X into the beets, going only about halfway through the beets.

Place the beets in the oven-safe dish, cut side up.

Place a generous pat of butter in the middle of each X.

Salt lightly--you can add more later.

Cover the beets with parchment paper, then cover with a lid or tin foil to trap in the moisture.

Place the beets in the oven, cook for 20-30 min, then check for doneness. They are ready when a fork or knife pokes in easily.

Consume immediately as a side or a snack.

Drizzle some of the butter from the bottom of the pan back onto the beets when you serve them.

If you have any left, you can later reheat them in the oven or on the stove-top, or eat them cold!

You can't beat butter and beets!

Do you have a favorite beet recipe? Share with us your favorite way to eat beets!


Simple Roasted Beets

Author:
prep time: cook time: total time:

ingredients:

  • Beets (you will want more than 1, believe you me!)
  • Sea Salt (I recommend Celtic, Himalayan or Real Salt)
  • Butter (none of that fake stuff!)
  • Oven safe dish (glass or ceramic is best), a size that snugly hold the beets

instructions:

How to cook Simple Roasted Beets

  1. Preheat the oven to 400 degrees.
  2. Wash the beets.
  3. Cut off the tops and tails of the beets--not too much or all the juice will bleed out!
  4. Cut an X into the beets, going only about halfway through the beets.
  5. Place the beets in the oven-safe dish, cut side up.
  6. Place a generous pat of butter in the middle of each X.
  7. Salt lightly--you can add more later.
  8. Cover the beets with parchment paper, then cover with a lid or tin foil to trap in the moisture.
  9. Place the beets in the oven, cook for 20-30 min, then check for doneness. They are ready when a fork or knife pokes in easily.
  10. Consume immediately as a side or a snack.
  11. Drizzle some of the butter from the bottom of the pan back onto the beets when you serve them.
  12. If you have any left, you can later reheat them in the oven or on the stove-top, or eat them cold!
Created using The Recipes Generator