full GAPS

GAPS Legal Cocktails

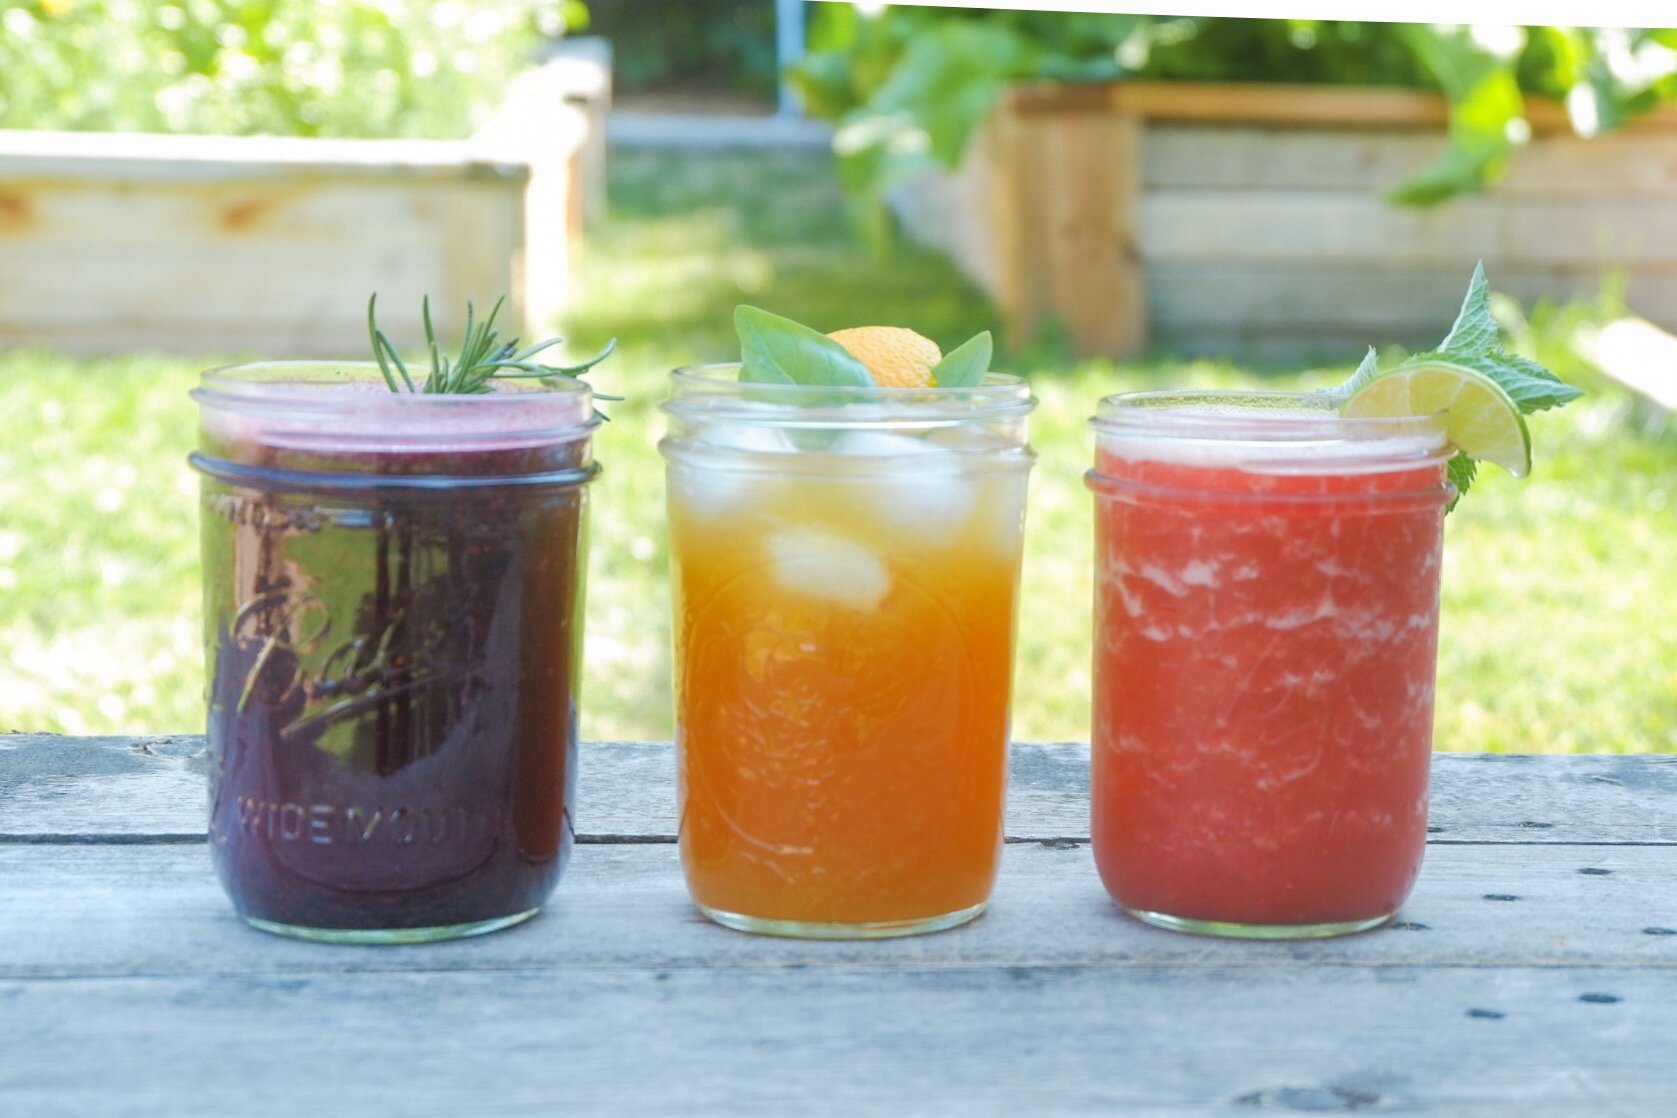
Enjoy some full-GAPS legal cocktails (or mocktails)! Delicious, refreshing, good for you and beautiful!

Each drink uses a homemade honey-herb simple syrup, unflavored kombucha and fruit. You can add liquor if desired (see recommendations for each drink).

Honey Simple Syrup:

  • 1/4 c filtered water

  • 2 tsp honey

  • 2 short sprigs of one herb (for these recipes we used rosemary, basil and mint)

Add each ingredient to a small pot. Simmer together for 15 minutes, stirring often to combine and making sure it does not boil. After 15 minutes remove from heat, strain the herbs out and pour the remaining syrup into a jar to cool.

Blueberry-Rosemary (Makes 2 servings)

  • 1 1/2 cups of unflavored kombucha (either homemade or store bought - remember, the longer ferment the better with GAPS)

  • 1/2 cup of frozen blueberries

  • 2 tbsp rosemary simple syrup

  • Rosemary sprig for garnish (optional)

  • Recommended liquor: Gin (optional, to taste)

Blend kombucha and blueberries until smooth. (it may take several minutes to get the blueberry skins to blend completely. It is still enjoyable even if it’s not completely smooth, so don’t stress if your blender has trouble with this part!)


Add cooled simple syrup and stir to combine. Pour into two glasses, add optional ingredients if desired, enjoy!

Strawberry-Lime-Mint (Makes 2 servings)

  • 1 1/2 cups of unflavored kombucha (either homemade or store bought - remember, the longer ferment the better with GAPS)

  • 3/4 - 1 cup frozen strawberries

  • 1/2 lime (slice the other half for garnish)

  • 2 tbsp mint simple syrup

  • Mint and lime wedge for garnish (optional)

  • Recommended liquor: Vodka (optional, to taste)

Blend kombucha and strawberries until a nice icy-blend consistency. Squeeze in juice of 1/2 lime and add mint simple syrup (add 1 tbsp at a time to taste). Stir with spoon to combine. Pour into two glasses, garnish and add liquor if desired, enjoy!

Orange-Basil (Makes 2 servings)

  • 1 1/2 cups of unflavored kombucha

  • Fresh juice from 1 orange

  • 2 tbsp basil simple syrup

  • Basil leaf and orange peel for garnish (optional)

  • Recommended liquor: Scotch (optional, to taste)

Combine kombucha, orange juice and basil simple syrup, pour into 2 glasses, top with garnish and add liquor if desired. Enjoy!

GAPS Legal Cocktails.jpg

All drinks are delicious without liquor. Note: small amounts of liquor is legal on full-GAPS, so make it a rare treat if you add in your choice of liquor. Just remember, as long as you are sticking to the legal foods, eat/drink intentionally, thoroughly enjoy, and move on - no guilt with a boozy treat, even with GAPS!

Hollie Bigham
RN, BSN, FNTP, CGP

Copy of Be Well Clinic Pinterest Blog Graphics - 4 (6).png

Gluten Free Noodle Alternatives

Years ago, it was quite unheard of to have a noodle alternative. But recently, allergies to gluten have allowed many traditional flour noodle alternatives to appear.

Large flat noodles can be replaced by cabbage, zucchini or yellow squash slices, or eggplant. Rice can be replaced by cauliflower. Long, skinny noodles can be replaced by zucchini or yellow squash zoodles or spaghetti squash.

Below you’ll find recipes to make two of my go-to noodle alternatives. If I want the convenience of something out of a box or a more traditional noodle for things like pasta salad, then I look for a minimally processed, minimal ingredient alternative noodle such as lentils, rice flour, seaweed, etc.

How to Make Zucchini Noodles

You can use a zoodler to make noodles out of your zucchini. I use a simple vegetable peeler! You will need one small zucchini per adult.

Wash your zucchini. Cut the ends off the zucchini.

IMG_0924.jpg

Using a vegetable peeler, peel the zucchini down to the seeds, turning as you go. Depending on the angle you hold the vegetable peeler, you’ll get different size noodles. Do not peel the middle core with seeds. You can chop the core later or compost it. If you are the beginning stages of GAPS and sensitive to having a lot of seeds, you should dispose of the core piece.

IMG_0947.jpg

To a cast iron pan, add 2 tbsp of butter and 1 tbsp of avocado oil. Add the zucchini noodles and use your hands to quickly toss them in the butter and oil before they get too hot.

Sautee the zoodles. This means stir them and then let them sit - don’t continually stir!

After the noodles have cooked for 2-3 minutes, add a few pinches of salt. Adding the salt too early will cause the zucchini to sweat too much and get too wet. As it cooks, add more salt to taste. 

IMG_0960.jpg

After a few more minutes, add your herbs and spices. On early stages of GAPS, you would do fresh herbs. Later stages, you can use dried herbs. I usually do oregano, thyme, sage, garlic, and onion.

Then - enjoy!

How to Make Spaghetti Squash

Preheat oven to 400.

Slice spaghetti squash in half lengthwise.

IMG_1249.jpg

Remove seeds and strings in center. You can compost the seeds but you might get lots of volunteer spaghetti squash seedlings. (Which is not necessarily a bad thing.)

Roast in the oven for 35 minutes to an hour. It depends on the size of your squash. I like my squash to be very soft and well cooked. This is also important for the GAPS Diet to have well cooked vegetables.

IMG_1538.jpg

Check your squash after 35 minutes to see if they are softened and squishy. They should not be mush, but should feel much softer.

When they are soft, remove them from the oven. If you need your squash to cool faster, you can flip them over. I prefer to keep them with the middle side down so they continue while they cool.

Check your spaghetti squash with a fork to see if it is done. If not, cook for a while longer.

IMG_1544.jpg

Once the spaghetti squash is cooked, remove the insides of the squash by scraping a fork along the insides.

How to Make Beef Stock

We use a lot of chicken stock around here but that doesn’t mean it’s superior to other kinds of stock. We’ve recently been working on adding soup recipes that are especially delicious with beef stock.

IMG_8558.jpg

Whatever meat you use, remember it should be 80% meat and 20% bone with a joint. Depending on your cut, you might need to add additional meat to fulfill these ratios.

Meat stock is a pillar in healing a leaky gut but this rich food is beneficial to anyone. It provides large amounts of the immune system’s favorite foods, is very easy to digest, and is a great base to modify for other healing and nutritious recipes.  

Meat stock is meant to be a meal in itself. It’s short cooking time allows the meat to remain edible while still enriching stock with easy to absorb nutrients. This is the perfect thing to eat anytime you are feeling ill or stressed or “can’t get filled up” hungry. These are some of the reasons meat stock is such an important part of the healing process of the GAPS Diet. Any time you are consuming meat stock on a regular basis, your body will be receiving the healing benefit.

Meat stock can be made into a soup or simply drunk on its own as a hot beverage with a meal. You can also poach a couple eggs in your stock for a rich breakfast. Stock can also be used to cook rice or other soaked grains to increase their digestibility and nutritional content. In short, this should be considered a staple to have in your kitchen at all times, either in the fridge or the freezer.

There are a variety of ways you can skim the scum off the top of your stock. I usually use a slotted spoon but you can also use a mesh scum skimmer, a slotted spoon, a small strainer, or a large soup spoon.

Skimming the scum off the top is where you can tell the quality of your meat. If your meat is poor quality, had a lot of hormones or was poorly processed, you’ll get scum that’s heavy, grey and unappetizing. If you have a good quality meat, you will have a small amount of light almost white colored scum that appears as a lighter foam. This is also where you can tell if your meat has gone bad at this point.

You can store your stock in the fridge or the freezer, depending on how quickly you’ll consume the batch.

A NOTE ABOUT MEAT STOCK AND THE GAPS INTRO DIET:

When Dr. Natasha Campbell talks about meat in stage 1, she’s referring to eating primarily the gelatinous meats like skin, joints and connective tissue. When meat is added on Stage 2, she means the muscle eats, the only thing we Americans consider to be meat. Eating a lot of muscle meat can be constipating so if this is your issue, be sure to eat every last bit of the skin and joints.

Ingredients for Beef Stock:

  • Beef. I am using 3 ½ lbs of beef short ribs. Whatever meat you use, remember it should be 80% meat and 20% bone with a joint. Depending on your cut, you might need to add additional meat to fulfill these ratios.

  • Small handful of peppercorns

  • 2 Bay Leaves

  • Filtered Water

Directions for Beef Stock:

IMG_8567.jpg

Cut your beef ribs apart so that each rib is separated.

Add to a pot and fill with filtered water.

IMG_8574.jpg

Add peppercorns whole and bay leaves to the pot.

If you are using dry herbs and are on Intro GAPS, pre-stage 4, put your herbs in a reusable herb or tea infuser or muslin pouch for easy removal. This is not necessary if you are using fresh herbs.

IMG_8580.jpg

Turn pot up to high to bring to a boil. Skim the scum off the top of your pot.

Turn heat down lower to a simmer. Simmer beef stock for 3-5 hours. 

IMG_8725.jpg

Strain the beef stock using a large mesh strainer and a funnel or large measuring cup with a lip.

Place in jars or a large bowl and allow to cool completely before placing in the fridge or freezer.


HowtoMakeBeefStockfortheGAPSDiet.png

15 Minute Meal: Chicken & Alfredo Sauce, Two Ways

Alfredo Sauce used to be my favorite growing up but it often gave me a stomach-ache. I learned that was caused by a dairy intolerance and so I stopped eating it for many years. Now that I’ve healed my gut using the GAPS Protocol, I can freely enjoy dairy and alfredo sauce again!

Alfredo is a beautiful food because it is full of nourishing fats. It’s a food that gets a bad rap precisely because of this. Read more about the importance of fat here. Use alfredo sauce on whatever, like chicken, zoodles, pasta (I prefer Jovial as an ethically real food made option), or add extra stock and eat your alfredo as a nourishing, fat filled soup! Because it is so thick, you can also dip veggies or sourdough crackers in it.

I prefer a chunky sauce to a smooth sauce. However, if you want a pure smooth alfredo, you can add this sauce to a blender or use an immersion blender to really smooth it out.

Adding cheese to the sauce when it is too warm will cause it to curdle and ruin your dish. Keep the temperature low but not cool when you are ready to add the cheese. I made sure I could leave my finger in the sauce for a second or two before adding the cheese.

Below are two recipes to make alfredo sauce. If you’re following the GAPS Protocol, the bottom “Early Stage” recipe is for you and can be eaten from GAPS Stage 3 on as long as you are gently frying the mushrooms and onions in plenty of fat and do not burn. On the early stages of GAPS, top boiled chicken pieces with the alfredo sauce. On later stages, fry your pieces in fat! This recipe is a great way to get a lot of fat in your diet!

This recipe makes for a very cheesy and thick sauce. If you’d like a less dense sauce similar to more commercial canned varieties, simply add less cheese.

If you’re topping chicken, remember chicken cooks best high and quick so have your pan hot before adding your meat. I prefer small slices and pieces of chicken. Cook over high heat, turning every minute or so, until cooked through. 

Traditional Alfredo Sauce Ingredients:

  • 4 oz Mushrooms

  • ½ Onions

  • 3 Cloves of Garlic

  • 2-3 tbsp of butter

  • ½ tsp Salt, to taste. Depending on the saltiness of the cheese that you add, you may want to add less salt.

  • 1 tbsp Gelatin 

  • 2 cups of Whole Cream

  • 8 ounces of Freshly Grated Cheese (I used Havarit and Montery Jack but you can use any white cheese that you like)

Directions:

Alfredo Sauce is a great, fat rich meal that is simple to put together. Top chicken, zoodles or gluten free pasta with this easy sauce. Also includes a recipe for early stage GAPS Protocol. Recipe by Amy Mihaly, Be Well Clinic.

Roughly chop onion and slice mushrooms. Dice garlic.

Add at least 2 tbsp butter to a flat, large skillet. Once melted, add onions. Allow to cook for several minutes then add the mushrooms. If needed, add additional butter to give the mushrooms more fat to cook in.

In a small stock pot, add ¼ cup of filtered water and gelatin. Whisk mixture and allow to warm to blood temperature, about 100 degrees. Stir constantly to avoid burning.

Alfredo Sauce is a great, fat rich meal that is simple to put together. Top chicken, zoodles or gluten free pasta with this easy sauce. Also includes a recipe for early stage GAPS Protocol. Recipe by Amy Mihaly, Be Well Clinic.

Reduce mushroom and onion mixture to a simmer. Add in the cream and heat to blood temperature. If gelatin is heated before the cream is heated, remove from heat.

Once cream is heated, add gelatin mixture and mix until smooth. Add ½ tsp of salt and freshly ground pepper to taste. You can also use white pepper if you’d like to keep the sauce white. Remove the sauce from the heat.

Grate your cheese fresh. Pre-grated cheese has additives in it that are no good!

Alfredo Sauce is a great, fat rich meal that is simple to put together. Top chicken, zoodles or gluten free pasta with this easy sauce. Also includes a recipe for early stage GAPS Protocol. Recipe by Amy Mihaly, Be Well Clinic.

Add your cheese into the slightly cooled sauce mixture and allow to melt. Whisk fully to melt and blend the cheese. Takes about 4-5 minutes to fully melt the cheese.

Pour over and enjoy!

When reheating this sauce, bring it to temperature slowly.

Alfredo Sauce is a great, fat rich meal that is simple to put together. Top chicken, zoodles or gluten free pasta with this easy sauce. Also includes a recipe for early stage GAPS Protocol. Recipe by Amy Mihaly, Be Well Clinic.

Traditional Alfredo Sauce

Author: The Be Well Clinic

Ingredients

  • 4 oz Mushrooms
  • ½ Onions
  • 3 Cloves of Garlic
  • 3 tbsp of butter
  • ½ tsp Salt, to taste. Depending on the saltiness of the cheese that you add, you may want to add less salt.
  • 1 tbsp Gelatin
  • 2 cups of Whole Cream 
  • 8 ounces of Freshly Grated Cheese (I used Havarit and Montery Jack but you can use any white cheese that you like)

Instructions

  1. Roughly chop onion and slice mushrooms. Dice garlic.
  2. Add at least 2 tbsp butter to a flat, large skillet. Once melted, add onions. Allow to cook for several minutes then add the mushrooms. If needed, add additional butter to give the mushrooms more fat to cook in.
  3. In a small stock pot, add ¼ cup of filtered water and gelatin. Whisk mixture and allow to warm to blood temperature, about 100 degrees. Stir constantly to avoid burning.
  4. Reduce mushroom and onion mixture to a simmer. Add in the cream and heat to blood temperature. If gelatin is heated before the cream is heated, remove from heat.
  5. Once cream is heated, add gelatin mixture and mix until smooth. Add ½ tsp of salt and freshly ground pepper to taste. You can also use white pepper if you’d like to keep the sauce white. Remove the sauce from the heat.
  6. Grate your cheese fresh. Pre-grated cheese has additives in it that are no good!
  7. Add your cheese into the slightly cooled sauce mixture and allow to melt. Whisk fully to melt and blend the cheese. Takes about 4-5 minutes to fully melt the cheese.
  8. Pour over and enjoy!
  9. When reheating this sauce, bring it to temperature slowly.
Created using The Recipes Generator

Early Stage Gaps Alfredo Sauce:

  • 4 oz Mushrooms

  • ½ Onion

  • 3 Large Cloves of Garlic

  • 16 oz. Sour Cream

Directions:

Alfredo Sauce is a great, fat rich meal that is simple to put together. Top chicken, zoodles or gluten free pasta with this easy sauce. Also includes a recipe for early stage GAPS Protocol. Recipe by Amy Mihaly, Be Well Clinic.

Roughly chop onion and slice mushrooms. Dice garlic.

Add at least 2 tbsp butter to a flat, large skillet. Once melted, add onions. Allow to cook for several minutes then add the mushrooms. If needed, add additional butter to give the mushrooms more fat to cook in.

Alfredo Sauce is a great, fat rich meal that is simple to put together. Top chicken, zoodles or gluten free pasta with this easy sauce. Also includes a recipe for early stage GAPS Protocol. Recipe by Amy Mihaly, Be Well Clinic.

Once onions and mushrooms, turn off the heat. Add in the sour cream. Return to very low heat to allow the sour cream to warm and melt.

Add over boiled chicken or eat on it’s own.

How to make GAPS Legal Alfredo Sauce for Early Stags of the GAPS Protocol by Amy Mihaly, Be Well Clinic.

Early Stage GAPS Alfredo Sauce

Author: The Be Well Clinic

Ingredients

  • 4 oz Mushrooms
  • ½ Onion
  • 3 Large Cloves of Garlic
  • 16 oz. Sour Cream

Instructions

  1. Roughly chop onion and slice mushrooms. Dice garlic.
  2. Add at least 2 tbsp butter to a flat, large skillet. Once melted, add onions. Allow to cook for several minutes then add the mushrooms. If needed, add additional butter to give the mushrooms more fat to cook in.
  3. Once onions and mushrooms, turn off the heat. Add in the sour cream. Return to very low heat to allow the sour cream to warm and melt.
  4. Add over boiled chicken or eat on it’s own.
Created using The Recipes Generator


Alfredo Sauce is a great, fat rich meal that is simple to put together. Top chicken, zoodles or gluten free pasta with this easy sauce. Also includes a recipe for early stage GAPS Protocol. Recipe by Amy Mihaly, Be Well Clinic.

Butternut Squash French Fries

Butternut squash french fries are a labor of love. They are totally worth it but you may forget that during making them. The most time consuming part is cutting up the squash into french fry pieces. If you have the patience to do this, you will get rich, filling, crispy fries that are truly a great replacement for potatoes. 

When you’re purchasing your squash, try to find one with a long neck and more neck than gourd bottom. A medium size butternut squash makes enough fries for 2-4 people to enjoy a generous portion. If you need to make more, you can easily follow the same recipe with multiple squashes.

Often, when I make these fries for myself, I use only the neck of the squash due to the ease of cutting it into fry shaped pieces and will use the body of the squash to make a soup with small meatballs or squash pancakes. 

Based on Dr. Natasha Campbell-McBride’s new recommendations on butternut squash, it’s recommended to wait until you are on Full GAPS to make this recipe.

Ingredients for Butternut Squash:

  • Butternut Squash

  • 1-2 tbsp Tallow or Lard

  • 1 tsp Salt

  • Additional seasonings as desired

Directions for Butternut Squash:

IMG_1593.jpg

Cut the butternut squash at the base of the neck. Remove the skin of the butternut squash using the sharpest knife you can find, leaving as much of the meat on as you can.

Determine the size you want your french fries to be and cut the squash in half. Scrap out the squash innards.

IMG_1605.jpg

Slice your squash into long, thin slices resembling a french fry.

IMG_1700.jpg

Preheat oven to 400. Add 1-2 tbsp of tallow or lard to the fries, enough to coat them. Shake salt over the top.

Bake for approximately 30 minutes at 400. Stir every ten minutes. Then broil them for 5 minutes until crisp.

Salt them again immediately after they come out of the oven. Enjoy!

IMG_1779.jpg

Alternate Preparation:

Fill a large pot with filtered water. Bring to a boil on the stove.

Add the fry pieces to the pot of boiling water. Boil for 3-5 minutes. Preheat oven to 400.

Drain the water from the fries and remove from heat.

Add 1-2 tbsp of tallow or lard to the fries, enough to coat them. 

Lay them out onto a baking sheet covered with parchment paper.

Bake for approximately 40 minutes at 400. Then broil them for 5 minutes until crisp.


ButternutSquashFrenchFries.png

Butternut Squash French Fries

Author: The Be Well Clinic
Prep time: Cook time: Total time:

Ingredients:

  • Butternut Squash
  • 1-2 tbsp Tallow or Lard
  • 1 tsp Salt
  • Additional seasonings as desired

Instructions:

  1. Fill a large pot with filtered water. Bring to a boil on the stove.
  2. Cut the butternut squash at the base of the neck. Remove the skin of the butternut squash using the sharpest knife you can find, leaving as much of the meat on as you can.
  3. Determine the size you want your french fries to be and cut the squash in half. Scrap out the squash innards.
  4. Slice your squash into long, thin slices resembling a french fry.
  5. Preheat oven to 400. Add 1-2 tbsp of tallow or lard to the fries, enough to coat them. Shake salt over the top.
  6. Lay them out onto a baking sheet covered with parchment paper.
  7. Bake for approximately 30 minutes at 400. Stir every ten minutes. Then broil them for 5 minutes until crisp.
  8. Salt them again immediately after they come out of the oven. Enjoy!
Created using The Recipes Generator

Real Food Seven Layer Dip

I don’t know about you, but I grew up loving seven-layer dip! It was the best day ever when my mom would put it together and throw it in the oven to warm. Usually it was for a party or potluck we were attending, but sometimes she made it just for us, for lunch!

One day recently I was missing it, then realized how easy it would be to make it the real-food way! It’s an amazing mix of fats and fresh vegetables, with some beans to make it even more sustaining! If you make a large batch of sprouted refried beans and freeze them, the first layer of this recipe is as simple as pulling those beans to defrost. Then the rest of the layers just flow!

If you can’t eat chips right now, don’t worry! You can use sliced vegetables like peppers, cucumbers or zucchini as your “chip.” Mmm… delicious!

Enjoy!

IMG_9002.jpg
IMG_9086.jpg

Ingredients for Seven Layer Dip

Directions:

Preheat oven to 350.

IMG_9111.jpg

In a large serving dish, add a layer of refried beans. If you make them specifically for this recipe, allow them to cool before you add the additional layers.

IMG_9254.jpg

Add a layer of guacamole, then a layer of sour cream. Spread each layer evenly without pressing too hard or you’ll squish it into the layer below.

IMG_9270.jpg

Spoon your pico de gallo over the top. Try to avoid getting too much of the water onto the dip.

IMG_9283.jpg

Top with grated cheese. You want a white cheese; most yellow cheeses contain artificial coloring. Grate it yourself to avoid preservatives.

Slice olives and tomatoes and sprinkle over the top.

IMG_9330.jpg

Pop the dip into the oven for 10-15 minutes just to heat it. You can serve this cold, but warmed is just so much better!


HomemadeSevenLayerDip.png

Seven Layer Dip

Author:
Prep time: Cook time: Total time:

Ingredients:

Instructions:

  1. Preheat oven to 350.
  2. In a large serving dish, add a layer of refried beans. If you make them specifically for this recipe, allow them to cool before you add the additional layers.
  3. Add a layer of guacamole, then a layer of sour cream. Spread each layer evenly without pressing too hard or you’ll squish it into the layer below.
  4. Spoon your pico de gallo over the top. Try to avoid getting too much of the water onto the dip.
  5. Top with grated cheese. You want a white cheese; most yellow cheeses contain artificial coloring.
  6. Slice olives and tomatoes and sprinkle over the top.
  7. Pop the dip into the oven for 10-15 minutes just to heat it. You can serve this cold, but warmed is just so much better!
Created using The Recipes Generator

Mayo Free Egg Salad

Eggs are a great non-meat protein source. While I usually recommend eating eggs yolks running to preserve the cholesterol on them, sometimes a hard boiled egg is hard to beat!

This is a recipe that could easily be doubled or tripled for a party. You can serve it spread on a romaine lettuce leaf, as shown, or you can use it as a dip for cucumber slices or carrots.. Feel free to use whatever herbs you have in the fridge and experiment to find your favorites.

This recipe is legal on GAPS Stage 3 if you omit the paprika. Otherwise, it is legal on GAPS Stage 6. The ingredient list is for 1-2 servings.

Ingredients for Mayo Free Egg Salad:

  • 4 Eggs

  • ½ cup Sour Cream or Creme Fraiche

  • 1 small stalk Celery

  • 1 large Green Onion

  • ¼ - ½  tsp Salt

  • 1 tsp Pepper

  • ½ tsp Paprika

  • Parsley

Directions for Mayo Free Egg Salad:

Hard boil eggs. (Recipe here)

mayo-free-egg-salad-recipe-egg-salad-on-gaps-sour-cream-egg-salad

Once eggs are cooled, peel them.

mayo-free-egg-salad-recipe-egg-salad-on-gaps-sour-cream-egg-salad

Coarsely chop eggs, celery and green onion.

Add to a mixing bowl and add in pepper, salt to taste, and sour cream. 

mayo-free-egg-salad-recipe-egg-salad-on-gaps-sour-cream-egg-salad

Gently mix to coat and then sprinkle paprika over the top. Mix gently.

Serve and enjoy!

mayo-free-egg-salad-recipe-egg-salad-on-gaps-sour-cream-egg-salad

Mayo Free Egg Salad

Author:
Prep time: Cook time: Total time:

Ingredients:

  • 4 Eggs
  • ½ cup Sour Cream or Creme Fraiche
  • 1 small stalk Celery
  • 1 large Green Onion
  • ¼ - ½ tsp Salt
  • 1 tsp Pepper
  • ½ tsp Paprika
  • Parsley

Instructions:

How to cook Mayo Free Egg Salad

  1. Hard boil eggs. (Recipe here.)
  2. Once eggs are cooled, peel them.
  3. Coarsely chop eggs, celery and green onion.
  4. Add to a mixing bowl and add in pepper, salt to taste, and sour cream.
  5. Gently mix to coat and then sprinkle paprika over the top. Mix gently.
  6. Serve and enjoy!
Created using The Recipes Generator
EggSalad.png

Easy Jambalaya

I know from personal experience that eating soups for most or all meals can become routine and unappealing. So I have been looking for soup recipes with unique tastes or flavor profiles to shake things up. 

I’ve never really had traditionally made jambalaya so I’m not sure how well this stacks up but it is delicious! It’s legal on Stage 4 of the GAPS Diet as long as you are tolerating nightshades (tomatoes and peppers.)

jambalaya-how-to-make-jambalya-on-the-gaps-diet-eating-seafood-on-gaps-how-to-eat-seafood-on-gaps-what-to-eat-on-gaps-diet-soups-for-gaps-easy-jambalaya-recipe

One of the most important ways to replenish a malnourished body is to eat a variety of nutrients that come from a variety of sources. Depending on where you live (i.e. a landlocked state like Colorado) seafood may not be a class of food you commonly partake in. When you purchase seafood, it should always be wild caught and sourced from a location that is not off the coast of China. When seafood is fresh, it tastes very mild. As it ages, it will become more and more “fishy.” Flash frozen seafood is often the best because was preserved in the freshest state possible.

Jambalaya is traditionally served over rice. While rice isn’t GAPS Legal, if it is something you are tolerating or eating currently, I have a blog post on how to properly prepare rice here. If you are on full GAPS, wild rice is legal and you can learn how to properly prepare wild rice here. I think it’s delicious to eat this jambalaya on it’s own and don’t miss the rice.

Ingredients for Jambalaya:

  • 3 tbsp Lard

  • 7 cups of Stock

  • 2 Chicken Breasts, cubed

  • 1 lb. Scallops

  • 10 oz. Salmon

  • 2 lb Jumbo Shrimp

  • 9-10 Medium Tomatoes

  • 3 Stalks of Celery

  • ½ Large Onion

  • 2 Bell Pepper

  • 2 ½ tbsp Salt

  • 1 tbsp Paprika

  • 1 tbsp Cayenne Pepper

  • 1 tbsp Freshly Ground Pepper

  • 1 tbsp Dried Oregano

  • ⅛ cup parsley

Directions for How to Prepare Jambalaya:

jambalaya-how-to-make-jambalya-on-the-gaps-diet-eating-seafood-on-gaps-how-to-eat-seafood-on-gaps-what-to-eat-on-gaps-diet-soups-for-gaps-easy-jambalaya-recipe

In a large stock pot, add 2 tbsp of lard and heat on medium high heat. Add chicken once it’s heated and stir to cook in lard. 

In a bowl, combine the spices. Roughly chop the parsley.

Generously coat the chicken with a few shakes of the spice mixture.

Remove the chicken pieces from the pan while leaving the juices in the pot.

Roughly chop the tomatoes. Add them to the pot. Add 1 - 2 tsp of the spice mixture. Simmer for about 10 - 15 minutes until soft. Stir constantly to prevent sticking. Immersion blend them tomatoes slightly. You still want a few chunks in.

jambalaya-how-to-make-jambalya-on-the-gaps-diet-eating-seafood-on-gaps-how-to-eat-seafood-on-gaps-what-to-eat-on-gaps-diet-soups-for-gaps-easy-jambalaya-recipe

Pour the stock into the pot with the tomatoes. Add in chopped parsley.

Chop celery into small half moons. Add the celery to the pot with the tomato and stock mixture.

Chop the onions into bite size pieces. Cut the bell pepper into chunks. 

jambalaya-how-to-make-jambalya-on-the-gaps-diet-eating-seafood-on-gaps-how-to-eat-seafood-on-gaps-what-to-eat-on-gaps-diet-soups-for-gaps-easy-jambalaya-recipe

In a cast iron skillet, heat 1 tbsp of lard. When it’s melted, add the onions and bell peppers to fry. Sprinkle with 1 - 2 tsp of seasoning mixture.

Mince the garlic. Add to the pan with the onions and bell peppers. Cook for about a minute.

Add the chicken back into the tomato mixture pot. 

jambalaya-how-to-make-jambalya-on-the-gaps-diet-eating-seafood-on-gaps-how-to-eat-seafood-on-gaps-what-to-eat-on-gaps-diet-soups-for-gaps-easy-jambalaya-recipe

If necessary, remove the skin from the salmon. Cube the salmon into chunks. Add the salmon to the onion and bell pepper mixture.

jambalaya-how-to-make-jambalya-on-the-gaps-diet-eating-seafood-on-gaps-how-to-eat-seafood-on-gaps-what-to-eat-on-gaps-diet-soups-for-gaps-easy-jambalaya-recipe

Rinse the scallops with filtered water. Add the scallops to the onion and bell pepper mixture. Sprinkle the remaining seasoning mixture over the top of the scallops and stir. Let cook for a few minutes.

Rinse the jumbo shrimp. Add them directly to the pot of the tomato mixture.

jambalaya-how-to-make-jambalya-on-the-gaps-diet-eating-seafood-on-gaps-how-to-eat-seafood-on-gaps-what-to-eat-on-gaps-diet-soups-for-gaps-easy-jambalaya-recipe

After a few minutes, add the scallops, salmon, onions, and bell pepper mixture to the large stock pot with the tomatoes.

Simmer everything for about 15 to 20 minutes to allow the seafood to cook and the flavors to meld. Be careful to not overcook your seafood.

Enjoy!

jambalaya-how-to-make-jambalya-on-the-gaps-diet-eating-seafood-on-gaps-how-to-eat-seafood-on-gaps-what-to-eat-on-gaps-diet-soups-for-gaps-easy-jambalaya-recipe

EasyGAPSJambalaya.png

Easy Jambalaya

Author:
Prep time: Cook time: Total time:

Ingredients:

  • 3 tbsp Lard
  • 7 cups of Stock
  • 2 Chicken Breasts, cubed
  • 1 lb. Scallops
  • 10 oz. Salmon
  • 2 lb Jumbo Shrimp
  • 9-10 Medium Tomatoes
  • 3 Stalks of Celery
  • ½ Large Onion
  • 2 Bell Pepper
  • 2 ½ tbsp Salt
  • 1 tbsp Paprika
  • 1 tbsp Cayenne Pepper
  • 1 tbsp Freshly Ground Pepper
  • 1 tbsp Dried Oregano
  • ⅛ cup parsley

Instructions:

How to cook Easy Jambalaya

  1. In a large stock pot, add 2 tbsp of lard and heat on medium high heat. Add chicken once it’s heated and stir to cook in lard.
  2. In a bowl, combine the spices. Roughly chop the parsley.
  3. Generously coat the chicken with a few shakes of the spice mixture.
  4. Remove the chicken pieces from the pan while leaving the juices in the pot.
  5. Roughly chop the tomatoes. Add them to the pot. Add 1 - 2 tsp of the spice mixture. Simmer for about 10 - 15 minutes until soft. Stir constantly to prevent sticking. Immersion blend them tomatoes slightly. You still want a few chunks in.
  6. Pour the stock into the pot with the tomatoes. Add in chopped parsley.
  7. Cop celery into small half moons. Add the celery to the pot with the tomato and stock mixture.
  8. Chop the onions into bite size pieces. Cut the bell pepper into chunks.
  9. In a cast iron skillet, heat 1 tbsp of lard. When it’s melted, add the onions and bell peppers to fry. Sprinkle with 1 - 2 tsp of seasoning mixture.
  10. Mince the garlic. Add to the pan with the onions and bell peppers. Cook for about a minute.
  11. Add the chicken back into the tomato mixture pot.
  12. If necessary, remove the skin from the salmon. Cube the salmon into chunks. Add the salmon to the onion and bell pepper mixture.
  13. Rinse the scallops with filtered water. Add the scallops to the onion and bell pepper mixture. Sprinkle the remaining seasoning mixture over the top of the scallops and stir. Let cook for a few minutes.
  14. Rinse the jumbo shrimp. Add them directly to the pot of the tomato mixture.
  15. After a few minutes, add the scallops, salmon, onions, and bell pepper mixture to the large stock pot with the tomatoes.
  16. Simmer everything for about 15 to 20 minutes to allow the seafood to cook and the flavors to meld. Be careful to not overcook your seafood.
  17. Enjoy!
Created using The Recipes Generator

What to do with Chicken on the GAPS Diet

Chicken is such a versatile and easy to meat to cook! It’s a mild meat so it can be easily adapted to many different recipes and flavors.

Purchase the highest quality meat you can afford! For me, this means buying chickens directly from farmers whenever possible. If I buy a chicken from a store, I buy organic and antibiotic free. And make sure you get the organs whenever possible! If you have the space, time and allowance from your city, consider raising your own chickens. I loved raising chickens, both for the fresh eggs and the delicious meat. I knew exactly where my food was coming from - and everything that had gone into it!

To help your budget, make sure you’re using as much of your chicken as possible. Chicken feet and gizzards can be added to stocks. The skin and joint cartilage can be blended in a stock. Liver can be made into pate. And the chicken heart is my favorite treat!

Below are some of my favorite recipes for chicken!

Chicken Stock

Meat stock can be made into a soup or simply drunk on its own as a hot beverage with a meal. You can also poach a couple eggs in your stock for a rich breakfast. Stock can also be used to cook rice or other soaked grains to increase their digestibility and nutritional content. In short, this should be considered a staple to have in your kitchen at all times, either in the fridge or the freezer.

Gluten Free, Dairy Free, Egg Free

Whole Roasted Chicken with Salt

This is a very simple recipe that makes a whole, juicy roasted chicken. It takes just two simple ingredients and is a very hands off recipe.

Gluten Free, Dairy Free, Egg Free

Honey Roasted Chicken

Roasting a chicken is a great and simple way to make a meal. This particular roasting recipe requires a little more attention than others, as you need to baste and adjust the temperature often, but it's definitely worth it!

Gluten Free, Dairy Free, Egg Free

Chicken Tortilla Soup

This is a good GAPS soup because of all of the sour cream. It wasn't too spicy, and it's different than plain meat stock that you typically eat on Stage 1. There are many different ways to make it, so it's also easy to switch up to match your tastes.

Gluten Free, Dairy Free, Egg Free

Creamy Garlic Chicken Soup

Because you immersion blend the vegetables into the stock, this is a great recipe to also blend in the the joint cartilage, skin and any of the other parts of the chicken that you may be tempted to throw away. I separate the chicken into three parts usually - bones, chicken meat, and everything else.

Gluten Free, Dairy Free, Egg Free

Creamy Chicken Pot Pie Soup

The key to this soup being reminiscent of a pot pie is to cut the vegetables into bite size pieces and make a consistency that’s more like a stew than a soup. Included in this recipe are a few tricks to thicken the soup so it more closely resembles the gravy that we associate with chicken pot pie.

Gluten Free, Dairy Free, Egg Free

Coconut Carrot Gluten Free Birthday Cake

IMG_9185.jpg

In celebration of my friend's birthday years ago, I made an "Amazingly Delicious Carrot Cake" (that's what the recipe was called, at least). I’ve modified the recipe a bit and I am so excited to have found such a delicious-looking recipe.

One ingredient in it that I have never even heard of *gasp, I know* is coconut butter (or coconut manna--they can be used interchangeably). This is not a more expensive version of coconut oil, as I first thought, but a coconut puree. I bought a jar (a bit pricey) at our local health food grocery store, or you can make your own.

Coconut butter is very sweet, and can be used as a little sweet snack. However, because there is more fiber, and it is much sweeter than coconut oil, if you are following GAPS, you should not introduce it until Introduction stage 6 or full GAPS. But if you can tolerate it, I would recommend trying this delicious coconut treat!

Sometimes I wonder why we even want to eat processed sugar, this cake is so rich, moist and delicious! Sadly for you, the photos cannot portray the enticing aroma I am experiencing! You will just have to try it out for yourself!

I have also made this recipe using the leftover pulp from juicing carrots. Add a little bit of additional water to keep the cake from getting too dry.

I made this as one cake in a 9x13 pan and then cut it in half and stacked to decorate it. You can also make it in two smaller pans. Just make sure you are using glass, not aluminum to bake with. Baking it as a sheet cake also means you can cut it into shapes for themed birthdays.

Ingredients for Coconut Carrot Gluten Free Birthday Cake:

For the Cake

  • 2 cups coconut manna (1 15 oz jar)

  • 9 dates

  • 1 cup carrots, about two large carrots

  • 2 tsp cinnamon

  • ½ cup raisins

  • ½ cup shredded coconut (if you have coconut flakes, just put them in a food processor for a minutes)

  • 1 tsp sea salt

  • 1 tsp vanilla extract

  • 10 organic eggs

For the Frosting

  • 2 cups cultured cream or sour cream

  • 2 tbsp honey 

  • 1 tsp vanilla extract

  • Zest of 1 Lemon

  • ½ tsp Lemon Juice

  • Pinch of sea salt

Directions for Coconut Carrot Gluten Free Birthday Cake:

IMG_8785.jpg

In a pot on the stove, start your coconut manna melting by adding the jar to water. Melt over low heat. It can take up to 30 minutes to melt depending on how big and full your jar is.

Start your dates rehydrating. Remove the pits and add the dates to a bowl that can have hot water in it (I use glass.). Add boiling water to the bowl, enough to cover the dates. Let sit for 20 minutes until dates are rehydrated

IMG_8810.jpg

Finely shred two large carrots with a food processor. 

Once dates are soft and squishy, about 20 minutes, put them in a food processor, without liquid. Slowly add more liquid as they blend until they are a smooth consistency but not too liquidy.

IMG_8804.jpg

In a large bowl, crack all the eggs. Whisk with an electric whisk or immersion blender to get the maximum amount of air into them.

Grease the baking dish with butter or the fat of your choice. If you have a butter allergy, coconut oil is acceptable.

Stir the ingredients into the bowl with eggs until they are all distributed evenly.

IMG_8880.jpg

Add the mixture to the greased baking dish.

Bake in the preheated oven for 40 minutes until the top is golden and the cake is set.

Allow to cool slightly before removing from the pan.

IMG_9123.jpg

Mix the frosting in a bowl. 

Decorate the cake as desired and enjoy!

IMG_9173.jpg

If you don’t have a tray, plate or board to decorate your cake on:

IMG_9134.jpg

Make one simply with leftover cardboard and aluminum foil.

IMG_9137.jpg

Cut your cardboard to size. Cover with aluminum foil and tape underneath so nothing slips.

Add parchment paper to the top where the cake will sit so your food is not sitting on metal.

IMG_9168.jpg

Decorate your cake!


Author:
prep time: cook time: total time:

ingredients:

For the Cake
  • 2 cups coconut manna (1 15 oz jar)
  • 9 dates
  • 1 cup carrots, about two large carrots
  • 2 tsp cinnamon
  • ½ cup raisins
  • ½ cup shredded coconut (if you have coconut flakes, just put them in a food processor for a minutes)
  • 1 tsp sea salt
  • 1 tsp vanilla extract
  • 10 organic eggs
For the Frosting
  • 2 cups cultured cream or sour cream
  • 2 tbsp honey
  • 1 tsp vanilla extract
  • Zest of 1 Lemon
  • ½ tsp Lemon Juice
  • Pinch of sea salt

instructions:

How to cook

  1. In a pot on the stove, start your coconut manna melting by adding the jar to water. Melt over low heat. It can take up to 30 minutes to melt depending on how big and full your jar is.
  2. Start your dates rehydrating. Remove the pits and add the dates to a bowl that can have hot water in it (I use glass.). Add boiling water to the bowl, enough to cover the dates. Let sit for 20 minutes until dates are rehydrated
  3. Finely shred two large carrots with a food processor.
  4. Once dates are soft and squishy, about 20 minutes, put them in a food processor, without liquid. Slowly add more liquid as they blend until they are a smooth consistency but not too liquidy.
  5. In a large bowl, crack all the eggs. Whisk with an electric whisk or immersion blender to get the maximum amount of air into them.
  6. Grease the baking dish with butter or the fat of your choice. If you have a butter allergy, coconut oil is acceptable.
  7. Stir the ingredients into the bowl with eggs until they are all distributed evenly.
  8. Add the mixture to the greased baking dish.
  9. Bake in the preheated oven for 40 minutes until the top is golden and the cake is set.
  10. Allow to cool slightly before removing from the pan.
  11. Mix the frosting in a bowl.
  12. Decorate the cake as desired and enjoy!
If you don’t have a tray, plate or board to decorate your cake on:
  1. Make one simply with leftover cardboard and aluminum foil.
  2. Cut your cardboard to size. Cover with aluminum foil and tape underneath so nothing slips.
  3. Add parchment paper to the top where the cake will sit so your food is not sitting on metal.
  4. Decorate your cake!
Created using The Recipes Generator
CoconutCarrotBirthdayCake.png

A Simple Cabbage Soup Recipe

I love this cabbage soup. Maybe it’s because of my German roots. 

Cabbage is good for stimulating hydrochloric acid production in your stomach. This is an important first step of food digestion. If your stomach pH is greater than 3 (meaning less acidic) the enzymes that we use to digest protein don’t even get turned on! This means your body won’t give the signal to digest the protein and the proteins that you eat won’t get digested. Cabbage is also very high in Vitamin C. The Vitamin C concentration is much higher in sauerkraut, however eating cabbage in any form is a great way to get important nutrients into your body. Cabbage also contains high amounts of Vitamin K. Vitamin K is a fat soluble vitamin that helps with inflammation.

Try cutting your cabbage into long strips to resemble noodles for pasta loving children. 

I recommend pairing this soup with our meatballs. You can drop balls of raw meat in to cook in the stock and the pairing would be legal on GAPS Stage 1. If you’re on more advanced stages (or not following the GAPS Diet) you can drop frozen pre-cooked meatballs into the soup or serve the meatballs on the side.

Ingredients:

  • 1 Cabbage

  • 1 stalk of Celery

  • 5 cloves of Garlic

  • 6 cups Stock (I used pork as a nod to my German roots but you can also use chicken or beef)

  • 2 tsp salt

Directions:

Bring stock to a boil in a large pot.

Chop up cabbage into bite size pieces. Slice the celery into half moons. Remove the garlic wrappings and cut in half.

Cabbage soup is very simple! It takes just a few simple ingredients but it’s a very filling and nutritious soup. It’s GAPS legal so try it today! Recipe by Amy Mihaly, Certified GAPS Practitioner in Colorado.

Add the cabbage, celery and garlic into the stock. Add salt to the pot to help draw out the moisture in the cabbage.

Simmer on medium heat for 30 to 45 minutes until the cabbage is soft.

Enjoy!

Cabbage soup is very simple! It takes just a few simple ingredients but it’s a very filling and nutritious soup. It’s GAPS legal so try it today! Recipe by Amy Mihaly, Certified GAPS Practitioner in Colorado.

Cabbage soup is very simple! It takes just a few simple ingredients but it’s a very filling and nutritious soup. It’s GAPS legal so try it today! Recipe by Amy Mihaly, Certified GAPS Practitioner in Colorado.

Cabbage Soup

Author:
prep time: cook time: total time:

ingredients:

  • 1 Cabbage
  • 1 stalk of Celery
  • 5 cloves of Garlic
  • 6 cups Stock (I used pork as a nod to my German roots but you can also use chicken or beef)
  • 2 tsp salt

instructions:

How to cook Cabbage Soup

  1. Bring stock to a boil in a large pot.
  2. Chop up cabbage into bite size pieces. Slice the celery into half moons. Remove the garlic wrappings and cut in half.
  3. Add the cabbage, celery and garlic into the stock. Add salt to the pot to help draw out the moisture in the cabbage.
  4. Simmer on medium heat for 30 to 45 minutes until the cabbage is soft.
  5. Enjoy!
Created using The Recipes Generator

GAPS Legal Pumpkin Soup

Pumpkin is a winter squash but it contains less sugar than most winter squashes, making it ideal for the GAPS Introduction Diet. Pumpkins are also very easily grown so if you’re a beginner gardener looking for an easy first crop or if you only have a small amount of growing space available. 

While other winter squashes like butternut squash can be tolerated by people on the GAPS Introduction Diet, it’s best to do pumpkin because it’s milder and with less sugar.

Pumpkin puree is very easy to freeze in individual portions. You can also sprout the pumpkin seeds. Both mean you can enjoy your own homegrown produce throughout the winter! Once you have the puree for this pumpkin soup recipe, you can also use it to make a pumpkin pie or use it to make GAPS Pancakes.

I usually eat a small bowl of pureed soup alongside a much larger bowl of another soup. It’s a great way to have a multi course meal on the GAPS Intro Diet. 

Ingredients for Pumpkin Soup:

  • 2-3 Small Pumpkins

  • 4 cups of Chicken Stock

  • ¼ of a White Onion

  • 1 inch of Fresh Ginger

  • 1 tsp Salt

  • 2 Bay Leaves

  • 1 Cinnamon Stick

Directions for Pumpkin Soup:

Pumpkins are great for your digestive system! This pumpkin soup is made with a few simple ingredients and is legal on the GAPS Diet. Find the pumpkin soup recipe and other GAPS recipes at bewellclinic.net. Recipe by Amy Mihaly, Certified GAPS Practi…

Preheat the oven to 400.

Cut each pumpkin in half. Remove the seeds and set aside to make sprouted pumpkin seeds.

Set each pumpkin open face side down on a baking sheet lined with parchment paper. Place the pumpkins in the oven.

Pumpkins are great for your digestive system! This pumpkin soup is made with a few simple ingredients and is legal on the GAPS Diet. Find the pumpkin soup recipe and other GAPS recipes at bewellclinic.net. Recipe by Amy Mihaly, Certified GAPS Practi…

Roast the pumpkins for about 45 minutes in the oven until the tops are soft.

Remove them from the oven and flip the pumpkins over so they cool faster.

Pumpkins are great for your digestive system! This pumpkin soup is made with a few simple ingredients and is legal on the GAPS Diet. Find the pumpkin soup recipe and other GAPS recipes at bewellclinic.net. Recipe by Amy Mihaly, Certified GAPS Practi…

Using a fork, carefully remove the pumpkin flesh from the skin and add to a bowl. If it’s not well cooked, it won’t remove from the skin easily.

Warm chicken stock on the stove.

Pumpkins are great for your digestive system! This pumpkin soup is made with a few simple ingredients and is legal on the GAPS Diet. Find the pumpkin soup recipe and other GAPS recipes at bewellclinic.net. Recipe by Amy Mihaly, Certified GAPS Practi…

Add 3 cups of pumpkin to the warmed stock. Immersion blend until well pureed. Pureeing the pumpkin on it’s own will allow the flavors of the other ingredients to meld better.

Pumpkins are great for your digestive system! This pumpkin soup is made with a few simple ingredients and is legal on the GAPS Diet. Find the pumpkin soup recipe and other GAPS recipes at bewellclinic.net. Recipe by Amy Mihaly, Certified GAPS Practi…

Chop onions into bite size pieces so they cook quickly. Add to the pureed mixture. 

Slice ginger and add to the pureed mixture. Add the salt and mix well.

Add bay leaves and cinnamon stick. Simmer for 20 minutes. Be sure to stir as the pumpkin and liquid will separate and the pumpkin will stick to the bottom of the pan. 

Pumpkins are great for your digestive system! This pumpkin soup is made with a few simple ingredients and is legal on the GAPS Diet. Find the pumpkin soup recipe and other GAPS recipes at bewellclinic.net. Recipe by Amy Mihaly, Certified GAPS Practi…

Remove the bay leaves and cinnamon stick from the mixture. Immersion blend everything again.

Enjoy! I topped mine with a dollop of creme fraiche but this is optional. Leave it off if you are not tolerating dairy.

Pumpkins are great for your digestive system! This pumpkin soup is made with a few simple ingredients and is legal on the GAPS Diet. Find the pumpkin soup recipe and other GAPS recipes at bewellclinic.net. Recipe by Amy Mihaly, Certified GAPS Practi…

Pumpkins are great for your digestive system! This pumpkin soup is made with a few simple ingredients and is legal on the GAPS Diet. Find the pumpkin soup recipe and other GAPS recipes at bewellclinic.net. Recipe by Amy Mihaly, Certified GAPS Practi…

GAPS Legal Pumpkin Soup

Author:
prep time: cook time: total time:

ingredients:

  • 2-3 Small Pumpkins
  • 4 cups of Chicken Stock
  • ¼ of a White Onion
  • 1 inch of Fresh Ginger
  • 1 tsp Salt
  • 2 Bay Leaves
  • 1 Cinnamon Stick

instructions:

How to cook GAPS Legal Pumpkin Soup

  1. Preheat the oven to 400.
  2. Cut each pumpkin in half. Remove the seeds and set aside to make sprouted pumpkin seeds.
  3. Set each pumpkin open face side down on a baking sheet lined with parchment paper. Place the pumpkins in the oven.
  4. Roast the pumpkins for about 45 minutes in the oven until the tops are soft.
  5. Remove them from the oven and flip the pumpkins over so they cool faster.
  6. Using a fork, carefully remove the pumpkin flesh from the skin and add to a bowl. If it’s not well cooked, it won’t remove from the skin easily.
  7. Warm chicken stock on the stove.
  8. Add 3 cups of pumpkin to the warmed stock. Immersion blend until well pureed. Pureeing the pumpkin on it’s own will allow the flavors of the other ingredients to meld better.
  9. Chop onions into bite size pieces so they cook quickly. Add to the pureed mixture.
  10. Slice ginger and add to the pureed mixture. Add the salt and mix well.
  11. Add bay leaves and cinnamon stick. Simmer for 20 minutes. Be sure to stir as the pumpkin and liquid will separate and the pumpkin will stick to the bottom of the pan.
  12. Remove the bay leaves and cinnamon stick from the mixture. Immersion blend everything again.
  13. Enjoy! I topped mine with a dollop of creme fraiche but this is optional. Leave it off if you are not tolerating dairy.
Created using The Recipes Generator

Roasted Fermented Pumpkin Seeds

Pumpkin seeds are like any seed (or bean or nut.) They should be properly prepared before consuming to neutralize the acid and make them easier to digest. Sprouting your seeds is essentially germinating. Germination changes the chemical structure of the seeds, chemically changing it from a closed off protector of the treasure inside to an open seed ready to bring nutrition.  It’s best to sprout or otherwise properly prepare your seeds to allow more nutrition to be bioavailable to you.

Pumpkin seeds also have an especially helpful quality in that they help rid your body of parasites by attacking the parasites and intestinal worms. If you suspect you have parasites or worms, consuming pumpkin seeds is a good idea. However, be sure to take it slow and don’t overdo it.

Ingredients for Fermented Pumpkin Seeds:

  • 3 small pumpkins

  • ½ tsp Real Salt

  • Water

Directions for Fermented Pumpkin Seeds:

Fermented pumpkin seeds can help your digestion by getting rid of parasites in your gut. Improve your gut health with this GAPS Diet legal recipe for fermented pumpkin seeds. Recipe by Amy Mihaly, Certified GAPS Practitioner in Colorado.

Cut the pumpkins in half.

Fermented pumpkin seeds can help your digestion by getting rid of parasites in your gut. Improve your gut health with this GAPS Diet legal recipe for fermented pumpkin seeds. Recipe by Amy Mihaly, Certified GAPS Practitioner in Colorado.

Remove the seeds from the inside and separate from the pumpkin flesh.

Fermented pumpkin seeds can help your digestion by getting rid of parasites in your gut. Improve your gut health with this GAPS Diet legal recipe for fermented pumpkin seeds. Recipe by Amy Mihaly, Certified GAPS Practitioner in Colorado.

Rinse the pumpkin seeds.

Fermented pumpkin seeds can help your digestion by getting rid of parasites in your gut. Improve your gut health with this GAPS Diet legal recipe for fermented pumpkin seeds. Recipe by Amy Mihaly, Certified GAPS Practitioner in Colorado.

Add the pumpkin seeds to a jar.

Cover the seeds with water, add salt and shake. Place in a sunny location and leave to soak overnight. As long as the jar is closed tightly, these can be put up next to other ferments.

Drain and rinse in the morning. Fill with new water.

Repeat draining, rinsing and adding new water until tiny sprouts have formed.

Rinse one final time. Season with salt and roast in the oven at 250 for several hours until cooked.


Roasted Fermented Pumpkin Seeds

Author:
prep time: cook time: total time:

ingredients:

  • 3 small pumpkins
  • ½ tsp Real Salt
  • Water

instructions:

How to cook Roasted Fermented Pumpkin Seeds

  1. Cut the pumpkins in half.
  2. Remove the seeds from the inside and separate from the pumpkin flesh.
  3. Rinse the pumpkin seeds.
  4. Add the pumpkin seeds to a jar.
  5. Cover the seeds with water, add salt and shake. Place in a sunny location and leave to soak overnight. As long as the jar is closed tightly, these can be put up next to other ferments.
  6. Drain and rinse in the morning. Fill with new water.
  7. Repeat draining, rinsing and adding new water until tiny sprouts have formed.
  8. Rinse one final time. Season with salt and roast in the oven at 250 for several hours until cooked.
Created using The Recipes Generator
RoastedFermentedPumpkinSeeds.png

How to Make Your Own Dairy Free, Egg Free Sausage

I was searching for the perfect sausage recipe. I discovered I don’t like a sausage that is heavily flavored with sage. My ideal tasting sausage was Jimmy Dean’s sausage which, of course, contains MSG. 

I needed to find a recipe that would keep me from occasionally caving and eating Jimmy Dean. While watching one of my favorite YouTube shows, 18th Century Cooking, I saw their Oxford Gate sausage recipe from Martha Washington’s Book of Cookery which seemed ideal! I’ve modified it below.

This sausage is the ideal breakfast sausage. It wouldn’t work well as a sausage with marinara sauce. It’s great alongside eggs or in an omelette. If I don’t want to eat cheese, it’s also a great, easy snack on the go.

The original recipe for this called for suet, which is rendered kidney fat. The suet melts while cooking and creates a lighter patty. That’s not something I usually have on hand but this recipe works just as well without it. If you don’t mind a denser patty (think like a hamburger) than you’ll enjoy this sausage without the suet.

This is a dairy free, egg free sausage recipe which is great if you’re not currently tolerating either.

You’ll notice a spice used in this recipe is Blade Mace. Blade mace is the shell that surrounds and protects nutmeg. Mace has a sharper taste than nutmeg but if you don’t have blade mace, equal amounts of ground nutmeg can be substituted.

What will you eat alongside this sausage?

If you’re looking for a DIY sausage recipe that tastes like Jimmy Dean but is made with real ingredients, try this one! It’s GAPS Legal, good for the Whole 30 Diet and paleo. Recipe by Amy Mihaly, Certified GAPS Practitioner in Colorado.

Ingredients for How to Make Your Own Sausage:

  • 1 lb fresh ground pork

  • 1 1/2 tsp. Salt

  • ½ tsp Ground Pepper

  • ¼ tsp Blade Mace, coarsely ground

  • 1 ½ tsp Sage

  • ¼ tsp Ground Cloves

  • 2 - 3 tbsp Lard

Directions for How to Make Your Own Sausage:

If you’re looking for a DIY sausage recipe that tastes like Jimmy Dean but is made with real ingredients, try this one! It’s GAPS Legal, good for the Whole 30 Diet and paleo. Recipe by Amy Mihaly, Certified GAPS Practitioner in Colorado.

In a large bowl, mix the meat with the spices.

If you’re looking for a DIY sausage recipe that tastes like Jimmy Dean but is made with real ingredients, try this one! It’s GAPS Legal, good for the Whole 30 Diet and paleo. Recipe by Amy Mihaly, Certified GAPS Practitioner in Colorado.

Heat a cast iron pan on low to medium heat. Add 2 - 3 tbsp of lard to the pan, enough to give yourself a good amount of cooking fat. If your pan is too hot, your sausages will burn!

If you’re looking for a DIY sausage recipe that tastes like Jimmy Dean but is made with real ingredients, try this one! It’s GAPS Legal, good for the Whole 30 Diet and paleo. Recipe by Amy Mihaly, Certified GAPS Practitioner in Colorado.

Roll sausages into finger like shapes. Add them to a pan, a small amount at a time.

These need tending! As soon as you can, move them on the bottom of the pan to prevent them from burning. Then roll them gently to cook on all sides. Because they are thicker and take longer to cook, you do need to roll them a bit to prevent them cooking too long on one side.

If you’re looking for a DIY sausage recipe that tastes like Jimmy Dean but is made with real ingredients, try this one! It’s GAPS Legal, good for the Whole 30 Diet and paleo. Recipe by Amy Mihaly, Certified GAPS Practitioner in Colorado.

Cook the sausage for about 5-7 minutes, depending on how thick you make them. They will start to feel more solid as they cook.

Enjoy warm or cold! Cold sausage tastes more salty to me so if you plan to eat them cold, adjust your salt slightly. These also freeze extremely well, cooked or raw! I cooked and took a large batch of them with me when I went hunting and ate them for breakfast cold. 

Creamy Garlic Chicken Soup

This is one of my favorite soups! It’s warm and creamy and so delicious.

This soup is easy to make in large or small batches depending on how many servings you need. A small batch requires one small chicken, about 4 lbs, one head of garlic, and one glass baking dish of vegetables. A small batch will make about 4-6 hearty servings of soup. A large batch requires a larger chicken, about 6 lbs, two heads of garlic, and two glass baking dishes of vegetables.

Keeping the garlic in their paper shells roasts the garlic while preventing them from getting burnt. Don’t worry if your paper peels a little off the garlic - it’s still ok!

This soup requires a LOT of salt. If you don’t salt this soup enough, it is very bland and boring.

Because you immersion blend the vegetables into the stock, this is a great recipe to also blend in the the joint cartilage, skin and any of the other parts of the chicken that you may be tempted to throw away. I separate the chicken into three parts usually - bones, chicken meat, and everything else.

Ingredients for Creamy Garlic Chicken Soup:

  • 1 Chicken

  • 1 Zucchini (Courgettes)

  • 1 Yellow Squash

  • ½ Large Head of Cauliflower or 1 Small Cauliflower

  • 1-2 Heads of Garlic, Cloves separated but still in their paper

  • 3-4 tbsp Lard (Learn to make your own lard here.)

  • 1 tbsp Salt

  • ½ Bunch Parsley

Directions for Creamy Garlic Chicken Soup:

Zucchini, yellow squash, cauliflower and garlic are roasted with lard and then blended together to form the base of this creamy garlic chicken soup. This soup is GAPS legal and great for Whole 30 or Paleo. It’s dairy free and gluten free but still c…

Start a chicken stock on the stove. (Find the recipe for a chicken stock here.)

Cut the vegetables into even size pieces for even roasting. For the cauliflower, you can remove or keep however much of the fibrous material (stems), depending on how much you are tolerating.  Start the oven preheating to 400 degrees.

Roasted zucchini, cauliflower, yellow squash and garlic are the base for this soup. It’s delicious and filling while still being dairy free and gluten free. It’s a soup for the GAPS diet but is also great for Whole 30 or Paleo diets since it’s made …

Add the squash, zucchini, cauliflower and garlic to a baking dish with the lard. Melt the lard in the oven on top of the vegetables and then stir to fully coat the vegetables with the melted lard. If you do not have enough lard to fully coat your vegetables, add more! Season with salt.

Roast the coated vegetables uncovered in the oven for about an hour. The vegetables are done when they are softened and slightly browned. Set them aside to cool. 

You can make your own chicken stock to use in this recipe for creamy garlic chicken soup. It’s a GAPS legal soup but is also great for Paleo or Whole 30 diets since it’s made with real food. It gets it’s creaminess from a medley of blended vegetable…

About ten minutes before the stock is done, add in ½ bunch of parsley for an added dose of Vitamin C and magnesium. 

Strain your stock but keep the joint meats, skin and everything else to blend into this creamy garlic chicken soup. It’s delicious, full of fat, hearty and made with real food so it’s perfect for the GAPS Diet, Whole 30, Weston A Price or Paleo. Rec…

Once the stock is done, strain the stock and set the cooked meat aside to cool. 

Once the roasted vegetables have cooled, peel the garlic paper off. Wait until the garlic is cooled - if you are impatient and peel it too early, it will burn your hands.

Add the roasted vegetables to a large pot. Add 12 cups of stock to the pot. 

This creamy garlic chicken soup uses a whole chicken. Set aside the bones and meat from your stock but blend everything else into the soup base to create a creamy soup that can’t be beat! It’s great for the GAPS Diet, Weston A Price, Whole 30 or Pal…

Once your meat is cooled, remove it from the bone. Separate the joint cartilage and skin from the meat. In the above photo, the top left is the bones, the bottom plate is the meat and the plate on the right has everything else that will be added into the stock and blended.

Roasted cauliflower, zucchini, yellow squash and garlic get blended with chicken skins to create a creamy base that keeps this creamy garlic chicken soup dairy free but still delicious! Recipe for GAPS Diet, Whole 30, Weston A Price or Paleo by Amy …

Add the skin, cartilage and other non-meat bits (no bones) to the pot. 

Immersion blend everything together until it is well blended and the vegetables are in small pieces.

Add shredded chicken to a base of roasted vegetables and blended chicken skins for a creamy, dreamy soup. Creamy Garlic Chicken Soup recipe for the GAPS Diet, Whole 30, Weston A Price or Paleo by Amy Mihaly, Certified GAPS Practitioner in Colorado.

Add the meat from your chicken into the blended stock. Add 1 tbsp of salt.

Cook for 15-20 minutes to blend the flavors.

This soup is a dream! Creamy Garlic Chicken soup is made with a blend of cauliflower, zucchini, yellow squash and garlic. It’s legal for the GAPS Diet, Whole30, Weston A Price and Paleo diets because it’s made with simple, real food. Recipe by Amy M…

Enjoy! I topped mine with sliced avocado. However, this does make it legal on GAPS Stage 3.


Creamy Garlic Chicken Soup

Author:
prep time: cook time: total time:

ingredients:

  • 1 Chicken
  • 1 Zucchini (Courgettes)
  • 1 Yellow Squash
  • ½ Large Head of Cauliflower or 1 Small Cauliflower
  • 1-2 Heads of Garlic, Cloves separated but still in their paper
  • 3-4 tbsp Lard
  • 1 tbsp Salt
  • ½ Bunch Parsley

instructions:

How to cook Creamy Garlic Chicken Soup

  1. Start a chicken stock on the stove.
  2. Cut the vegetables into even size pieces for even roasting. For the cauliflower, you can remove or keep however much of the fibrous material (stems), depending on how much you are tolerating. Start the oven preheating to 400 degrees.
  3. Add the squash, zucchini, cauliflower and garlic to a baking dish with the lard. Melt the lard in the oven on top of the vegetables and then stir to fully coat the vegetables with the melted lard. If you do not have enough lard to fully coat your vegetables, add more! Season with salt.
  4. Roast the coated vegetables uncovered in the oven for about an hour. The vegetables are done when they are softened and slightly browned. Set them aside to cool.
  5. About ten minutes before the stock is done, add in ½ bunch of parsley for an added dose of Vitamin C and magnesium.
  6. Once the stock is done, strain the stock and set the cooked meat aside to cool.
  7. Once the roasted vegetables have cooled, peel the garlic paper off. Wait until the garlic is cooled - if you are impatient and peel it too early, it will burn your hands.
  8. Add the roasted vegetables to a large pot. Add 12 cups of stock to the pot.
  9. Once your meat is cooled, remove it from the bone. Separate the joint cartilage and skin from the meat. Add the skin, cartilage and other non-meat bits (no bones) to the pot.
  10. Immersion blend everything together until it is well blended and the vegetables are in small pieces.
  11. Add the meat from your chicken into the blended stock. Add 1 tbsp of salt.
  12. Cook for 15-20 minutes to blend the flavors.
  13. Enjoy! I topped mine with sliced avocado. However, this does make it legal on GAPS Stage 3.
Created using The Recipes Generator
This soup is a dream! Creamy Garlic Chicken soup is made with a blend of cauliflower, zucchini, yellow squash and garlic. It’s legal for the GAPS Diet, Whole30, Weston A Price and Paleo diets because it’s made with simple, real food. Recipe by Amy M…

Beef Tongue Recipe

I recently got half a cow and had a beef tongue in my freezer! I wanted to use all of meat and wanted to give this recipe a try. Turns out - I love beef tongue!

Beef  tongue is a very delicious dark meat with a rich flavor because of it’s high fat content. It’s about 66% fat! It’s also a highly used muscle so it’s very tender. 

Beef tongue is very simple to prepare. I prefer to boil it, like the recipe below, but you can also put it in a slow cooker for 8 hours. Either way, the stock that you’re left with is rich and delicious. I’ve kept my beef tongue stock before and used it to make Egyptian Lentil Soup

You can also shred beef tongue to use it in tacos or slice it to use in a stir fry. Because it looks like any other cut of meat, no one will know it’s tongue! It’s not an organ meat so it doesn’t have the strong taste associated with it like livers or hearts to.

Did you recently get a full cow and you’re unsure what to do with the beef tongue? This is an easy recipe for boiled beef tongue. Beef tongue is a mild meat, like a pork tenderloin. GAPS Diet legal recipe by Amy Mihaly, Certified GAPS Practitioner i…

Ingredients for Beef Tongue:

  • 4.4 lbs of beef tongue

  • 1 ½ tbsp Salt

  • 1 tsp Peppercorns

  • 5 Cloves of Garlic, Whole

  • 4 Bay leaves

Directions for Beef Tongue:

Rinse the beef tongue thoroughly.

Did you recently get a full cow and you’re unsure what to do with the beef tongue? This is an easy recipe for boiled beef tongue. Beef tongue is a mild meat, like a pork tenderloin. GAPS Diet legal recipe by Amy Mihaly, Certified GAPS Practitioner i…

Place beef tongue in a large pot. Fill with enough water to cover the beef tongue. Gently press the beef tongue down so it is under the water.

Did you recently get a full cow and you’re unsure what to do with the beef tongue? This is an easy recipe for boiled beef tongue. Beef tongue is a mild meat, like a pork tenderloin. GAPS Diet legal recipe by Amy Mihaly, Certified GAPS Practitioner i…

Add salt, peppercorns, garlic and bay leaves to the pot. Or to prevent inadvertently taking out peppercorns with the scum, add your aromatics after you skim the scum. 

Did you recently get a full cow and you’re unsure what to do with the beef tongue? This is an easy recipe for boiled beef tongue. Beef tongue is a mild meat, like a pork tenderloin. GAPS Diet legal recipe by Amy Mihaly, Certified GAPS Practitioner i…

Bring beef tongue and water to a boil. Skim the scum off the top. 

Turn heat down to medium and cook for about two hours, until the outer skin starts to peel off . You want everything to be on a high simmer, low boil.

Did you recently get a full cow and you’re unsure what to do with the beef tongue? This is an easy recipe for boiled beef tongue. Beef tongue is a mild meat, like a pork tenderloin. GAPS Diet legal recipe by Amy Mihaly, Certified GAPS Practitioner i…

Once the outer skin can be peeled away, remove the tongue onto a plate to allow to cool. 

Strain the aromatics out of the stock and set aside to use in another recipe. (I suggest this Egyptian Lentil Soup recipe.) 

Did you recently get a full cow and you’re unsure what to do with the beef tongue? This is an easy recipe for boiled beef tongue. Beef tongue is a mild meat, like a pork tenderloin. GAPS Diet legal recipe by Amy Mihaly, Certified GAPS Practitioner i…

Once the tongue is cool, peel off the skin completely. Then chop up the meat as you would any other cut of meat!

Enjoy!


Did you recently get a full cow and you’re unsure what to do with the beef tongue? This is an easy recipe for boiled beef tongue. Beef tongue is a mild meat, like a pork tenderloin. GAPS Diet legal recipe by Amy Mihaly, Certified GAPS Practitioner i…

Beef Tongue

Author:
prep time: cook time: total time:

ingredients:

  • 4.4 lbs of beef tongue
  • 1 ½ tbsp Salt
  • 1 tsp Peppercorns
  • 5 Cloves of Garlic, Whole
  • 4 Bay leaves

instructions:

How to cook Beef Tongue

  1. Rinse the beef tongue thoroughly.
  2. Place beef tongue in a large pot. Fill with enough water to cover the beef tongue. Add salt, peppercorns, garlic and bay leaves to the pot. Or to prevent inadvertently taking out peppercorns with the scum, add your aromatics after you skim the scum.
  3. Bring beef tongue and water to a boil. Skim the scum off the top.
  4. Turn heat down to medium and cook for about two hours, until the outer skin starts to peel off . You want everything to be on a high simmer, low boil.
  5. Once the outer skin can be peeled away, remove the tongue onto a plate to allow to cool.
  6. Strain the aromatics out of the stock and set aside to use in another recipe. (I suggest thisEgyptian Lentil Soup recipe.)
  7. Once the tongue is cool, peel off the skin completely. Then chop up the meat as you would any other cut of meat!
  8. Enjoy!
Created using The Recipes Generator

Sprouted Refried Navy Beans Recipe

Beans make everything delicious! The old adage about beans isn’t true. If you’re worried about the unsightly smells and noises that beans so often bring, worry no more. The reason that beans are known for producing flatulence is because of the strong anti-nutrients present in the bean seed. Once you properly prepare these beans, the anti-nutrients are no longer present so there’s no reason for any symptoms.  When they’re properly prepared and you can tolerate them, navy beans are a good addition to your diet. If you do experience flatulence while eating the beans, it means your body is not ready for the starch and you still have work to do on your gut flora. 

Even if you are tolerating them well, remember that beans are a starch and should always be consumed alongside a generous amount of animal fat. 

These are great served with anything that has a Mexican theme with them. I like them next to eggs, like a Huervos Rancheros sort of feel.

IMG_5209.jpg

You can freeze this recipe into smaller portion sizes so that you can pull it out quickly to use as a side for a meal. I tried freezing this in muffin tins since they are about the correct proportion of a serving of beans. I lined the muffin tin with unbleached large baking cups and then scooped beans into them. I let them freeze over a weekend and then took them out of the muffin tin and placed them in a gallon bag to protect them from freezer burn. 

Makes about 12 servings

Ingredients for Sprouted Refried Beans

  • 6 cups sprouted navy beans

  • ½ onion

  • ½ jalapeno

Directions for Sprouted Refried Beans

IMG_4871.jpg

Add sprouted navy beans to a large pot.

IMG_4975.jpg

Bring to a boil and cook for about 2 hours until the beans are very soft. The beans will foam as they cook. You can skim the foam and the extra bean pods off of the top if you’d like. Just be sure not to scoop out any of your good sprouted beans!

Add onion and jalapeno into the pot once beans are soft. If too much water is gone, add a little bit into the pot so you don’t scorch the beans on the bottom of the pot. 

IMG_5126.jpg

Immersion blend the beans when they are soft. They should be smoother but still have a little bit of texture to them.

Put them back on the stove. Stir frequently for five minutes over medium high heat to evaporate the liquid.

This is the basic refried bean recipe.

IMG_5173.jpg

My favorite way to eat these is to add a cup of beans to a cast iron skillet. Add in a half a stick of butter. Cook together until well mixed.

IMG_5197.jpg

Add a fried egg and a few softened pepper pieces. 

Sprouted Refried Beans

prep time: cook time: total time:

ingredients:

  • 6 cups sprouted navy beans
  • ½ onion
  • ½ jalapeno

instructions:

How to cook Sprouted Refried Beans

  1. Add sprouted navy beans to a large pot.
  2. Bring to a boil and cook for about 2 hours until the beans are very soft. The beans will foam as they cook. You can skim the foam and the extra bean pods off of the top if you’d like. Just be sure not to scoop out any of your good sprouted beans!
  3. Add onion and jalapeno into the pot once beans are soft. If too much water is gone, add a little bit into the pot so you don’t scorch the beans on the bottom of the pot.
  4. Immersion blend the beans when they are soft. They should be smoother but still have a little bit of texture to them.
  5. Put them back on the stove. Stir frequently for five minutes over medium high heat to evaporate the liquid.
  6. This is the basic refried bean recipe.
  7. My favorite way to eat these is to add a cup of beans to a cast iron skillet. Add in a half a stick of butter. Cook together until well mixed.
  8. Add a fried egg and a few softened pepper pieces.
Created using The Recipes Generator
39.png

A Chili Recipe for the GAPS Diet

I was excited to make this chili as I hadn’t had it for years! For a long time, I have been following the GAPS Protocol and didn’t want to take the time to properly prepare the navy beans needed for this recipe. Even now that I can tolerate more foods, I tend to avoid chili because most chilis are made from beans stored in a can, which should be avoided if possible. However, this homemade chili was well worth the effort because of how delicious it was - and how many meals it made!

IMG_4866.jpg

This recipe uses GAPS Legal navy beans. Navy beans are GAPS legal because they have a lower amount of starch content compared to other beans. They are legal on full GAPS. These beans have also been soaked and sprouted for easier and better digestion. (Learn more about properly preparing grains here!)

This chili is a great way to get in the healing meat stock that should be part of your every day diet since it contains meat stock as the liquid.

In my opinion, one of the things that makes chili chili is tomatoes! But some people who have a leaky gut are sensitive to nightshades, which includes tomatoes. If that’s you, this is a recipe to look forward to in the future once you have healed your gut. 

There are many great toppings for chili and I’m sure you have your favorites! Some suggestions are sour cream or yogurt, cheese, bacon or cracklings (see recipe for making cracklings here) green onions, avocado.

This is a hearty meal that’s easy to make in large batches and then frozen for later use. I’m looking forward to enjoying this chili on many cool fall and winter evenings.

Ingredients for Chili

  • 6 cups of sprouted navy beans

  • 6 Large Tomatoes

  • Onion

  • Garlic

  • 1 lb. Ground Beef, you could substitute any ground protein

  • ½ Jalepeno

  • 2 tbsp Lard

  • 4 cups chicken stock

  • 7 oz Tomato Paste (make sure it is canned in glass, never in metal!)

  • 2 tsp Salt

  • 1 tsp Paprika

  • ¼ tsp Chili Powder

  • ¼ tsp Cayenne Pepper

  • 1 tsp Cumin

  • Chili Peppers (two shakes)

Directions for Chili

IMG_4863.jpg

Sprout your beans 48 hours in advance. To sprout your beans, soak them in filtered water overnight. In the morning, rinse them. Leave them on the counter in the sunlight with a cover to keep the bugs away and rinse every twelve hours. Drain them completely before you rinse them or you will get mold. Once they sprout, they’re done. Rinse them for a final time. Make sure they are well drained. Put the lid back on the bowl and put the beans into the fridge.

IMG_4975.jpg

Add 6 cups of sprouted navy beans to a large pot. Bring to a boil and simmer for 1.5 hours. The beans will foam as they cook. You can skim the foam and the extra bean pods off of the top if you’d like. Just be sure not to scoop out any of your good sprouted beans!

IMG_5008.jpg

While the beans cook, start your tomatoes stewing and breaking down. Add an inch of water to a stock pot. Remove the cores of the tomatoes. Roughly chop the tomatoes. You don’t have to be very precise since eventually they will cook down and eventually be smashed. Add 1 tsp salt.

Once the beans are softened (but not soft as they will cook longer with the rest of the chili) drain them and set them aside with a lid over the pot to keep them warm.

Melt two tbsp of lard into a cast iron skillet. Add more fat as needed. 

IMG_5074.jpg

Once lard is melted, add ground beef and onion. Cook until beef is browned. Add in garlic and jalapeno.

IMG_5168.jpg

Add beef mixture to bean pot. Add in spices. Add in stewed tomatoes, stock, and tomato paste. Mix gently. Add a teaspoon of salt and ½ tsp pepper.

Return to the stove and let simmer for about an hour so that the flavors meld together.

IMG_5245.jpg

Top with your favorite toppings and enjoy!


GAPS Legal Chili Recipe

prep time: cook time: total time:

ingredients:

  • 6 cups of sprouted navy beans
  • 6 Large Tomatoes
  • Onion
  • Garlic
  • 1 lb. Ground Beef, you could substitute any ground protein
  • ½ Jalepeno
  • 2 tbsp Lard
  • 4 cups chicken stock
  • 7 oz Tomato Paste (make sure it is canned in glass, never in metal!)
  • 2 tsp Salt
  • 1 tsp Paprika
  • ¼ tsp Chili Powder
  • ¼ tsp Cayenne Pepper
  • 1 tsp Cumin
  • Chili Peppers (two shakes)

instructions:

How to cook GAPS Legal Chili Recipe

  1. Sprout your beans 48 hours in advance. To sprout your beans, soak them in filtered water overnight. In the morning, rinse them. Leave them on the counter in the sunlight with a cover to keep the bugs away and rinse every twelve hours. Drain them completely before you rinse them or you will get mold. Once they sprout, they’re done. Rinse them for a final time. Make sure they are well drained. Put the lid back on the bowl and put the beans into the fridge.
  2. Add 6 cups of sprouted navy beans to a large pot. Bring to a boil and simmer for 1.5 hours. The beans will foam as they cook. You can skim the foam and the extra bean pods off of the top if you’d like. Just be sure not to scoop out any of your good sprouted beans!
  3. While the beans cook, start your tomatoes stewing and breaking down. Add an inch of water to a stock pot. Remove the cores of the tomatoes. Roughly chop the tomatoes. You don’t have to be very precise since eventually they will cook down and eventually be smashed. Add 1 tsp salt.
  4. Once the beans are softened (but not soft as they will cook longer with the rest of the chili) drain them and set them aside with a lid over the pot to keep them warm.
  5. Melt two tbsp of lard into a cast iron skillet. Add more fat as needed.
  6. Once lard is melted, add ground beef and onion. Cook until beef is browned. Add in garlic and jalapeno.
  7. Add beef mixture to bean pot. Add in spices. Add in stewed tomatoes, stock, and tomato paste. Mix gently. Add a teaspoon of salt and ½ tsp pepper.
  8. Return to the stove and let simmer for about an hour so that the flavors meld together.
  9. Top with your favorite toppings and enjoy!
Created using The Recipes Generator
38.png

GAPS Legal Chicken Pot Pie Soup

I have fond memories of chicken pot pie growing up. I recently learned it’s one of my mom’s favorite foods, which is probably why we enjoyed it often. She at times would make her own but we would usually have the individual frozen pot pies. 

The key to this soup being reminiscent of a pot pie is to cut the vegetables into bite size pieces and make a consistency that’s more like a stew than a soup. Included in this recipe are a few tricks to thicken the soup so it more closely resembles the gravy that we associate with chicken pot pie.

In case you aren’t already convinced by the title, here are a couple other reasons you should try this recipe:

  1. Soup is easy to make in a large batch making it great to feed a crowd or to freeze for later.

  2. You just might find some distant childhood memories while eating it.

  3. The vegetables in pot pie can vary so you can use up what you have on hand.

  4. With a specific flavor profile, it can help expand your soup repertoire. 

Ingredients for GAPS Legal Chicken Pot Pie Soup

  • 1 Whole Chicken

  • 8 Whole Carrots

  • 4 Celery Stalks

  • 1 Yellow Onion

  • 10 oz. Frozen Peas

  • 2 sprig of Tarragon

  • 2 sprig of Basil

Directions for GAPS Legal Chicken Pot Pie Soup

IMG_4915.jpg

Prepare your stock first. Cut up the entire chicken (See how to break down a chicken here.) Set breast meat aside. Add the rest of a chicken to a large stock pot filled with filtered water. Bring to a boil.

Cube chicken breasts, keeping meat around the same size.

Cut up 3 carrots, 2 celery stalks and ½ onions. 

IMG_5021.jpg

Once chicken is brought to a boil, skim off any scum. Add in the aromatics: carrots, celery, onions, tarragon and basil.

Boil for an hour and half until chicken is done.

IMG_5108.jpg

Once chicken is done, remove the chicken pieces from the stock pot. Set aside to cool. Keep the remaining yummy stock on the stove.

IMG_5122.jpg

Once chicken has cooled, remove the chicken meat from the bones. Remove all the meat, joints and connective tissue from the bones. It’s all good stuff! Set the skin aside. The skin will be blended into the stock. Add the bones back to the stock.

Continue to simmer the stock for another 30 - 45 minutes.

IMG_5002.jpg

Chop up remaining carrots, celery and onion. Roughly chop the cooked chicken into bite sized pieces.

Strain the stock. Add 8 cups of stock to a seperate pot. Add in the chicken skin and any organ meats. Blend the skin into the stock with an immersion blender.

Add in chopped carrots, celery, and onion. Cook for 20 minutes.

IMG_5271.jpg

When carrots are soft, add in chopped chicken pieces and the frozen peas. Add fresh tarragon and basil. Add additional salt and a few turns of a pepper grinder.

Cook for twenty minutes, until peas are warmed.

Serve warm!

For added creaminess, I recommend adding sour cream, cultured cream, ghee, butter, or heavy whipping cream, whichever you are tolerating. Make sure to add any probiotic foods into your bowl after serving so as not to kill the live microbes.

GAPS Legal Chicken Pot Pie Soup

prep time: cook time: total time:

ingredients:

  • 1 Whole Chicken
  • 8 Whole Carrots
  • 4 Celery Stalks
  • 1 Yellow Onion
  • 10 oz. Frozen Peas
  • 2 sprig of Tarragon
  • 2 sprig of Basil

instructions:

How to cook GAPS Legal Chicken Pot Pie Soup

  1. Prepare your stock first. Cut up the entire chicken (See how to break down a chicken here.) Set breast meat aside. Add the rest of a chicken to a large stock pot filled with filtered water. Bring to a boil.
  2. Cube chicken breasts, keeping meat around the same size.
  3. Cut up 3 carrots, 2 celery stalks and ½ onions.
  4. Once chicken is brought to a boil, skim off any scum. Add in the aromatics: carrots, celery, onions, tarragon and basil.
  5. Boil for an hour and half until chicken is done.
  6. Once chicken is done, remove the chicken pieces from the stock pot. Set aside to cool. Keep the remaining yummy stock on the stove.
  7. Once chicken has cooled, remove the chicken meat from the bones. Remove all the meat, joints and connective tissue from the bones. It’s all good stuff! Set the skin aside. The skin will be blended into the stock. Add the bones back to the stock.
  8. Continue to simmer the stock for another 30 - 45 minutes.
  9. Chop up remaining carrots, celery and onion. Roughly chop the cooked chicken into bite sized pieces.
  10. Strain the stock. Add 8 cups of stock to a seperate pot. Add in the chicken skin and any organ meats. Blend the skin into the stock with an immersion blender.
  11. Add in chopped carrots, celery, and onion. Cook for 20 minutes.
  12. When carrots are soft, add in chopped chicken pieces and the frozen peas. Add fresh tarragon and basil. Add additional salt and a few turns of a pepper grinder.
  13. Cook for twenty minutes, until peas are warmed.
  14. Serve warm!
  15. For added creaminess, I recommend adding sour cream, cultured cream, ghee, butter, or heavy whipping cream, whichever you are tolerating. Make sure to add any probiotic foods into your bowl after serving so as not to kill the live microbes.
Created using The Recipes Generator
36.png

Full GAPS Legal Fried Rice

We had fried rice a lot growing up! It’s a good “kitchen sink” recipe. You can use almost any ingredients you have on hand. It also comes together fairly quickly, especially if you’re like us and usually have rice in the fridge.

One of the reasons I chose white rice for this recipe is because on the transition to the GAPS Intro diet, or at any time during the GAPS Intro diet, if you or your practitioner feel that your body is in need of some carbohydrates, this is a simple carbohydrate that many of us relate to. While it’s  not a whole grain, which generally we prefer, the husk of a whole grain can be harder to digest. White rice that’s been soaked is fairly easy to digest and fairly untroublesome for the gut.

This is a quick and easy meal.

To make it GAPS legal, substitute wild rice for the white rice. 

One of the keys to the recipe is find a true correctly fermented soy sauce. Soy should only ever be eaten in a properly fermented state. When it’s properly fermented, it’s legal on the Full GAPS Diet. I found a properly fermented soy sauce from Ohsawa Organic called Nama Shoyu. It’s an unpasteurized soy sauce and delicious!

IMG_5388.jpg

There are “classic” fried rice vegetables but truly you can change this recipe to use any vegetables you have in the fridge. In this version I used carrots, celery, onions, red cabbage and green onion. You could also use any type of summer squash like yellow squash or zucchini, broccoli, cauliflower, swiss chard, shredded brussel sprouts, snow peas, snap peas, green peas, or green beans. We always made it with water chestnuts and bean sprouts growing up. I’m not sure if these are GAPS legal but I’m very doubtful they would be. What vegetable combination is your favorite?

Ingredients for GAPS Legal Fried Rice

  • 2 cups of rice

  • 4 cups stock

  • Carrots

  • Onions

  • Red Cabbage

  • Green Onions

  • 3 tbsp Lard or Other Animal Fat

  • 4-6 cloves of Garlic, depending on size

  • 2 Eggs

  • 1.5 tbsp Soy Sauce (see note about correctly fermented soy sauce)

Directions for GAPS Legal Fried Rice:

24 Hours Before:

Soak your rice overnight. Place in warm filtered water with 4 tbsp of yogurt or whey.

The Next Day:

Rinse rice under filtered water.

Add 2 cups of rice to 4 cups of stock. Cook rice in the stock for 15 minutes until the stock is absorbed. 

Chop all vegetables. The smaller you chop them, the faster they’ll cook. Make sure you slice your vegetables the same size for even cooking. 

Add 3 tbsp of lard to a  cast iron pan. 

IMG_5311.jpg

When adding vegetables, add the ones that take the longest to cook in first, usually the hardest ones. So for me, I added the carrots and celery first. Add in cabbage and onions.

Add 1-2 tsps of soy sauce into the cast iron pan. This will start to create the sticky sauce. 

IMG_5316.jpg

A tip in sauteing vegetables: let them sit for a minute or two to get brown. Then move them to cook other sides. 

IMG_5352.jpg

Once your vegetables have cooked, add in the rice and stir.

IMG_5359.jpg

Crack two eggs into a bowl and scramble them. Add them into the cast iron pan and mix well.

IMG_5370.jpg

Add in about 1 tbsp of soy sauce and mix everything together.

Serve alongside more soy sauce on the table and enjoy!

GAPS Legal Fried Rice

prep time: cook time: total time:

ingredients:

  • 2 cups of rice
  • 4 cups stock
  • Carrots
  • Onions
  • Red Cabbage
  • Green Onions
  • 3 tbsp Lard or Other Animal Fat
  • 4-6 cloves of Garlic, depending on size
  • 2 Eggs
  • 1.5 tbsp Soy Sauce (see note about correctly fermented soy sauce)

instructions:

How to cook GAPS Legal Fried Rice

  1. 24 Hours Before:
  2. Soak your rice overnight. Place in warm filtered water with 4 tbsp of yogurt or whey.
  3. The Next Day:
  4. Rinse rice under filtered water.
  5. Add 2 cups of rice to 4 cups of stock. Cook rice in the stock for 15 minutes until the stock is absorbed.
  6. Chop all vegetables. The smaller you chop them, the faster they’ll cook. Make sure you slice your vegetables the same size for even cooking.
  7. Add 3 tbsp of lard to a cast iron pan.
  8. When adding vegetables, add the ones that take the longest to cook in first, usually the hardest ones. So for me, I added the carrots and celery first. Add in cabbage and onions.
  9. Add 1-2 tsps of soy sauce into the cast iron pan. This will start to create the sticky sauce.
  10. A tip in sauteing vegetables: let them sit for a minute or two to get brown. Then move them to cook other sides.
  11. Once your vegetables have cooked, add in the rice and stir.
  12. Crack two eggs into a bowl and scramble them. Add them into the cast iron pan and mix well.
  13. Add in about 1 tbsp of soy sauce and mix everything together.
  14. Serve alongside more soy sauce on the table and enjoy!
Created using The Recipes Generator
35.png