nutrient-dense food

Nutritional Healing Program at Be Well Clinic

At Be Well Clinic, we believe that our bodies
were created to be able to heal and thrive
when they are given what they need.


In our Nutritional Healing Program we primarily focus on the 3 following beliefs: 


  1. We believe that in order to heal, we must give our bodies foods which contain the nutrients they need. When our bodies have the nutrients needed, amazing healing can take place: diagnoses reversed, lifelong aches and pains withdrawn, chronic depression and anxiety lifted. We believe, first and foremost, these nutrients come from real, traditionally-prepared whole foods. We also recognize that not all foods are created equal. Many foods are harmful to our bodies - they create more symptoms, reduce our body’s abilities to heal, grow and develop, and cause chronic illness. Only when we know which foods our bodies need at specific times, and which foods cause additional stress on our bodies, can we take charge of our own health. 

  2. We believe that emotions are instrumental to healing. If we address only the physical, and not the emotional, we may see some healing, but often do not see the full healing that we desire for ourselves and our patients. We believe that in order to find true healing, to move past plateaus and to find peace, doing emotional work alongside nutritional work is crucial. 

  3. We believe that healing is not found in isolation. We humans were created to be in community. This means that we are meant to do life with others - eating, playing, celebrating, worshiping, mourning, and healing. Community in healing may look like your family, a practitioner, or a support group of people going through similar struggles as you. The more supportive of a community one has, the deeper the healing. It is important to heal with those who think that you are strong and capable to heal, not ones that think you are crazy, lazy, or wasting your time. 

With these 3 key elements in mind, we offer 3 levels to our Nutritional Healing Program. Each one includes working with nutrition, emotions, and community in order to heal. One of the 3 program levels is appropriate for you, no matter where you are starting from. If you wish to heal naturally from symptoms of leaky gut, which include (but are not limited to): food allergies and intolerances, digestive disorders, autoimmune disorders, mental illness, brain and neurological symptoms, skin issues, hormonal concerns, sleep and energy problems, chronic pain and inflammation, we would like to support you. 

Where you currently are in your healing journey will determine which level is most applicable for you. Read the descriptions below to find out, and if you are not sure which would be best for you, please schedule an inquiry call so that one of our practitioners can work with you to decide where to start. 


Nutritional Healing Program Level 1:

This program is for individuals and families who are looking to heal from chronic and acute symptoms, and know that their nutrition needs a reset, but they are not sure what nutrition advice is right for them. 

In this 12-week program we work to bring cleansing to your home and body by removing foods and substances in your home that are causing harm and increased symptoms, and eating foods that are meant to soothe, heal, repair and replenish. 

  • You will work one-on-one with a Certified GAPS Practitioner: a nutrition practitioner trained in healing the gut to then heal the mind and the rest of the body. 

  • You will learn new cooking techniques, how the body works in relation to food, what nutritional deficiencies your own body has, and how to replenish these nutrients appropriately. 

  • You will be given sample shopping lists and meal plans to help simplify your meal time planning. 

  • You will also be enrolled in the Getting Started On GAPS online course (normally $997) which will give you in depth information and training to help you start strong on your healing journey. 

  • Additionally, you will have 3 appointments with an Emotional Work Practitioner who is trained in addressing emotions in order to help heal chronic illness. 

  • You will receive a journal created by Amy Mihaly, founder of Be Well Clinic, to help you document foods, symptoms, supplements and practices as you work through this program.  


Out of the 3 programs, this is where you should start if you are just embarking on your natural healing journey, or if you have been dabbling for a while but need more direction, accountability and personal instruction for your own symptoms and concerns. Prices and payment options for all programs are located at the bottom of the blog post.

Nutritional Healing Program Level 2:

\This program is for individuals ready for a rigorous nutritional program to heal chronic symptoms. Most people who go through this program have tried many other therapies, whether food-based, medication based, or other. Level 2 is designed to take your healing to the next level, using the GAPS nutritional protocol to initiate the deep healing and sealing work that a leaky gut needs in order to see mental and physical healing. 

  • During this intensive 12 weeks you will work one on one (weekly or biweekly) with a Certified GAPS Coach, a Certified GAPS Practitioner, and Emotional Work Practitioner.  These practitioners will address the practical cooking techniques and stages of the protocol, the symptom management and assessment as you do the healing and detoxifying work, and the emotional and spiritual component of healing from chronic illness. 

  • You will have access to our GAPS community - weekly group zoom calls facilitated by one of our practitioners, with other individuals who are also going through the GAPS Nutritional Protocol with Be Well Clinic. All are at a different place on their journey, which creates a beautiful community of invaluable support and encouragement.

  • You will receive a journal created by Amy Mihaly, founder of Be Well Clinic, to help you document foods, symptoms, supplements and practices as you work through this program.

  • Of the three programs, Level 2 offers the most frequent practitioner support through the most rigorous nutritional protocol. This program is by application only, to ensure that those wanting to be a part of Level 2 are as ready as possible, in order to ensure the most efficient and effective healing during this program. 


Nutritional Healing Program Level 3:

This program is for individuals who have gone through our Level 2 program or otherwise have been on the GAPS diet for at least 3 months. 

Level 3 is all about continued support - through accountability, symptom analysis and management, further therapeutic recommendations and community. 

Healing through nutrition is not a quick process. It does not simply happen in 12 weeks. Levels 1 and 2 are extremely powerful with initiating and pinpointing detoxification, healing and sealing a leaky gut. However, they are not the end. Healing takes time, and that is where our Level 3 program comes. Make sure that as you live out your healing you do not do so alone. 

  • During Level 3, you will meet with a Certified GAPS Practitioner, and you will have access to making additional appointments with an Emotional Work Practitioner in order to address the physical, emotional and spiritual components of ongoing, long term healing. 

  • You will also have access to our GAPS community - weekly group zoom calls, facilitated by one of our practitioners, with other individuals who are also going through the GAPS Nutritional Protocol with Be Well Clinic. 

  • Participation in Level 3 is by application only, to make sure you do not need the initial education and guidance of Level 1 or the intense support and robustness of Level 2, but are ready for the continuing support offered here. 

Schedule, Pricing and Payment Information:

Schedule:

The next opportunity to begin one of our program levels is just after the new year! Reset, commit, and heal in 2023. Don’t try another free challenge or a new quick fix… commit yourself to making a real change and finding deep healing this coming year. Our Summer program level starts on July 3rd, 2023 and runs until September 22nd, 2023.

Applications for Levels 2 and 3 are due June 16th, 2023. 

No application is necessary for Level 1, but registration for this level of the program is also due by June 16th, 2023.

Payment Options:

For each level of the program you may pay in full, up front or pay in 3 equal installments, which will be automatically withdrawn on the following schedule:

  • First Payment: 2 weeks prior to the start of the program

  • Second Payment: week 5 of the program

  • Third Payment: week 9 of the program

Pricing:

Level 1: $2000

Level 2: $3500*

Level 3: $1075


*Note: 

For those who complete Level 1 with us and wish to continue with Level 2, a $500 discount will be applied for Level 2.

NOT SURE WHAT LEVEL TO CHOOSE? Schedule a free 15-min inquiry call with one of our practitioners!

Please select select practitioner, Hollie Bigham.

Egg Free, Dairy Free Liver Meatballs

Liver is an amazing superfood! It contains lots of vitamins and minerals, including zinc, iron, B vitamins, A vitamins, and folate. In our modern world, all of our livers are well taxed because of our exposure to chemicals. Anytime we know we need to support a particular organ, one of the best ways to do that is to consume the organ meat of the organ you’re trying to support.

You can spice your meatballs with anything you want but think of strong flavors. You want to neutralize the flavor of the liver.  You can also add any additional vegetables that you know your family likes. If you add additional vegetables like zucchini, eggplant or peppers and are finding the consistency of the meatball mixture to not be very sticky, you may want to add an egg to help bind everything together. Otherwise, these meatballs are egg free and dairy free!

This is a recipe that I recommend to a lot of moms! It’s a great way to help your kids eat a little bit of liver every day, which is the best way to eat liver. This recipe makes a lot of meatballs so you can freeze them and take out a few at a time to have for lunch or dinner.

Makes 27-30 Meatballs

Ingredients for Liver Meatballs:

  • 2 lb ground beef

  • ½ lb beef liver

  • 2 carrots, about 1 cup grated

  • ⅓ large white onion, about ⅔ a cup grated

  • 6 large cloves of Garlic

  • Oregano, 1 bunch Fresh or 1 tbsp Dried

  • Basil, 1 bunch Fresh or 1 tbsp Dried

  • ¼ - ½ tsp Pepper

  • 2 tsp Salt

  • 1 tbsp lard

Directions for Liver Meatballs:

IMG_6158.jpg

For milder tasting liver, soak it in some kind of acid. Cover the liver in filtered water and then add the juice of one lemon or 1-2 tablespoons of apple cider vinegar. Leave to soak for 30 minutes. Be sure not to soak it for too long. The acid will break down the liver and start it “cooking” prematurely.

Preheat your oven to 375.

IMG_6175.jpg

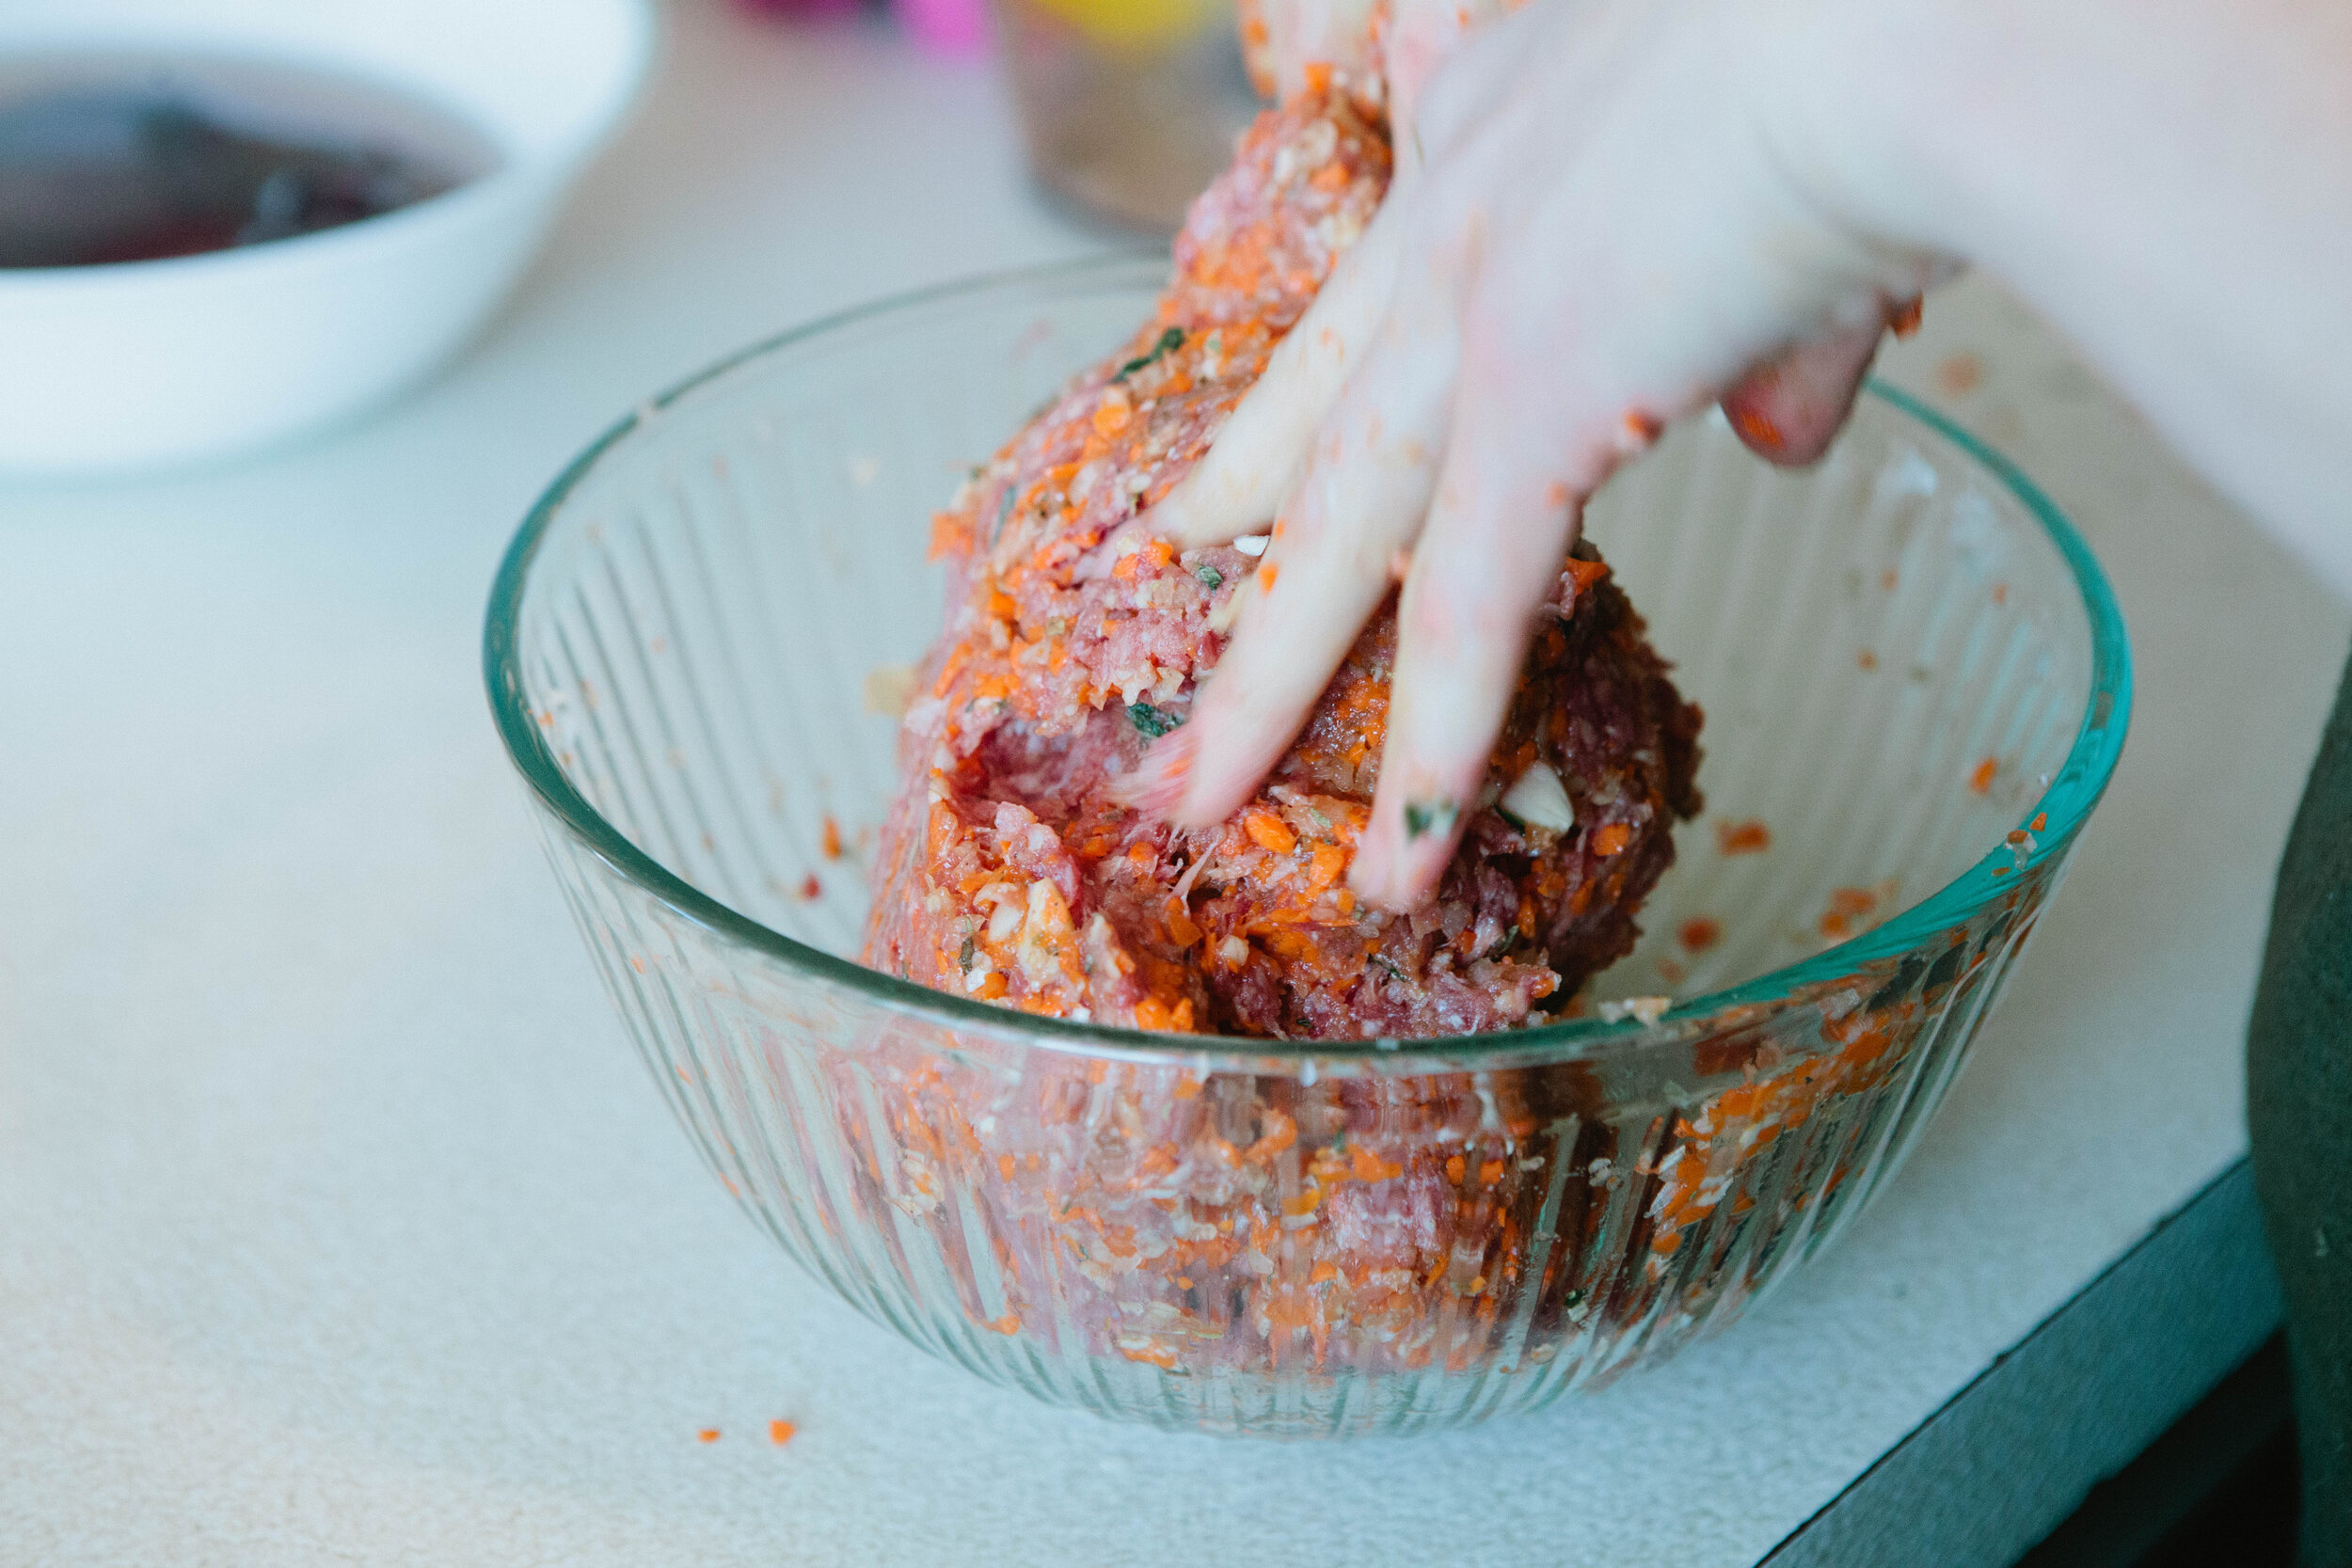
Grate your carrot, onion and garlic into very fine pieces. Add to a large bowl with ground beef. Add in oregano, basil and salt and pepper. Mix with your hands. 

IMG_6189.jpg

Place your liver into a food processor once it has soaked. Pulse until smooth. Add to the bowl with the beef, vegetables and spices and mix again.

IMG_6214.jpg

Spread lard onto the bottom of a glass oven safe casserole dish. 

IMG_6224.jpg

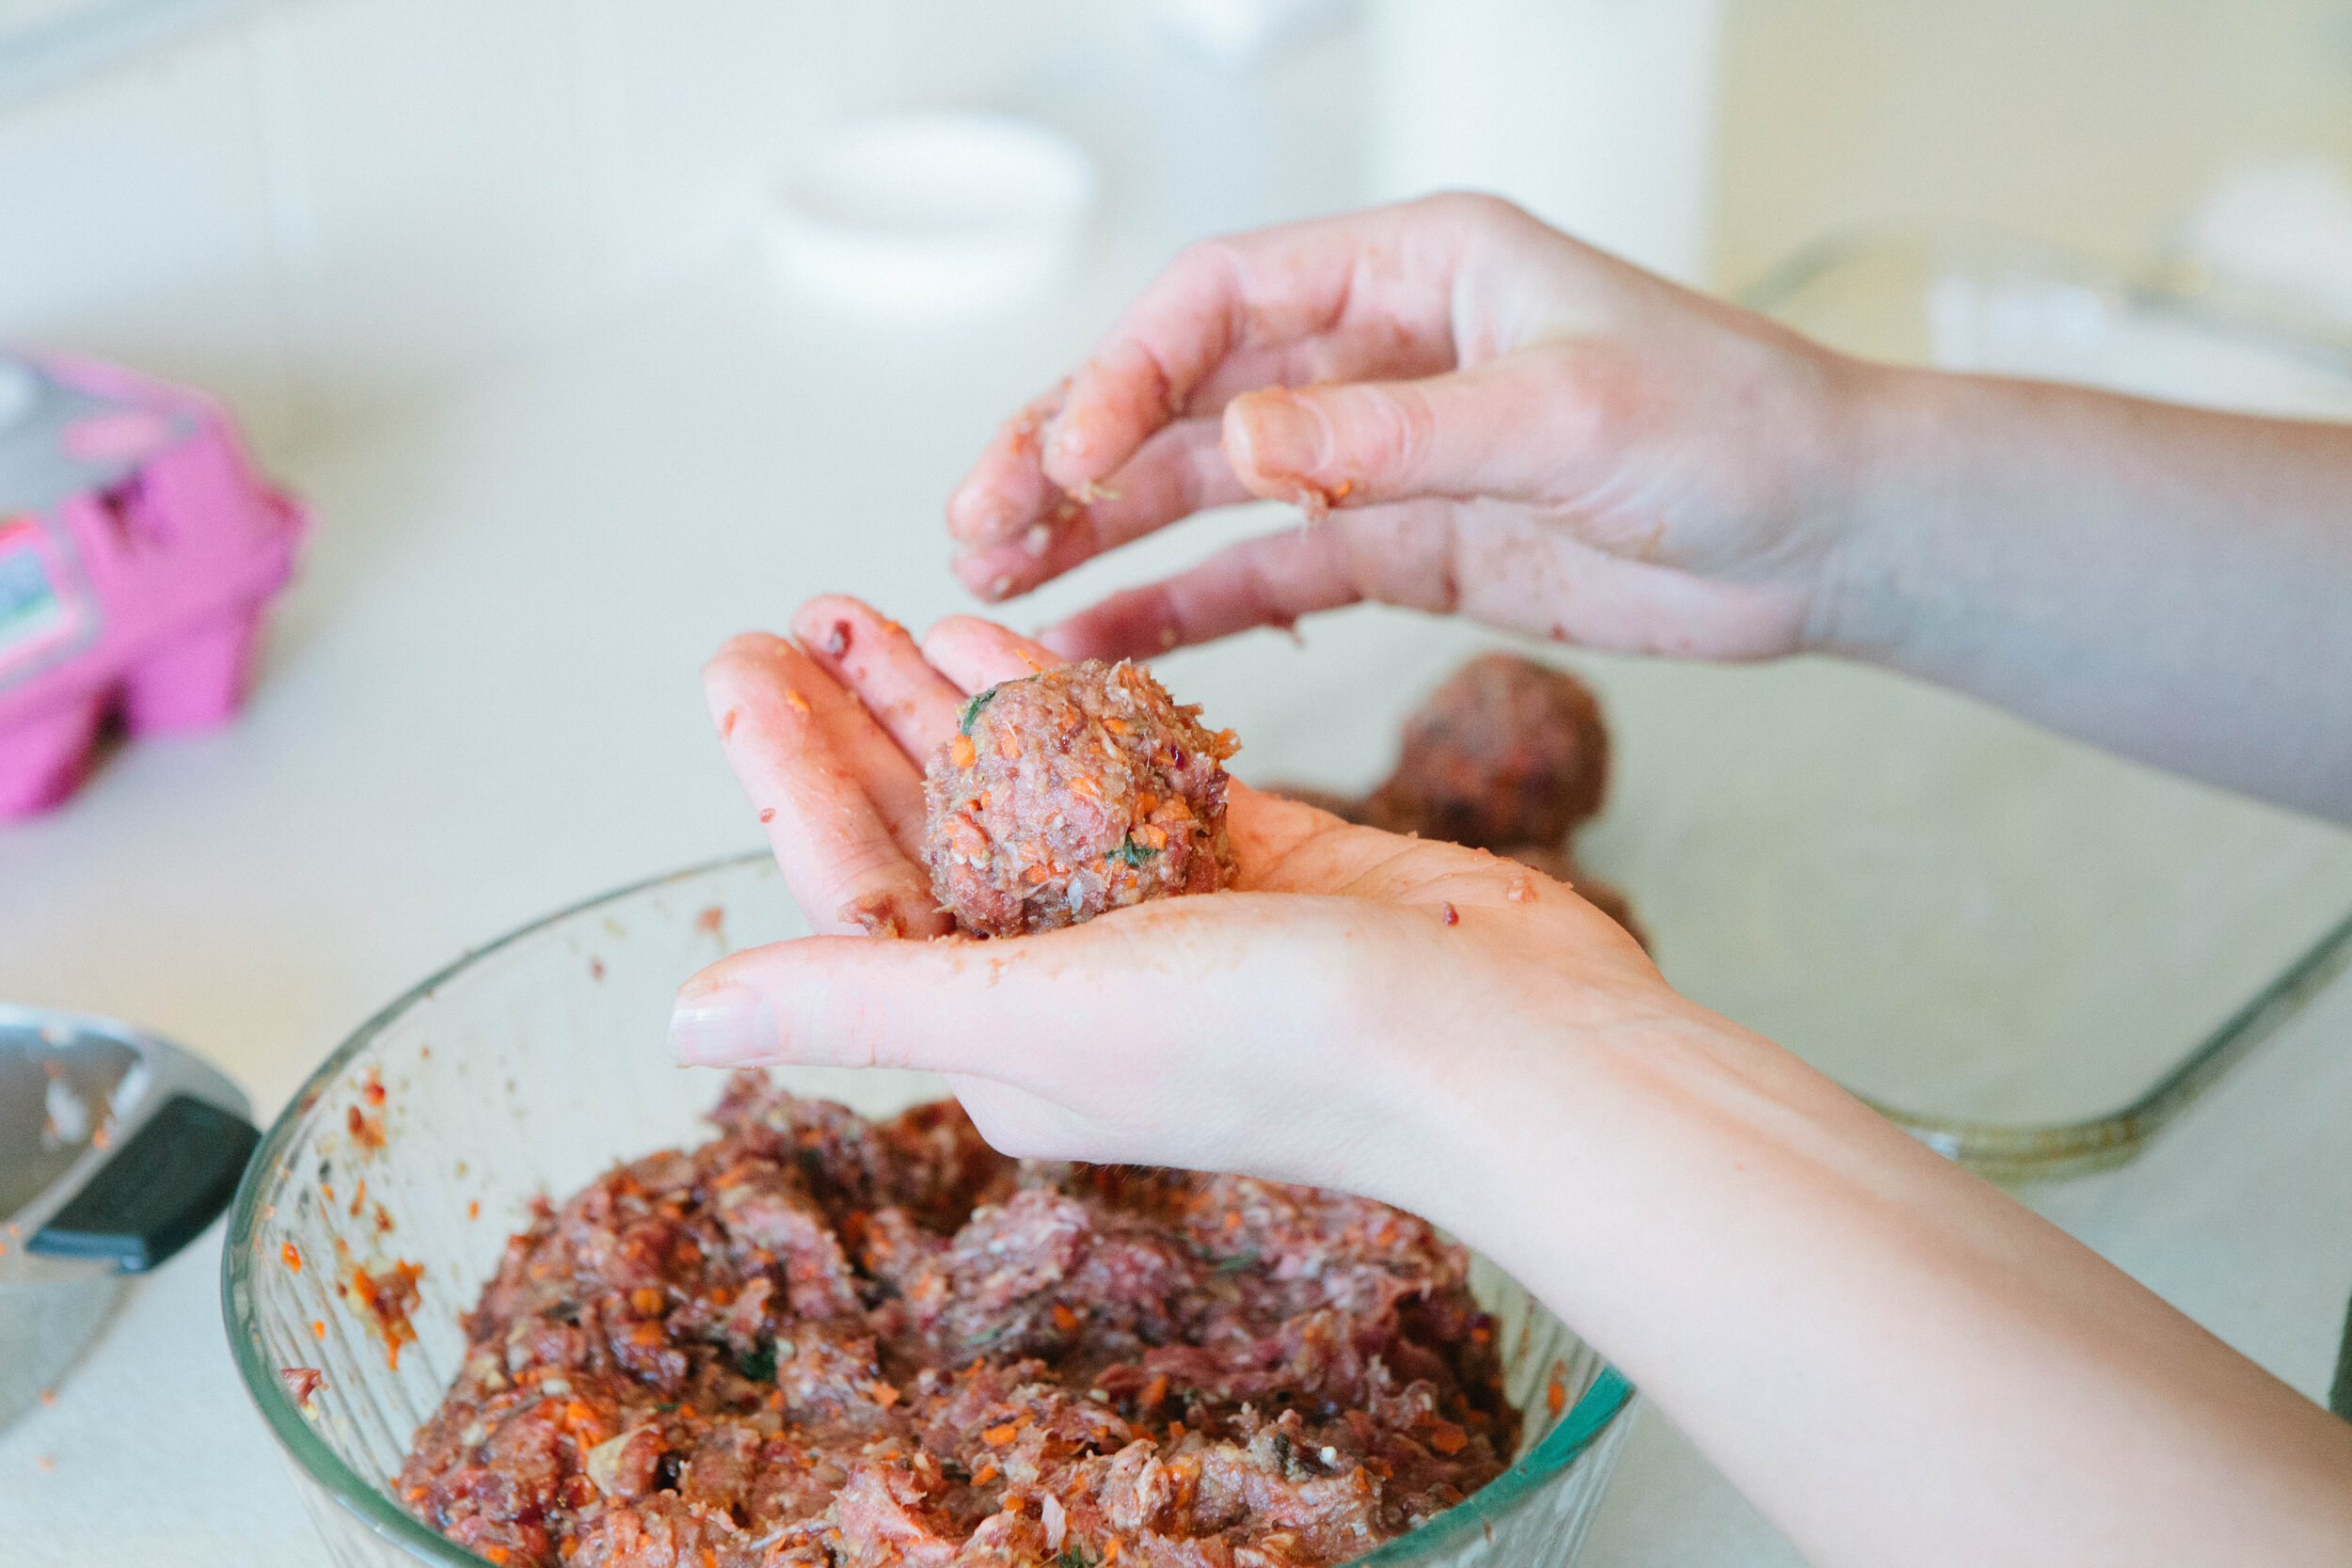
Take a small handful of meat at a time and roll into a meatball. Continue to roll meatballs until you have filled your casserole dish. Keep consistency in the size and shape of your meatballs to ensure even cooking time.

IMG_6229.jpg

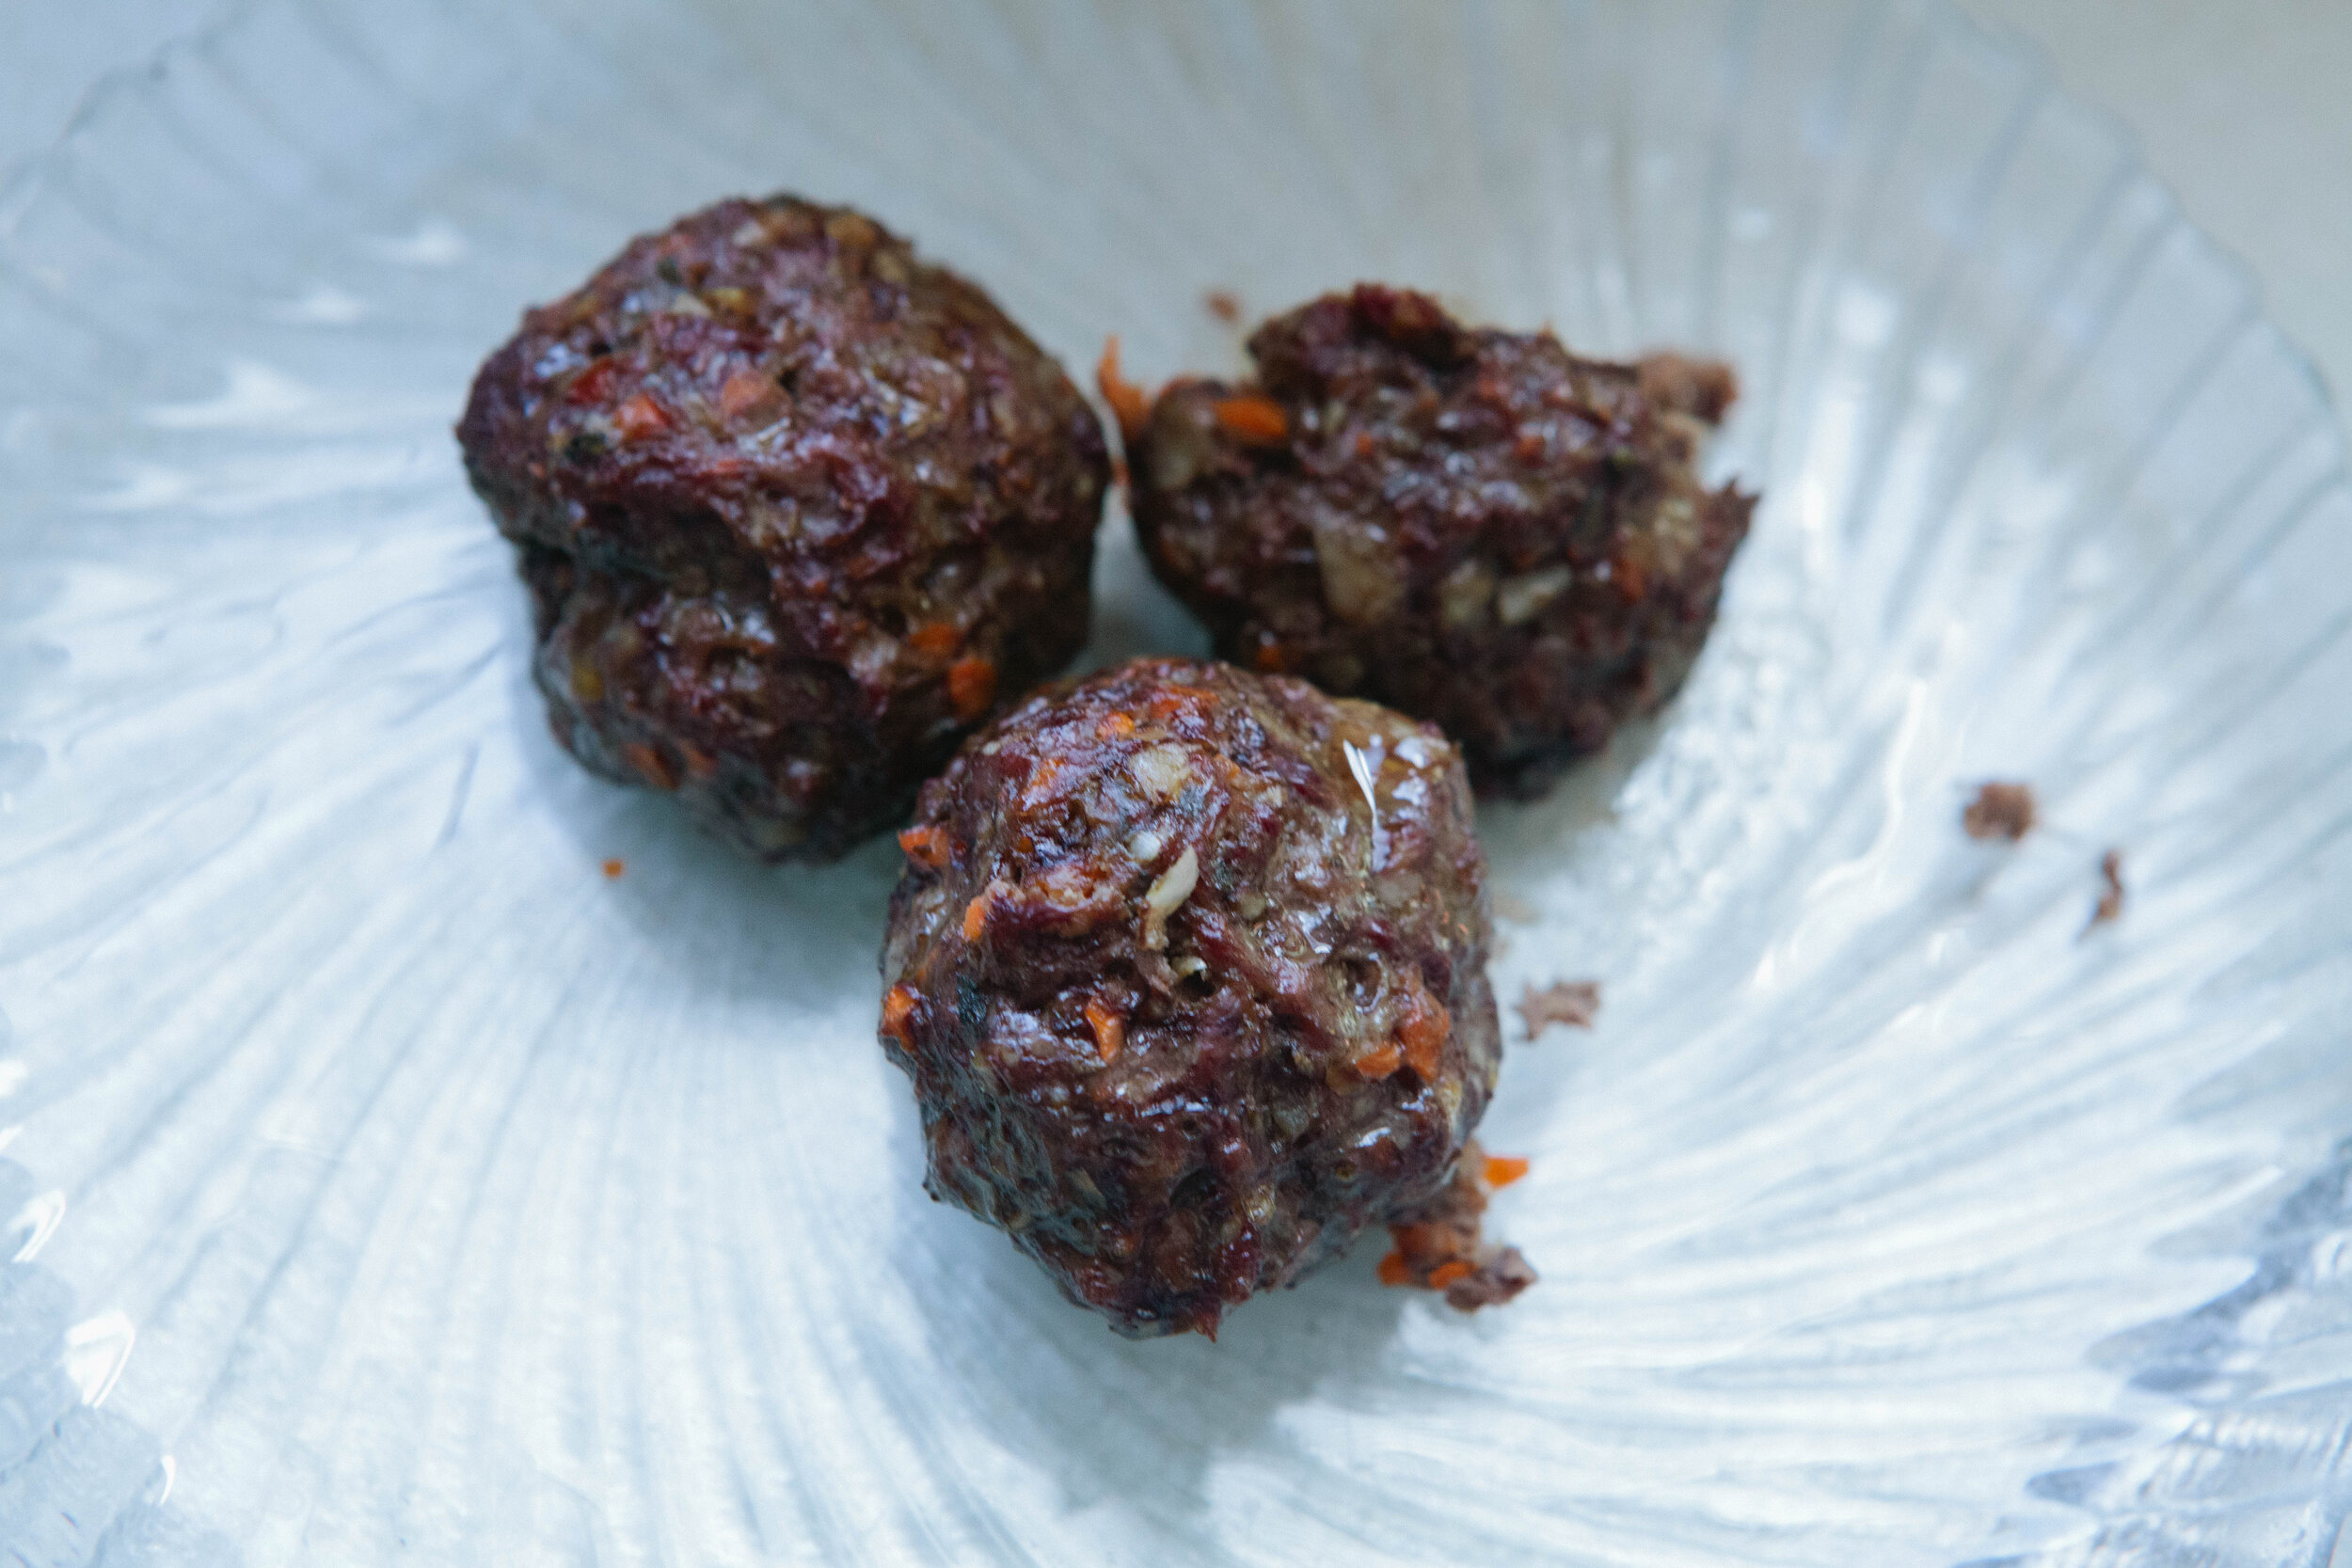
Line meatballs, leaving some space between them.

Bake for 45 minutes.

IMG_6353.jpg

Enjoy with spaghetti squash and make your own spaghetti sauce for a spaghetti night. Or enjoy with any variety of vegetables like brussels sprouts or broccoli!

Egg Free, Dairy Free Liver Meatballs

prep time: cook time: total time:

ingredients:

  • 2 lb ground beef
  • ½ lb beef liver
  • 2 carrots, about 1 cup grated
  • ⅓ large white onion, about ⅔ a cup grated
  • 6 large cloves of Garlic
  • Oregano, 1 bunch Fresh or 1 tbsp Dried
  • Basil, 1 bunch Fresh or 1 tbsp Dried
  • ¼ - ½ tsp Pepper
  • 2 tsp Salt
  • 1 tbsp lard

instructions:

How to cook Egg Free, Dairy Free Liver Meatballs

  1. For milder tasting liver, soak it in some kind of acid. Cover the liver in filtered water and then add the juice of one lemon or 1-2 tablespoons of apple cider vinegar. Leave to soak for 30 minutes. Be sure not to soak it for too long. The acid will break down the liver and start it “cooking” prematurely.
  2. Preheat your oven to 375.
  3. Grate your carrot, onion and garlic into very fine pieces. Add to a large bowl with ground beef. Add in oregano, basil and salt and pepper. Mix with your hands.
  4. Place your liver into a food processor once it has soaked. Pulse until smooth. Add to the bowl with the beef, vegetables and spices and mix again.
  5. Spread lard onto the bottom of a glass oven safe casserole dish.
  6. Take a small handful of meat at a time and roll into a meatball. Continue to roll meatballs until you have filled your casserole dish. Keep consistency in the size and shape of your meatballs to ensure even cooking time.
  7. Line meatballs, leaving some space between them.
  8. Bake for 45 minutes.
  9. Enjoy with spaghetti squash and make your own spaghetti sauce for a spaghetti night. Or enjoy with any variety of vegetables like brussels sprouts or broccoli!
Created using The Recipes Generator
42.png

Honey Roasted Chicken Recipe

I've been posting some of my ol' stand by recipes, and this cinnamon-toasted honey-roasted chicken is one of the first Paleo recipes I truly enjoyed. You can tell this is an old recipe because it uses honey... something I don't usually use anymore in my baking and cooking, but I can't give it up!

Roasting a chicken is a great and simple way to make a meal. This particular roasting recipe requires a little more attention than others, as you need to baste and adjust the temperature often, but it's definitely worth it! Just make sure to set the time or you might end up with a fried-to-a-crisp chicken! Also, I recommend doing this in as small of a dish as fits your chicken. As you can see from the final pictures if the juices get too spread out they will burn! This is a larger dish than I usually use (I thought it would be pretty for the photos), and I will never use it for this recipe again! I hope you enjoy!  

Recipe Adapted from The Paleo Project by Dr. Marc Bubbs

GAPS Legal Honey Roasted Chicken Recipe Ingredients

  • 1/4 tsp ground cloves

  • 1/8 tsp ground ginger

  • 1/4 tsp ground nutmeg

  • 1/4 tsp cinnamon

  • 1 tbsp salt

  • 9 cloves of garlic

  • 2 tbsp Raw Honey

Directions for gaps legal roasted chicken with honey

IMG_1035.jpg

Preheat oven to 500 degrees.

Make your rub by mixing cloves, ginger, nutmeg, cinnamon and salt in a small bowl.

IMG_1059.jpg

Crush 5 cloves with the flat of your knife, keep 4 cloves of garlic whole.

Remove the giblets. Wash and pat dry the chicken. Make sure you dry the chicken really well so the rub will stick.

IMG_1085.jpg

Drizzle approx. 2 tbs of honey of the top of the chicken, rub both sides well.

Massage the rub on the chicken, making sure to rub both sides.

Add all garlic cloves to chicken cavity.

Cover chicken with parchment paper and aluminum foil to keep cinnamon from burning.

Roast at 500 degree for 15 min then decrease your oven to 450 for 15 minutes.

IMG_1279.jpg

Remove chicken from oven. Baste chicken with juice drippings.

Reduce oven to 425. Recover chicken and bake for approx 30 - 45  minutes until chicken reaches internal temp of 165. Uncover chicken for five more minutes then remove from oven.

IMG_1415.jpg

Let the chicken rest for 20 minutes.

Carve chicken and serve! Make sure you enjoy the skin while it’s crispy and hot!

Notes:If your chicken came with giblets, you can add them to your next batch of stock or make liver pate.

I don’t normally recommend baking with honey but for this delicious recipe I make an exception.

Save the gelatin and juices of this chicken! Once cooled, they are like candy because of the sweet honey and cinnamon.


Honey Roasted Chicken

Author:
prep time: cook time: total time:

ingredients:

  • 1/4 tsp ground cloves
  • 1/8 tsp ground ginger
  • 1/4 tsp ground nutmeg
  • 1/4 tsp cinnamon
  • 1 tbsp salt
  • 9 cloves of garlic
  • 2 tbsp Raw Honey

instructions:

How to cook Honey Roasted Chicken

  1. Preheat oven to 500 degrees.
  2. Make your rub by mixing cloves, ginger, nutmeg, cinnamon and salt in a small bowl.
  3. Crush 5 cloves with the flat of your knife, keep 4 cloves of garlic whole.
  4. Remove the giblets. Wash and pat dry the chicken. Make sure you dry the chicken really well so the rub will stick.
  5. Drizzle approx. 2 tbs of honey of the top of the chicken, rub both sides well.
  6. Massage the rub on the chicken, making sure to rub both sides.
  7. Add all garlic cloves to chicken cavity.
  8. Cover chicken with parchment paper and aluminum foil to keep cinnamon from burning.
  9. Roast at 500 degree for 15 min then decrease your oven to 450 for 15 minutes.
  10. Remove chicken from oven. Baste chicken with juice drippings.
  11. Reduce oven to 425. Recover chicken and bake for approx 30 - 45 minutes until chicken reaches internal temp of 165. Uncover chicken for five more minutes then remove from oven.
  12. Let the chicken rest for 20 minutes.
  13. Carve chicken and serve! Make sure you enjoy the skin while it’s crispy and hot!
  14. Notes:If your chicken came with giblets, you can add them to your next batch of stock or make liver pate.
  15. I don’t normally recommend baking with honey but for this delicious recipe I make an exception.
  16. Save the gelatin and juices of this chicken! Once cooled, they are like candy because of the sweet honey and cinnamon.
Created using The Recipes Generator

New Year's Resolutions: Six Habits I Recommend on a Regular Basis

New Year's Resolutions: Six Habits I Recommend on a Regular Basis

In the last post, I shared about mindsets to have (or not) that will help with successful habit change. This week I want to share about some of the habits I think are most important to consider integrating into your family. This is not an exhaustive list! These habits are simple and sound.

Christmas Wreath Cookies {GAPS Legal}

It's the holiday season! More specifically, it's cookie season!   I love making, giving away (and eating) Christmas cookies. But it's been a long time since I have enjoyed many of the cookies I grew up making, so this year I decided I wanted to create real-food versions of some of my favorite Christmas cookie recipes.  

First up, Christmas Wreath cookies!

  This cookie is traditionally a mix of corn flakes, marshmallows, and butter. So let's look at the ingredients...

  • The butter is already a real food!

  • Marshmallows I have made before, modified from Mommypotamus' marshmallow recipe.

So all I had to do was figure out a substitution for the corn flakes (and see if the marshmallows actually work the same as the commercial variety).   Challenge accepted!

Christmas Wreath Cookies

Makes about 36 cookies (recipe can be halved)

Ingredients

For Marshmallows

  • 2 cups honey

  • 1 cup of filtered water

  • 2 tsp vanilla

  • 1 tsp sea salt

  • 6 TBS grass-fed beef gelatin

  • 1 cup of filtered water

For Wreath Cookies

  • Marshmallow paste (above)

  • 8 ounces organic butter

  • 14 cups coconut flakes (approximately 20 ounces)

  • Red hots (my homemade recipe)

  • Natural food coloring, blue and yellow packets (I used this one)

Directions

IMG_9987.jpg

Place the coconut flakes in the oven at 200°

Toast the coconut until they are light brown—this makes the cookies crispier! When done, remove them from the oven Place in a large bowl, set aside.

IMG_9996.jpg

Melt the butter in a saucepan over low heat When melted, remove from heat and set aside   Next, make the marshmallow paste. See recipe here.

Soften the gelatin

  • Add gelatin to 1 cup hot water

  • Stir and allow to to sit, keep warm (not on stove)

While gelatin is softening... Heat honey and water in a medium saucepan (medium to high heat), stirring frequently, until it reaches the soft ball candy stage (about 235°F).

If you don't have a thermometer, you can check by dripping the heated honey into a glass of cold water. When the candy forms a ball, it is ready!

When the honey has reached the soft ball stage, remove from heat. Add the heated mixture to the softened gelatin in a large bowl. Add vanilla.

Do these steps quickly, you don't want honey mixture to cool off too much!

Whisk the mixture using an electric mixer or stand mixer for about 10 minutes.

When the mixture is thick and looks like marshmallow paste, it's done!  

If you want marshmallows, you can stop here. Put the marshmallow paste in a greased glass 9x11 dish and allow to cool and dry for a 24-36 hrs. Then cut up and serve.  

But we are not stopping here! To make traditional Christmas wreath cookies you melt the marshmallows and turn them back into paste-which is what you just created!  

Next, stir the melted butter into the mixture. It will deflate the mixture somewhat, this is normal.

Mix in the blue and yellow food coloring packets. This will turn it green (not neon green—that's an artificial color). But when it's made into wreathes it does look green—although you're going to have to take my word for it!

IMG_0006.jpg

Pour the marshmallow mixture into the bowl with the toasted coconut flakes. Mix until the flakes are coated.

Finally, form the warm mixture into wreath-shaped cookies on parchment paper.

IMG_0019.jpg

Add decorative red hots as berries (see my homemade recipe) Allow to cool.

See, I told you they look green!

All that's left is to share and enjoy these delicious treats!

Disclosure: This post contains affiliate links. Your trust is important. I only recommend products I trust. 

IMG_0021.jpg

Christmas Wreath Cookies

Author:
prep time: cook time: total time:

ingredients:

For Marshmallows
  • 2 cups honey
  • 1 cup of filtered water
  • 2 tsp vanilla
  • 1 tsp sea salt
  • 6 TBS grass-fed beef gelatin
  • 1 cup of filtered water
For Wreath Cookies
  • Marshmallow paste (above)
  • 8 ounces organic butter
  • 14 cups coconut flakes (approximately 20 ounces)
  • Red hots (my homemaderecipe)
  • Natural food coloring, blue and yellow packets (I used this one)

instructions:

How to cook Christmas Wreath Cookies

  1. Place the coconut flakes in the oven at 200°
  2. Toast the coconut until they are light brown—this makes the cookies crispier! When done, remove them from the oven Place in a large bowl, set aside.
  3. Melt the butter in a saucepan over low heat When melted, remove from heat and set aside Next, make the marshmallow paste. See recipe here.
  4. Soften the gelatin
  5. Add gelatin to 1 cup hot water
  6. Stir and allow to to sit, keep warm (not on stove)
  7. While gelatin is softening... Heat honey and water in a medium saucepan (medium to high heat), stirring frequently, until it reaches the soft ball candy stage (about 235°F).
  8. If you don't have a thermometer, you can check by dripping the heated honey into a glass of cold water. When the candy forms a ball, it is ready!
  9. When the honey has reached the soft ball stage, remove from heat. Add the heated mixture to the softened gelatin in a large bowl. Add vanilla.
  10. Do these steps quickly, you don't want honey mixture to cool off too much!
  11. Whisk the mixture using an electric mixer or stand mixer for about 10 minutes.
  12. When the mixture is thick and looks like marshmallow paste, it's done!
  13. If you want marshmallows, you can stop here. Put the marshmallow paste in a greased glass 9x11 dish and allow to cool and dry for a 24-36 hrs. Then cut up and serve.
  14. But we are not stopping here! To make traditional Christmas wreath cookies you melt the marshmallows and turn them back into paste-which is what you just created!
  15. Next, stir the melted butter into the mixture. It will deflate the mixture somewhat, this is normal.
  16. Mix in the blue and yellow food coloring packets. This will turn it green (not neon green—that's an artificial color). But when it's made into wreathes it does look green—although you're going to have to take my word for it!
  17. Pour the marshmallow mixture into the bowl with the toasted coconut flakes. Mix until the flakes are coated.
  18. Finally, form the warm mixture into wreath-shaped cookies on parchment paper.
  19. Add decorative red hots as berries (see my homemade recipe) Allow to cool.
  20. See, I told you they look green!
  21. All that's left is to share and enjoy these delicious treats!
Created using The Recipes Generator

Fruit Chutney for your Thanksgiving

Happy Thanksgiving!

One of the best things about November is the focus on being grateful and thankful. Everywhere you look there are posts and tweets showing gratitude. And we sure have a lot to be thankful for! Some things are so obvious we often forget to be thankful for. These are things like safe drinking water, warm houses, smart phones and electricity are so everyday for us that we forget how much we have.

Sometime this week, I encourage you to write a list of all the things you have to be thankful for. Don't feel silly including things like water, or your favorite pair of jeans. See how long you can make the list! Even if you don't feel like being thankful, I encourage you to do this exercise—gratitude changes our perception and experience of life, even if nothing is circumstantially different.

This is not to say that you don't have hard things in your life, or that you should pretend they aren't difficult. They are. Hard things are part of life and are very, very real. Remembering that there are good things in your life as well will help YOU through difficult situations.  

As you know, most of my posts (so far, at least) aren't recipes. But it's Thanksgiving! The start of holidays and delicious, rich, made-with-love food. Well this recipe is definitely delicious, rich and made-with-love!

I took the recipe out of Gut and Psychology Syndrome by Dr. Natasha Cambell-McBride. If you are following the GAPS diet this is legal on stage 5 or 6, when you are tolerating dried spices and peppercorns.

This recipe is very simple—chop and combine ingredients, simmer for a while, then store in jars. It would be a great recipe to make in a crockpot... you really could fix it and forget it! But simple doesn't mean plain. It's delicious and adds flavor to any meat you are eating. And I'm told, quite excellent with turkey!  

*This dairy-free, gluten-free, nut-free, sugar-free recipe would be great for gifts as well—ladle into pint jars and add a bow!

Fruit Chutney

Makes 3-4 quarts

Ingredients

  • 2 lbs dried dates (without stones, cut in half)

  • 2 lbs cooking apples (about 7 cups of pieces)

  • 1 lb plumbs (I used packaged prunes)

  • 3 medium onions (about 3 cups, finely diced)

  • 3 peppers (about 2 cups, finely diced)

  • 2 cups raw apple cider vinegar

  • 1-2 tsp whole peppercorns (freshly crushed)

  • 1-2 tsp aromatic seeds (I used cumin and dill)

  • 1 tsp cayenne pepper

  • 1-2 tsp natural salt

Directions:

Cut dates in half (and remove stones (seeds) if needed)

Slowly boil the dates in about 1 cup of water in a large pot until soft (about 10 minutes)

If you live in Colorado like me, and don't use a lid (also like me), you may need to add extra water during this process.

When the dates are soft, turn off heat and mash them with a potato masher—they don't have to be perfectly smooth, just mashed.  

While you were softening the dates, I hope you were furiously chopping! I completely underestimated the time it was going to take to chop everything I needed for this recipe. If you want the process to go smoother, I would recommend chopping everything at the beginning. Then as soon as the dates are soft you can add the rest, stir occasionally, and walk away!

The directions from Dr. Natasha are:

Add everything else to the dates and simmer 1-1/2 hours on very low heat, stirring occasionally.

If you are like me and work better with a little note of panic, then by all means, chop furiously and add things as you chop. For all you step-by-steppers like me, below are pictures to show what I added.

Sterilize the jars.

Dr. Natasha recommends doing this in an oven. I had never done this but it seemed to work great! Place cold jars in a cold oven. Heat the oven to 250°F, then leave it at that temperature for 40 minutes to sterilize the jars. Pull the jars out of the oven one-by-one as you are ready to fill them so they stay hot. Use oven mitts!

Ladle the hot chutney into the jars.

A jar funnel is a lifesaver here!

I left just a little room for air, much less than my fermenting self wanted, but no jars exploded so it must be okay!

Wipe off any chutney on the rim of the jar. Then immediately seal the jar, tightening the lid.

Again, use an oven mitt—the jars are hot!  

Place the jar on the counter, some distance between them.

It's better to not move the jars until they are cool, so place them where you will not need to move them for many hours, overnight is better.

When cool, place the jars into the refrigerator.

This is not a fermented food, so it does require refrigeration.  

Serve with meats and fish. Good cold or warm.

It's delicious! I made this for our Thanksgiving feast in a few days, but tried it out with some chicken today. I enjoyed it thoroughly! I hope you enjoy it as well!

Onward!


Fruit Chutney

Author:
prep time: cook time: total time:

ingredients:

  • 2 lbs dried dates (without stones, cut in half)
  • 2 lbs cooking apples (about 7 cups of pieces)
  • 1 lb plumbs (I used packaged prunes)
  • 3 medium onions (about 3 cups, finely diced)
  • 3 peppers (about 2 cups, finely diced)
  • 2 cups raw apple cider vinegar
  • 1-2 tsp whole peppercorns (freshly crushed)
  • 1-2 tsp aromatic seeds (I used cumin and dill)
  • 1 tsp cayenne pepper
  • 1-2 tsp natural salt

instructions:

How to cook Fruit Chutney

  1. Cut dates in half (and remove stones (seeds) if needed)
  2. Slowly boil the dates in about 1 cup of water in a large pot until soft (about 10 minutes)
  3. If you live in Colorado like me, and don't use a lid (also like me), you may need to add extra water during this process.
  4. When the dates are soft, turn off heat and mash them with a potato masher—they don't have to be perfectly smooth, just mashed.
  5. While you were softening the dates, I hope you were furiously chopping! I completely underestimated the time it was going to take to chop everything I needed for this recipe. If you want the process to go smoother, I would recommend chopping everything at the beginning. Then as soon as the dates are soft you can add the rest, stir occasionally, and walk away!
  6. The directions from Dr. Natasha are:
  7. Add everything else to the dates and simmer 1-1/2 hours on very low heat, stirring occasionally.
  8. If you are like me and work better with a little note of panic, then by all means, chop furiously and add things as you chop. For all you step-by-steppers like me, below are pictures to show what I added.
  9. Sterilize the jars.
  10. Dr. Natasha recommends doing this in an oven. I had never done this but it seemed to work great! Place cold jars in a cold oven. Heat the oven to 250°F, then leave it at that temperature for 40 minutes to sterilize the jars. Pull the jars out of the oven one-by-one as you are ready to fill them so they stay hot. Use oven mitts!
  11. Ladle the hot chutney into the jars.
  12. A jar funnel is a lifesaver here!
  13. I left just a little room for air, much less than my fermenting self wanted, but no jars exploded so it must be okay!
  14. Wipe off any chutney on the rim of the jar. Then immediately seal the jar, tightening the lid.
  15. Again, use an oven mitt—the jars are hot!
  16. Place the jar on the counter, some distance between them.
  17. It's better to not move the jars until they are cool, so place them where you will not need to move them for many hours, overnight is better.
  18. When cool, place the jars into the refrigerator.
  19. This is not a fermented food, so it does require refrigeration.
  20. Serve with meats and fish. Good cold or warm.
Created using The Recipes Generator

Immunity: The Best Defense is a Good Offense {Part One}

Immunity: The Best Defense is a Good Offense {Part One}

Fall is coming! I hope you have been enjoying the cooler nights (and sometimes day) like I have! The onset of cooler weather also means that cold and flu season is coming!

Lovely Lard

Eating animal fat is important to our body's health. But eating enough fat can be challenging, especially when there is a dairy allergy. Lard is a great alternative to butter, and its taste is more mild than that of tallow.

You can buy lard at the store, but it is expensive and may be hydrogenated or of poor quality. Making your own lard is simple and easy, and can be done for a fraction of the price.

To make lard, you first start out with pig fat. This can be obtained from a butcher, or even trimmed off of fatty cuts of pork like the Boston butt. The process of turning fat into lard or tallow is called rendering. In this post I describe rendering lard, but the process for rendering tallow (which is fat from beef, bison, deer, lamb, or elk) is the same, although for tallow it may take a few more hours.  

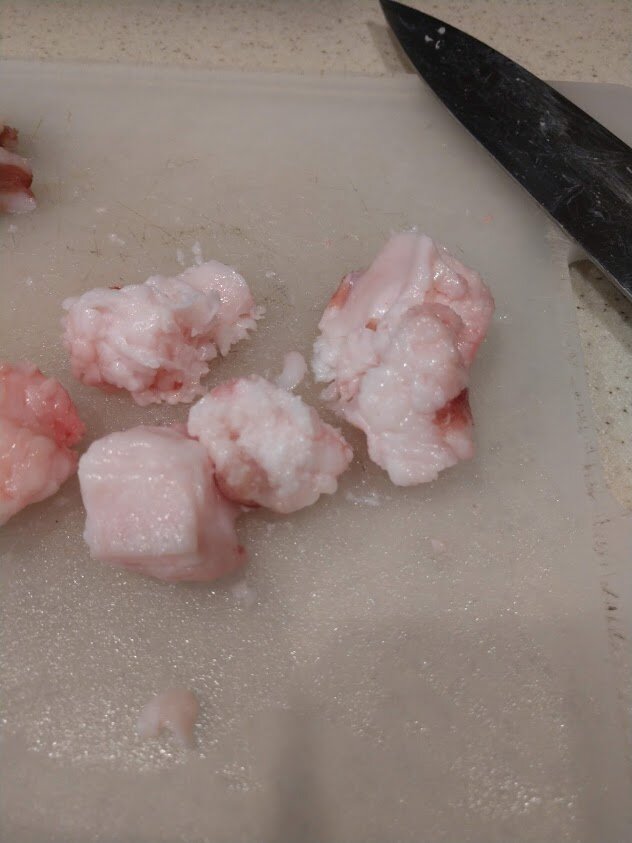
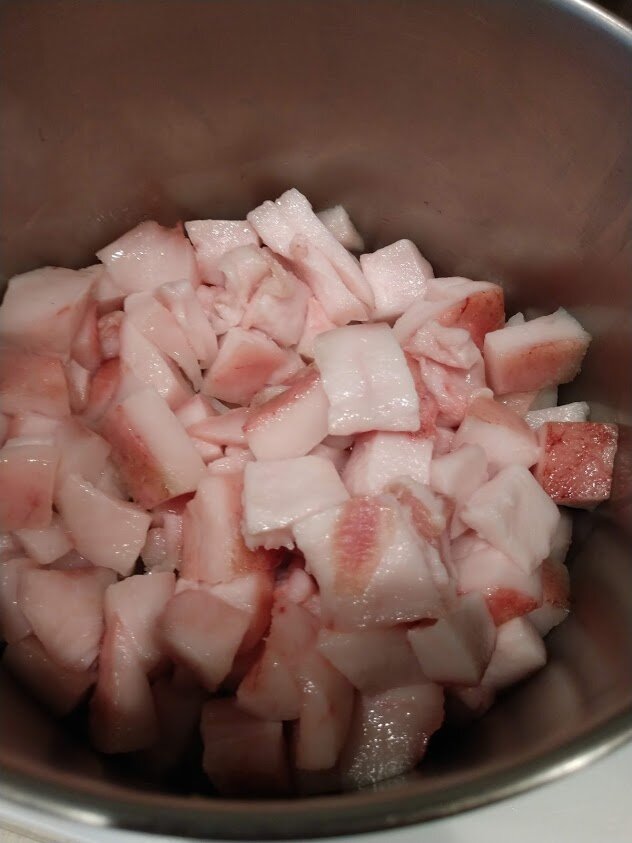
There are two kinds of pig fat. Leaf fat is from fat surrounding the internal organs. It is very mild in taste and used to be reserved for making pies and pastries. Body fat is from the layer of fat beneath the skin. This has a slightly stronger pork taste, and is better used in cooking meat and vegetables. Along with a different taste, there is a different look to the two types of fat. Body fat is in large pieces, and appears more dense and flat. Leaf fat is in smaller pieces, has a fluffier texture, and may contain membranes. The fat you get from a butcher may contain both types of fat. If that is the case, I recommend separating out the two types of fat and rendering them separately so you can use them for different purposes. However, there is no problem in mixing them and rendering them together.

Leaf fat

IMG_20190605_084127513.jpg

Body Fat

IMG_20190605_084134159.jpg

Watch the video below to learn how to make lard and then scroll down for the recipe and directions!

Making Lard:

First, cut up the pig fat into small 1-2 inch sized cubes. If using leaf fat, remove as much membrane as possible.

Put the fat cubes in a medium saucepan on low heat. You may use a crockpot, but it must have a very low setting or the fat will burn. Stir occasionally and watch closely. Don't let the lard smoke!

With time, the solid pieces of fat will get smaller, and the liquid will increase.

After a few hours, when the lard is liquefied, set up your strainer and cloth. A metal strainer is best because the lard is hot! For extra strained lard which will last even longer you can additionally strain through a cloth. You can use an old napkin or other cloth, or several layers of cheesecloth. I have a dedicated cloth I use just for straining lard because you can never really wash out all the grease.

Pour the liquid into the strainer. The liquid will go into the jar and the cracklings will stay in the cloth or strainer.

Squeeze the rest of the liquid out of the cracklings.

Once cracklings are separated from the liquid lard, salt and fry them. You can eat them like bacon bits, or just by themselves.

Allow the jar of lard to cool on the counter.

When the lard is cool you can move it to the fridge, or leave it on the counter.

If you are careful not to contaminate the jar, the lard will last for several months, even left out at room temperature. Use the lard in your cooking— it is a wonderful thing to fry up vegetables or meat and add fat to your diet. Bon appétit!

Onward!


How to Make Lard

Author:
prep time: cook time: total time:

instructions:

How to cook How to Make Lard

  1. First, cut up the pig fat into small 1-2 inch sized cubes. If using leaf fat, remove as much membrane as possible.
  2. Put the fat cubes in a medium saucepan on low heat. You may use a crockpot, but it must have a very low setting or the fat will burn. Stir occasionally and watch closely. Don't let the lard smoke!
  3. With time, the solid pieces of fat will get smaller, and the liquid will increase.
  4. After a few hours, when the lard is liquified, set up your strainer and cloth.
  5. Below you see pictured a jar, jar funnel, and metal strainer. Metal is best because the lard is hot! To finish it off, place a cloth. You can use an old napkin or other cloth, or several layers of cheesecloth.
  6. Pour the liquid into the strainer. The liquid will go into the jar and the cracklings will stay in the cloth.
  7. Squeeze the rest of the liquid out of the cracklings.
  8. Cracklings separated from the liquid lard. Salt and fry these. You can eat them like bacon bits, or just plain.
  9. Allow the jar of lard to cool on the counter.
  10. When the lard is cool you can move it to the fridge, or leave it on the counter.
  11. If you are careful not to contaminate the jar, the lard will last for several months, even left out at room temperature. Use the lard in your cooking— it is a wonderful thing to fry up vegetables or meat and add fat to your diet. Bon appétit!
Created using The Recipes Generator

Making New Ruts

We often get stuck in ruts. It's easiest to keep doing the same thing—once a pattern (good or bad) is established, we tend to keep doing things the same way. One of my deepest ruts is how fast I live my life. How much I try to squeeze into each day to live up to my own expectations. How hard it is for me to be okay with down-time. I have been consciously making different choices to try and get out of this rut for the last 3 years, but because it is so ingrained, it has been slow going. Of course there has been progress! I have become so much more okay with slowing down, saying no, and doing things just for fun. But a recent event has given me the opportunity for some concentrated time in the new ruts.

The event? Being sick! Sicker than I have ever been in my life. Sick and recovering for 2 weeks! Sick enough that all of my energy went just to taking care of myself.

It was hard to do. Taking care of myself is something I have only really learned to do in the last few years... when I found the GAPS protocol. It was then that I started to believe that it is important, and right, to take care of myself. And I began learning how to do it. I have been a slow learner... being busy and productive was so deeply ingrained in me that it has required a lot of purposeful energy and conscious thought to make choices that take me out of that rut.

I still considered myself a beginner at self-care. But after these two weeks I may be about to level up!

I had to let go of so many things as I allowed my body to heal. And I mean really let go. I could not catch up, make up, or push through like I usually can. I was focused on one thing: me. And that focus was obligatory, I had no real choice in the matter.

As I canceled my schedule day after day, I had to remember that my worth was unattached to my productivity or presence.

As I thought about everything on my to-do list that was not getting done, I had to remember that God is in control of growing my business.

As I gave my body the best support I could using herbs, essential oils, vitamins, and meat stock, I had to remember that healing is complex, and our bodies are amazing!

As I wondered at times if my body was strong enough to handle whatever was going on, I had to remember that it was okay to ask for help, and to receive it.

I was sick enough for long enough that I also needed time to recover. That means I couldn't jump back in a full speed once I was feeling better. I had to evaluate my important tasks, and be realistic in what I could accomplish in between naps. Part of me thinks that I will go back to how I was before. But most of me doesn't want that. Slowing down is refreshing and freeing. Tasks are so much easier when I let God carry the burden, instead of trying to bear it on my shoulders alone. I don't know if I can stay out of my old ruts, but I pray that I can. I want to keep making these new ruts deeper.

As I go, Onward!

How to Shop Like Betty: Tips on Nutrient-Dense Shopping

In the last post we discussed the differences in food quality, and explored the intricate way God designed our senses to be able to taste, smell, and see the difference. But, as amazing as all this is, we hit a reality check.

We can't all grow our own garden vegetables, have our seafood overnighted, or raise a cow in the backyard. It can be a struggle to even afford purchasing these things.

And that's okay. Most of us are in the same boat.

While I still encourage people to think differently about food budget—considering it instead as part of your health-care budget, I understand that at some point, cash-flow is a limiting factor. You can only do the best you can, prioritizing the things that seem important to your body and family, and go from there.

I want to share a few tips with you. Ones that can help you put more nutrient-dense food on the table. Today let's talk about how to shop.

canstockphoto14919872.jpg

Nutrient-Dense Shopping:

  • Shop sales, coupon, or go to wholesale stores (like Costco), and buy in bulk when the food is a good price.

I actually specifically recommend Costco because of their conscientious sourcing, and their larger selection of organic items. This automatically leads to better quality food options. Buying in bulk, and on sale are also great ways to get things like coconut oil and sugar (to feed your SCOBY, of course), as well as non-grocery items like Epsom salt, soaps and shampoos.

  • Find out when your favorite organic-carrying grocery store marks things down for quick-sale.

Stores go through their produce, dairy and meat products on a regular basis in order to catch and mark-down food that is about to expire. Usually this is scheduled, and if you know the time and day you can show up soon after (or during) this mark-down period and get incredible deals! You can also check to see if there is a local discount grocery store, that takes almost out-of-date items and sells them at a large discount.

Produce: The small health food stores that I shop at usually put the older assorted produce in $2 bags. Often times it comes out to roughly a 90% discount! You have to be creative with using it, and be willing to give away food you may not be able to eat (like maybe potatoes, for example), but I often walk out of these stores with $15-30 worth of organic produce that cost me $4-6.

Meat: Similarly, stores mark down meat when it is nearing it's expiration date. Find out what days they go through the organic produce, and shop at that time. Again, I have found even better deals in smaller stores, where they have more to loose by throwing away food. And don't be afraid to buy frozen meat! Very few nutrients are lost when the meat is frozen. If it comes down to buying fresh commercial meat, or frozen natural or organic meat, the latter will definitely give you more nutrition for your buck.

canstockphoto41638296.jpg
  • Know when to spend your money: when quality really matters, or when it varies tremendously.

There are some foods that are more difficult to find on sale, and ones that I recommend paying more for. Many of these items can be purchased much "cheaper," but the quality ranges from very poor to very good, and you get what you pay for. Dairy products in particular are very manipulated by manufacturers, and should be bought with that in consideration.

Dairy: If you can get raw milk, then do it! Otherwise, I do not recommend consuming pasteurized milk unless it has been cultured, like in yogurt or cheese. Aside from milk, most dairy products tend to keep longer, and may be more difficult to find on sale. Organic is important here, because commercial cows are given many antibiotics and hormones that will come through the milk and affect you. Don't "buy cheap" in these areas, especially butter, as it may be a main source of cholesterol (fat) for you. Cream can be purchased at the store, and although it has been pasteurized (some more than others), it is more stable than milk, and is less affected by pasteurization. Cheese, yogurt and sour cream have all been cultured, and those active cultures are working hard to counteract the damaging effects of pasteurization.

Eggs: Deciding which eggs to buy will depend on your area. If you can't purchase them from a local farm (real free-range are better than store-bought organic), then choose your egg based on the color of the yolk, and the taste. The yolk should be bright yellow or orange, meaning the chickens have been out in the sun and may even be able to eat bugs and fresh greens. Never buy eggs from vegetarian-fed hens. Believe me, hens are not vegetarians! Eggs are another large source of cholesterol, and it's best to buy the best quality of eggs you can find (these are not always the most expensive).

canstockphoto13062197.jpg
  • Look for bulk ordering companies or clubs.

You don't have to join a CSA to get farm-fresh produce. There are companies like Azure Standard, Miller's Organic Farm, and others that send you meat and produce from a farm (maybe in another state) and deliver it to you. This is a great way to buy things that are more difficult to get, like lard, nuts or dried fruit. This can also be a good way to get non-grocery items.

I hope these tips help you make more nutrient-dense food purchases. What other ways have you found to make nutrient-dense food affordable? Share your knowledge with the community in the comments below. Happy shopping!

Onward!

Why Betty Got Some Better Butter

Do you remember the old nursery rhyme/tongue twister about Betty Botter buying butter?

Betty Botter bought a bit of butter;“ But,” she said, “this butter’s bitter! If I put it in my batter It will make my batter bitter But a bit of better butter Will make my batter better.” So she bought a bit of butter Better than her bitter butter, Made her bitter batter better. So it was better Betty Botter Bought a bit of better butter.

(courtesy of Wikipedia)

Which begs the deep, philosophical question—was it actually important for her to buy better butter? Or did it just make the rhyme work?

Just kidding... ...or am I? Like many nursery rhymes, I believe this one also has a hidden meaning, a bit of wisdom that is being passed on through the "silly" childhood lines.

Wisdom that we should take to heart...

Quality Matters

Not all food is created equal. Hopefully you have all had the chance to eat fresh food out of a garden. Now compare that to much of the produce you can buy at the store. Can you see, smell and taste the difference? But isn't it all the same foods? How can it be different? Well, let's consider the differing conditions of, for example, a tomato.

  1. Grew in good soil vs growth forced by fertilizers

  2. Cared for with love vs impersonally raised in mass

  3. Picked when it was ripe vs ripening in a truck

It makes sense that all these things affect the taste, but does it really matter? Even if it's not as delicious, isn't it still basically a tomato? Doesn't it give us good nutrients that support our bodies?

Unfortunately, no. Taste, color and smell were put in place to show our bodies the quality and health of a plant. When the appeal is lacking, so is the nutrition. The same is true with all food. Meat, seafood, fruit, fats, dairy products, and any other single ingredient can be purchased at differing levels of quality. And when those ingredients are combined, the resulting dish can be bland or amazing! Top chefs know this. They know that ingredient selection is the most important factor in creating a delicious dish. You too can cook amazing food! Your kitchen skills matter some, but your ingredients matter more!  

Additionally, when the food you are eating has higher nutritional content, you won't need to eat as much. When you are no longer a slave to processed food's addictive substances, or the sugar cravings of bad flora in your body, your body gives signals for eating properly. How does the body "properly" signal, you might ask.  

The body signals hunger when it is needing nutrients! 

 When you eat nutrient-dense food, less will satisfy you! 

Therefore, it is actually more efficient to eat higher-quality food, even if it costs more, because you will need to eat less of it.

The only time this does not give the appearance of being true is when you first start eating nutrient-dense food. When you begin giving your starving body the nutrients it so desperately needs in good-quality, real food, it will ask for that food often! This period of time often lasts one to three months long, although it can be longer. Don't worry, it's a good sign! Your eating will slowdown when your body has caught up. (Also as you add more fat into your diet. Fat is one of the most nutrient-dense foods on the planet, and it is incredibly satisfying.)

So, the take away for today is that quality matters!

I know this is easier said than done. Next time we will talk about some ways that could make it possible for you to feed better quality food to yourself and your family. Y'all come on back now...

Onward!

Decadent Hot Chocolate

Winter is here in full force... the weather is cold, snow storms are common, and the evenings are dark and long. It's a great time to stay in, cuddle up in a blanket, and drink hot chocolate.

"Hot chocolate?" you ask. "I'm on (GAPS, WAPF, SCD, Paleo) and not eating processed food—how in the world can I drink hot chocolate?" Well, I'm about to tell you. I have also been without hot chocolate for a long time, but inspiration struck and I can now present you with an amazing hot chocolate recipe.

No really, it's amazing. Rich, thick, decadent, filling, indulging, chocolaty goodness.   

It even passed the skeptical, hot chocolate-loving teenage boy test.  

Which is a big deal.   And it's a nutrient-dense food!  

Are you ready?

Without further ado, here is the...

Decadent Hot Chocolate Recipe

*Legal on Paleo, SCD, WAPF, and Full GAPS (if tolerating milk and cocoa powder)

—Makes 2 large or 3 medium mugs of hot cocoa—

Ingredients:

  • 3 cups Milk (Raw)

  • 2 Eggs

  • 6-8 TBS Honey

  • 4 tsp Cocoa Powder

  • 1/8 tsp Sea Salt

  • 1/4 tsp Vanilla

Directions for raw milk hot chocolate:

Over low-medium heat, mix:

  • 2 cups milk

  • 2 eggs

  • 6-8 TBS honey

  • 1/8 tsp salt

IMG_0914.JPG

Stir or whisk constantly:

Whisk over low to medium heat for about 5-8 minutes, until the mixture coats the back of a spoon (if you have ever made ice cream, this is the same process as making the base)

IMG_0924.JPG

Remove From Heat:

When the spoon is coated, remove from the heat (or you will get milky scrambled eggs!)

Whisk in:

  • 1/4 tsp Vanilla

  • 4 tsp Cocoa powder

IMG_0939.JPG

(in this picture we did this in a cup because we were experimenting... you should add these ingredients to the saucepan—it's much easier)

Whisk until frothy

Pour into mugs, filling each mug about 2/3 full

Finish filling the mugs by carefully pouring plain milk (warmed or cool) down the inside of the mug (so as not to disturb the foam on top)

Add a few GAPS marshmallows if desired

For an added option (adults only!) I recommend adding a little rum

Serve and enjoy!

...you can clean up the mess later..


Raw Milk Hot Chocolate

Author:
prep time: cook time: total time:

ingredients:

  • 3 cups Milk (Raw)
  • 2 Eggs
  • 6-8 TBS Honey
  • 4 tsp Cocoa Powder
  • 1/8 tsp Sea Salt
  • 1/4 tsp Vanilla

instructions:

How to cook Raw Milk Hot Chocolate

  1. Over low-medium heat, mix:  cups milk, 2 eggs, 6-8 TBS honey, 1/8 tsp salt.
  2. Whisk over low to medium heat for about 5-8 minutes, until the mixture coats the back of a spoon (if you have ever made ice cream, this is the same process as making the base)
  3. When the spoon is coated, remove from the heat (or you will get milky scrambled eggs!)
  4. Whisk in: 1/4 tsp Vanilla, 4 tsp Cocoa powder
  5. (in this picture we did this in a cup because we were experimenting... you should add these ingredients to the saucepan—it's much easier)
  6. Whisk until frothy
  7. Pour into mugs, filling each mug about 2/3 full
  8. Finish filling the mugs by carefully pouring plain milk (warmed or cool) down the inside of the mug (so as not to disturb the foam on top)
  9. Add a few GAPS marshmallows if desired
  10. For an added option (adults only!) I recommend adding a little rum
  11. Serve and enjoy!
Created using The Recipes Generator